Plumbing - Its Not A Science
The plumbing for this swap is more art than science. I have posted how I did things, but it cannot be taken as "the" way to do it. This is actually my second writing and there have been big changes from my previous method. Remember that there are many ways to plumb the engine; mine are simply recomendations. Keep an open mind with this part of the swap. Being creative can result in some very functional and aesthetically pleasing plumbing. If you understand the concepts, feel free to plumb everything the way you'd like. Please share your changes on the forum. One day your recomendations may end up on the next revision of this page.
Intake Manifold

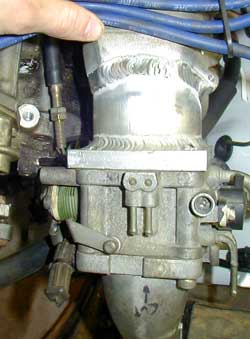
Most people use the stock intake manifold when doing a swap. Because the transverse cars have more room above the transmission, the intake pipe runs to the back of the engine. To correct this you will need to move the throttle body from one end of the plenum to the other. Block off the throttle body flange (and EGR while you're at it) and weld on a flange to the other side of the intake manifold. You're free to use any throttle body you'd like. Non-turbo eclipse throttle bodies are large enough and use a more traditional hose and clamp setup compared to the turbo's flanged setup (pictured).
Its best to make a flange and a neck to extend it out from the manifold at an slight downward angle. You might find when test fitting, that the intake manifold interferes with the brake booster. Remove the spacer behind the brake booster and shorten the rod between the pedal and the booster to free up some space.
For left hand drive StarQuests, you may need to remove the brace under the manifold to clear the steering box. The intake manifold will still be very close to the adjustment screw on the gearbox. Make sure that it is a safe distance away on your swap. If its still touching you may want to consider a different intake manifold or a even better, a steering rack conversion.
The throttle cable from the starion can be looped around and used if you cannot find a shorter throttle cable to use. Make a bracket to hold the end of the throttle cable that opens the throttle plate. The bolt holes used by the coil packs make good attachment points for just about any bracket you can dream up.
Some people have used Evo4-9 intake manifolds, but I do not yet have information or photos of this setup.
Main Coolant Hoses
These are the hoses that connect the radiator to the motor. There is an 'in' and 'out' on the engine. The 'in' comes from the bottom of the radiator into the water pump. The 'out' line comes from the head and goes to the top pipe on the radiator.

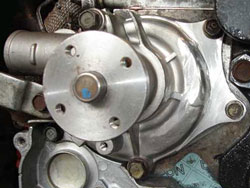
For the "in" side, one can use the stock DSM water pump and big water pipe that runs under the exhaust manifold. This will require caping off the end of the large pipe and teeing into the pipe to run the water to the radiator. This creates a cluttered difficult to work on setup in front of the turbo. Simplify the "in" water pipes, by using a Mighty Max SOHC water pump (MD997615) and heater hose pipe (MD143573). The water pump will need a few modifications to clear the DOHC tensioner parts. Machine down some of the castings on the side of the pump so that the tensioner pully can clear. The new pump will also require the timing cover to be trimmed. The offset of the pump is different from the DOHC pump. Your best bet it to use a press to change the offset of the DSM pulley. It sounds like a lot of work, but the end result is less cluttered and easlier to work on.
The "out" water neck on the back of the head will interfere with the firewall in most setups. There are several work arounds including moving the engine forward, moving the firewall back and/or modifying the water exit itself. Since moving the engine forward and modifying the firewall is undesireable, we've come up with a few tricks to modify the water exit. The 4G37 thermostat housing gives some room by pointing the water neck 90 degrees to the side. With this one can run the water pipe over the exhaust manifold to the front of the engine. This is a cheap easy method, but still doesn't leave much room behind the head. Its also possible to make a low profile water outlet that stays close to the head and goes off to the side where you can hook up a thermostat and water pipe to the front. I've even modified a water neck to point straight up to go over the intake manifold.

Recently, thanks to input from members of the site, we've made major improvements in clearing off the back of the head. We've started moving water outlets to the front of the head and blocking off the outlet in the rear. What we do is remove the 35mm freeze plug from the front of the head and install a water pipe in its place. You can use a section of the large water pipe that runs under the exhaust manifold for this. It is the perfect size. A 35mm O.D. pipe will fit snug, but will work loose over time. Weld on some means of bolting this to the head so it does not work loose. If you don't need a thermostat or connections for the turbo or heater hose lines all you will need to do is add a few bungs for temperature sensors. If you require a thermostat, you can weld a flange to the end of the pipe and bolt on the rear thermostat housing or run an inline thermostat between the head and the radiator. Trimming of the timing cover will be needed for this water pipe as well. Be careful and measure a few times before cutting and you can end up with a very clean setup.
While the above has been proven to work, some members have discussed the stagnation of flow in the back of the head. To coax the coolant to flow through the back of the head, drill two holes in the back of the head to correspond with the 2 holes already in place in the back of all 4G6x blocks. You will also need to open up coolant holes in the headgasket in this spot. It is difficult to punch holes in a stock composite head gasket, but most metal shops can punch clean holes in a Multi Layer Steel (MLS) head gasket. These two holes along with restricted holes at the front of the head should improve coolant flow to the back of the head, and will also prevent steam from building up in the back of the head.
Turbo and Heater Coolant Hoses
For the heater hoses you will need to run small hoses from the "in" side to the "out side of the system. This creates a circuit that allows the coolant to circulate through these components. The MD143573 water pipe mentioned earlier works for half of the heater core plumbing, but you will need to add a line from the heater core to between the head and thermostat to complete the circuit.
Turbo water hoses are optional in most cases. Even the stock MHI turbo may have the water lines removed. Over time with multiple hot shutdowns this may lead to coking of the turbo bearings. If this is a worry, you should either add a tee to the "in" water hose or the heater pipe. The other side will need to go from the turbo to between the head and the thermostat on the "out" side of the engine.
Turbo
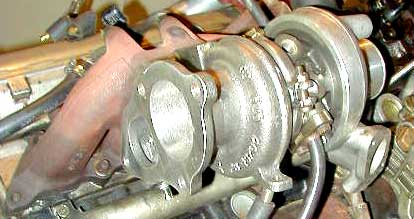
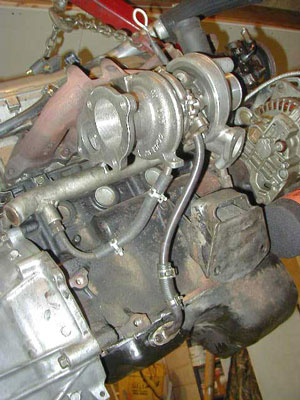
For reasons similar to those of the intake manifold, the turbo faces the wrong way for our swaps. The turbo needs to be turned around 180 degrees so that the inlet faces the front of the car instead of the firewall. There are currently no mass produced top mount 4G63 manifolds so most people stick with the stock one. If you will be making your own turbo manifold, or are using an aftermarket turbo, these suggestions may not apply.

If using the stock turbo, rotating the turbine housing in relation to the compressor housing will make using the stock wastegate actuator very difficult to use. Some people have modified the rod on the wastegate, but most people ended up using an external wastegate with the flange welded to the cast manifold.
Rotating the turbo also means that you need to rotate your center cartridge in relation to your turbine housing so that the oil drain faces down. Mark the before and after aligntment with a marker before taking everything apart. Remove the pins between the housings and the cartrige and turn the components accordingly. Depending on how you want to run your intercooler hoses, you might want to rotate you compressor housing as well. To do this you will need to remove the C-clip with some pliers. This can be a pain by yourself. A vice or a friend can be helpful. Once it is removed, use a small round file (chainsaw sharpening file) to make a new slot for the pin on the cartridge being careful not to hit the O-ring with the file.
Some people have used Evo4-9 manifolds and turbos by spacing the manifold out from the head.
Turbo Oil Lines

The turbo will need both a feed line and a drain line. Most people doing the swap will cap off the oil supply line in the back of the head in favor of a more direct feed from the oil filter housing. This hose can be purchased from several suppliers, but I recommend purchasing your own AN fittings and making your own. If you need a restrictor for your feed line, it is simple to tap one of your fittings, thread in a bolt, cut it off and drill an appropriatly sized hole.
The turbo drain may not contain pressurized oil, but it should not be considered less important than the feed. During cornering on boost, oil can actually back up into the drain from the oil pan and be pressurized by blow-by from the crank case. You can use rubber hoses to extend the turbo drain, but you might find that this option is difficult to route around the engine mount. You can make new flanges and bend some tubing for the drain. This works very well and can be very leak free. Another option is to build AN lines for the turbo drain. You can buy a weld-in steel AN bung for the oil pan and make a flange with a welded in fitting for the turbo drain. -10 AN should be large enough. No matter what the method on constructing the drain, be sure to bend the pipe so that it clears the motor mounts and crossmember.
Vacuum Hoses
The 4G6x requires very few vacuum hoses to run. Most of the hoses that come on the engine are used for evaporative emissions solenoids and filters. You will only need a few vacuum lines on a swapped 4G6x.
- Plenum to fuel pressure regulator
- Plenum to wastegate solenoid
- Two larger lines from the valvecover to catch can
- Optional: Plenum to boost gauge
- Optional: Plenum to blow off valve
- Optional: Plenum to MAP sensor
Fuel Hoses
You should be able to reuse your stock fuel lines up to the firewall. If you are unable to find an adapter for the flare fitting used by the stock high pressure line, you can cut the crimped fitting from the stock lines and clamp on a regular fuel compatible hose. The low pressure line is clamped on with a hose clamp from the factory. You may need a longer line, which may be due for replacement anyway.
Downpipe

Due to rotating the turbo, you will need to make a new downpipe to replace the DSM O2 housing. Flanges and mandrel bent tubing is available on ebay and from other suppliers. The stock exhaust manifold moves the exhaust flange back to nearly cylinder 4. Luckily, the low mounted turbo will eleviate the need for a tight radius bend, but if you're using a top mounted turbo you may want to consider its vicinity to the firewall.
You can purchase an O2 bung from many suppliers and a wideband kit generally includes them. A well designed downpipe can be bolted to a stock exhaust as well as any aftermarket exhaust that follows the same principles. Since you've already got a welder out, you might as well make your own full exhaust though.
Intercooler Pipes*
A bad intercooler pipe job can really make a swap look cobbled together. Take pride in your work and make it look well thought out and well executed. Mandrel bent aluminum tubing is available on ebay an other metal suppliers. If you want to get crafty you can mock up some styrofoam bucks and make carbon composite intercooler pipes with very unconventional shapes and bends. 2.5" tubing is adequate up to roughly 400 horsepower. Below this power level, you may want to look other places for adding power. If you're planning on getting into accidents (am I the only one who does this?) plan out your intercooler setup so that it is out of the way and easy to replicate or replace when parts get damaged. Move your intercooler from ground level up to the front of your radiator if you have space. Ducting can eliminate any problems caused by having the intercooler out of the direct flow of air. Tight ducting between the intercooler and radiator can draw in precious cool air as well.
*Most of this information can be applied to any intercooler upgrade or addition in any vehicle.
Power Steering Lines
You can use the DSM's high pressure line with an adapter and any low (100psi) pressure oil compatible hose. For swaps into other vehicles or if you are doing a steering rack conversion, metric o-ring to -AN adapters are available from most places carrying AN fittings. Below is an explanation of a cheap method for adapting DSM lines to a Starion steering box.

The Starion gearbox uses simple flared fittings, as does the rubber section of the DSM high pressure line. This makes it easy to make an adapter from the high pressure line to the steering box. Use 3/8" hardline; every parts store has a rack of these in various lengths and sizes. You don't need but 24". If you cannot find lines with the correct size metric fittings, use the flare nuts off of the Starion and DSM lines. Cut the line in half to remove both flare fittings. Slide the DSM and Starion nuts on making sure they are facing the correct directions and double flare the cut end. Install it in the car to hold it still and bend the hardline about 90 degrees in a graceful bend. No need for a tight radius. The Starion flare goes right into the Starion gearbox and the DSM flare goes into the DSM high pressure line. The best way to route the high pressure line, is right in front of the timing cover.
For the low pressure line, use the leftover 3/8" hardline from above. Slide on the Starion fitting on and you're done making the adapter. Install and bend same as above. Slide your low pressure oil hose over the cut end. It will hold fine without a bead. Hose clamp and run your low pressure line to the power steering cooler that runs across the front of the bumper and back up to the reservoir. You can use any power steering reservoir you want. I used the DSM one due to the locations of the inlet and outlets. It also bolted to the stock bracket without modification. Be sure to use a suction line to the pump that will not collapse when the pump draws in fluid.
A Tip for Custom Pipes
Whenever you need to route a pipe around something, a good method is to get some thick household electrical wire, or fence wire, or old brake line (it really doesn't matter as long as it can hold its shape). You take this and bend it how you would like your pipes to run. Take this to the store and say "Can you make me a pipe that is 'X' diameter and bent like this" (hold up wire)? Make their lives easier and don't make too tight of radii for larger pipes.
© 2012 Cybernetics
