Datsun 510 with 4G63 - $10k budget
Moderators: DJpowerHaus, mattmartindrift
-
jeffball610
- Too Much Time on His Hands
- Posts: 619
- Joined: Wed Feb 22, 2006 5:29 am
- Location: Las Vegas, NV
Datsun 510 with 4G63 - $10k budget
They say it can't be done. I'm still on track to spend less than $10k to build my project 4G63/510. I just got a sweet deal on a BB turbo and lines. Cost me $410 complete. Nothing seems to be wrong with it and I bought it from a trustworth source. I'll start a budget sheet and show my progress.
Last edited by jeffball610 on Mon Feb 28, 2011 9:31 pm, edited 2 times in total.
-
jeffball610
- Too Much Time on His Hands
- Posts: 619
- Joined: Wed Feb 22, 2006 5:29 am
- Location: Las Vegas, NV
-
DJpowerHaus
- Sir Post A Lot
- Posts: 1779
- Joined: Wed Apr 07, 2004 3:24 pm
- Location: Baltimore, MD
- Contact:
PM sent...
Good deal on that turbo. Be sure to use a restricter on the oil feed line to keep it in good condition. How big is a GT11 anyways? Sounds sort of small.
You should be able to do it for $10k if you don't need to modify the chassis in any way. Chassis mods can start to add up quick as can fuel mods.
Good deal on that turbo. Be sure to use a restricter on the oil feed line to keep it in good condition. How big is a GT11 anyways? Sounds sort of small.
You should be able to do it for $10k if you don't need to modify the chassis in any way. Chassis mods can start to add up quick as can fuel mods.

Getting the engine bolted in is about 10% of the way there.
The next 80% can go quickly with help and skill.
That last 10% takes about as long as the 90% that came before it.
You should easly be able to do this for less than 10 grand. I went 11.90 with a stock 14b in a car I built for $2000.00. I just spent more time doing research and trading than spending, most of the parts were from junkyards. With a headstart like that turbo, you should be able to easily build a 10 second car utlizing junkyard stuff. Good luck with the project, I really like 510's.
KILL
-
jeffball610
- Too Much Time on His Hands
- Posts: 619
- Joined: Wed Feb 22, 2006 5:29 am
- Location: Las Vegas, NV
The GT11 is a BB Garrett setup running on a DSM exhaust housing. It's rated at 50lbs/min. Should be similar to a 57 or 60 trim. It's actually a big turbo. (to me at least) Slowboy rates it at 475hp. They do have some hard numbers on the T3 flanged GT11. Best on pump gas is 388hp and race gas is 450 or something. I figure I could maybe make 350hp all day and run 400+hp at the track.
Most of my cash will have to go towards repro parts and brakes/suspension. I figure I've got almost $5k just in those parts. That would include interior, bushings, weatherstripping, seats (Corbeau GTS II), wheels (TSW Kyalami) and fiberglass body panels to replace the rusted ones. The engine is the cheap part. I got a block for $75, head (w/ new parts) for $250 and traded for an intake (not done yet). I figure I'll have $2k in the engine setup. That leaves me $3k for misc. There's always lots of that.

that's better
Most of my cash will have to go towards repro parts and brakes/suspension. I figure I've got almost $5k just in those parts. That would include interior, bushings, weatherstripping, seats (Corbeau GTS II), wheels (TSW Kyalami) and fiberglass body panels to replace the rusted ones. The engine is the cheap part. I got a block for $75, head (w/ new parts) for $250 and traded for an intake (not done yet). I figure I'll have $2k in the engine setup. That leaves me $3k for misc. There's always lots of that.
that's better
-
DJpowerHaus
- Sir Post A Lot
- Posts: 1779
- Joined: Wed Apr 07, 2004 3:24 pm
- Location: Baltimore, MD
- Contact:
-
jeffball610
- Too Much Time on His Hands
- Posts: 619
- Joined: Wed Feb 22, 2006 5:29 am
- Location: Las Vegas, NV
So I finally got some trial fit pictures taken. Still waiting on my new Billhousing, but thought this would do for now. I still need to cut and reverse the crossmember to get a good fit. It sits about 3" too high as it is. I have about 1/8" clearance using the stock thermostat housing. There's plenty of room for the CAS and I might actually be able to use the stock L16 motor mounts to mate to the Mitsu motor mounts. Hopefully I'll get a little more progress here soon now that my garage is more complete. Now I need to get a welder and learn to weld and I can get to work.
http://s165.photobucket.com/albums/u71/jeffball610/
http://s165.photobucket.com/albums/u71/jeffball610/
-
jeffball610
- Too Much Time on His Hands
- Posts: 619
- Joined: Wed Feb 22, 2006 5:29 am
- Location: Las Vegas, NV
Got some more pics up on the photobucket link. Still haven't gotten the crossmember welded, but I reversed it and looks like everything will fit better than I expected. It might move forward an inch or two, but that shouldn't be an issue. I can still use the stock L16 (stock 510 1600cc motor) motor mounts and have plenty of room for the steering linkage and such. Hopefully I'll get that welder or at least some help with it.
-
jelliott510
- Addict
- Posts: 56
- Joined: Sun May 08, 2005 12:41 am
- Location: Vancouver WA
Hey!!! Sport Compact Car can kiss my a$$. I need to post more pics. I have my fuel system solved. Mild sump in the original tank over to a high volume low pressure pump then to a small tank with a 255lph pump, then on to the engine.
I have to agree on the rear suspension MAJOR squat. I had a pumped up L20b and it would bottom out the rear on a hard launch.
I thought it was cool to find your letter printed in SCC.
I have to agree on the rear suspension MAJOR squat. I had a pumped up L20b and it would bottom out the rear on a hard launch.
I thought it was cool to find your letter printed in SCC.
-
jeffball610
- Too Much Time on His Hands
- Posts: 619
- Joined: Wed Feb 22, 2006 5:29 am
- Location: Las Vegas, NV
-
jeffball610
- Too Much Time on His Hands
- Posts: 619
- Joined: Wed Feb 22, 2006 5:29 am
- Location: Las Vegas, NV
Finally got some more parts today. Got my front spindles and front brakes. Spindles are from a Nissan 200SX (1985 RWD model). Front brakes are a 4 piston design from a 1994 Toyota 4Runner. Not sure of the rotor diameter on the 200SX spindles, but the brakes can fit an 11" rotor and should be able to bolt one on from a Z31 300ZX.
Also finally got my JMF intake. Looks beautiful and HUGE. Not sure if this is going to work. I measured 13" from the middle of the engine to the outer edge of the intake. It should fit between the shock towers, but the brake master cylinder is probably going to be an issue. I'll find out when I do another test fit. Hopefully I'll get that done this week. I'll get some pics of my progress and some more info when I get to it.
Also finally got my JMF intake. Looks beautiful and HUGE. Not sure if this is going to work. I measured 13" from the middle of the engine to the outer edge of the intake. It should fit between the shock towers, but the brake master cylinder is probably going to be an issue. I'll find out when I do another test fit. Hopefully I'll get that done this week. I'll get some pics of my progress and some more info when I get to it.
-
DJpowerHaus
- Sir Post A Lot
- Posts: 1779
- Joined: Wed Apr 07, 2004 3:24 pm
- Location: Baltimore, MD
- Contact:
-
jeffball610
- Too Much Time on His Hands
- Posts: 619
- Joined: Wed Feb 22, 2006 5:29 am
- Location: Las Vegas, NV
Well, I finally got some major parts together and started fitting some more. It looks like I might have to give up on the JMF intake manifold in favor of a stock modified unit. I'm also going to have to find some really thin fans to work with this thing. another issue that I wasn't expecting was that I might have to go with a front exit thermo housing. I have a 90* outlet for the stock location, but I somehow didn't think there would be a CAS in the way. I overlooked that one. I still don't have my transmission mounted up, but as soon as I get some help I'll see what issues I'll have there.
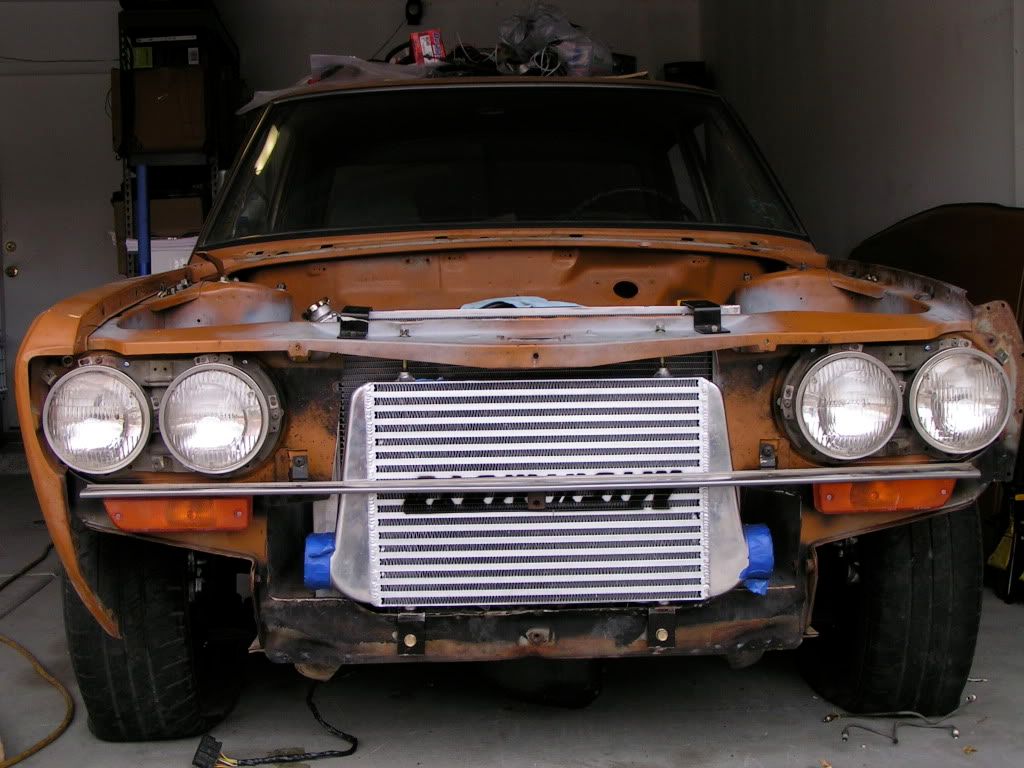
I did manage to get my suspension pretty much sorted out and have most of the stuff to make new fuel and brake lines. However, I can't find a source for metric tube nuts to fit the hard brake lines to the calipers and other hard parts. Anyone have a source for these? Anyway, here's some pics to make it look like I've done something.
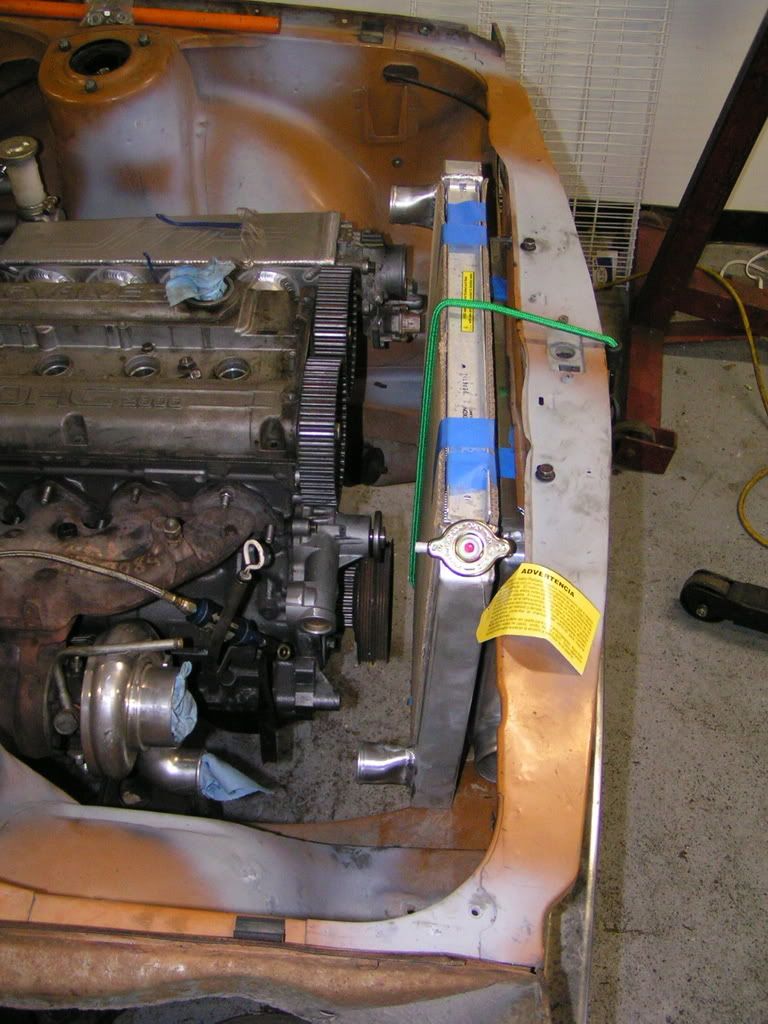
This is about what my clearance on the front of the engine will be.
Cutting I had to do to fit the intercooler. The intercooler and radiator fit great together. Too bad everything around it doesn't fit so well.
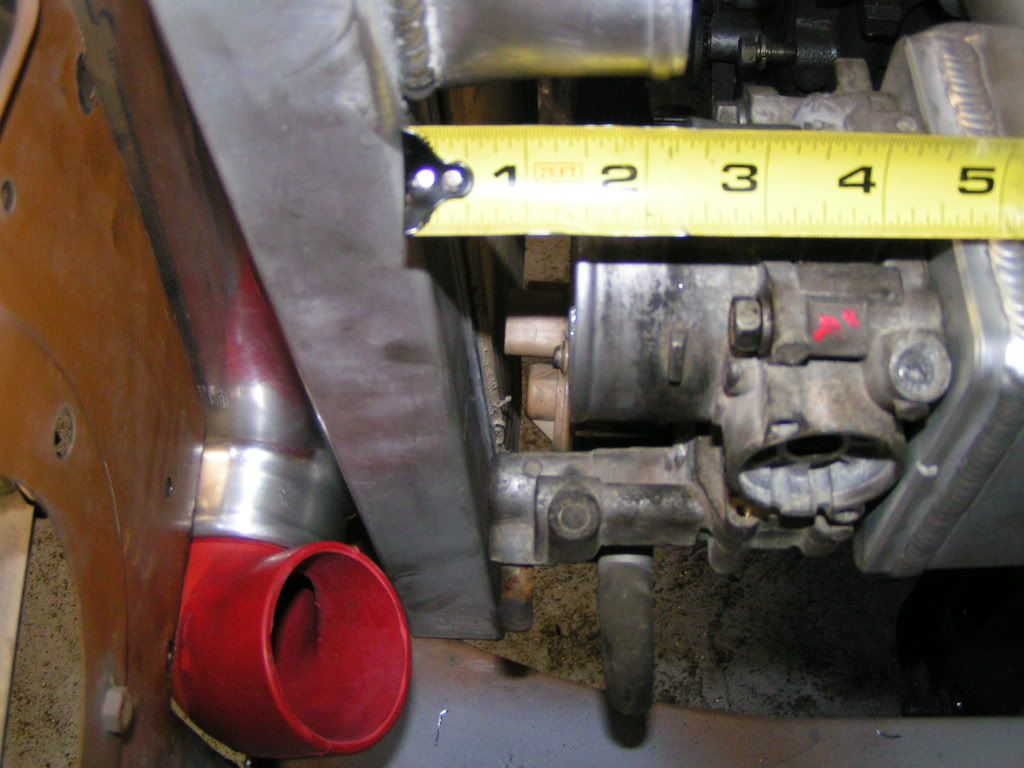
Clearance with the JMF intake manifold.
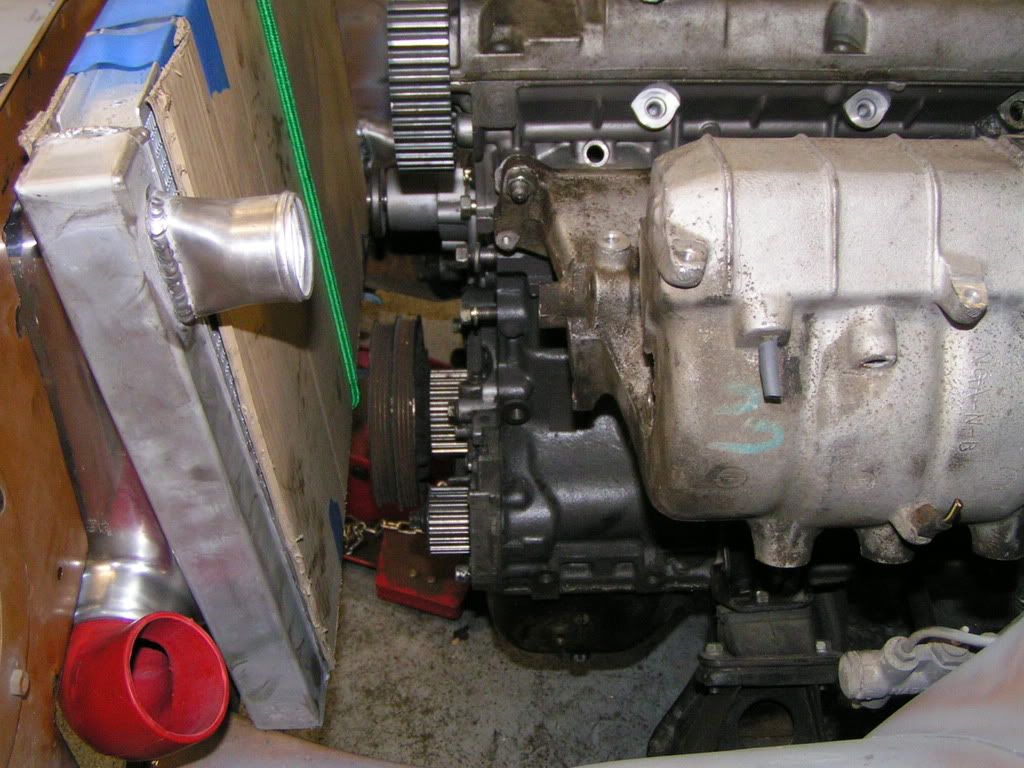
Clearance with the unmodified stock intake manifold.
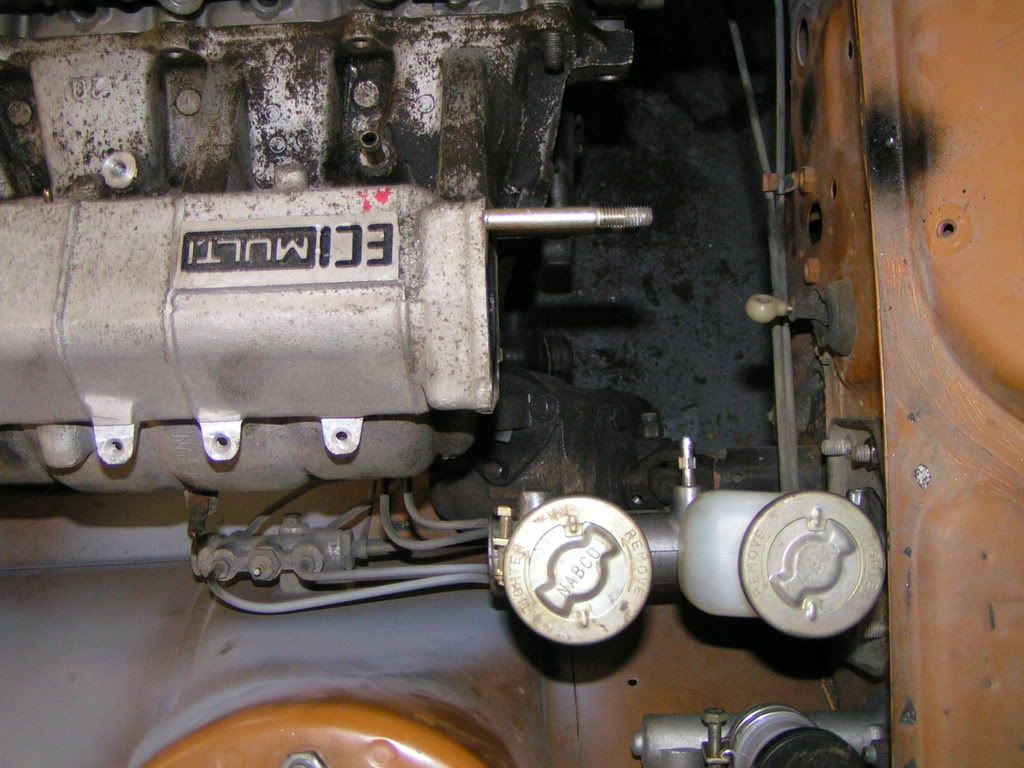
Rear of the stock unit clears my master cylinder with room to spare.
I did manage to get my suspension pretty much sorted out and have most of the stuff to make new fuel and brake lines. However, I can't find a source for metric tube nuts to fit the hard brake lines to the calipers and other hard parts. Anyone have a source for these? Anyway, here's some pics to make it look like I've done something.
This is about what my clearance on the front of the engine will be.
Cutting I had to do to fit the intercooler. The intercooler and radiator fit great together. Too bad everything around it doesn't fit so well.
Clearance with the JMF intake manifold.
Clearance with the unmodified stock intake manifold.
Rear of the stock unit clears my master cylinder with room to spare.
-
Bill Hincher
- Donating Member
- Posts: 1625
- Joined: Thu Jun 22, 2006 8:57 pm
- Location: Toledo,Ohio
- Contact:
well Jeff, I am glad to see you are okay, that weather out there has been awful!
If I understand your intake manifold correctly, the advantage of the sheet metal set up is the extra size of the plenum and the shorter length of intake runners, I think the whole thing would be nicly done by cutting the stock manifold in half and adding a larger plenum, that would lower the inlet area so you can feed air into it without as many bends and clear the master cylinder , because it would be lower and give you the added performance of the shorter intake runners
Did you move to Vagas yet?
-
jeffball610
- Too Much Time on His Hands
- Posts: 619
- Joined: Wed Feb 22, 2006 5:29 am
- Location: Las Vegas, NV
I haven't moved to Vegas yet. I'm still trying to sell my house. So since I still have my garage, I figured I'd try to get some of this car done. Who knows if I'll have a garage when I move.
The JMF unit is meant for race purposes and that's why it's built like it is. However, this is going to be mostly a street car. I wouldn't mind running a modified stock unit. I just got the JMF unit cause I got a great deal on it. Not only does it cause issues with the intercooler pipes, but it almost hits the brake master cylinder without tilting the engine. The stock unit I have in the picture clears the MC and should offer enough room to make some non-restrictive intercooler pipes.
I'd gladly trade my JMF intake for a modified DSM unit and some cash. Any takers?
-
Bill Hincher
- Donating Member
- Posts: 1625
- Joined: Thu Jun 22, 2006 8:57 pm
- Location: Toledo,Ohio
- Contact:
a decent intake using the stock manifold is my next big adventure, I had built the remote CAS set up before but I wasnt so impressed with it, I need to build an adjustable plenum area intake manifold with shorter lower intake runners and a CAS remote holder all in one unit
next to a bellhousing its the next best option to be provided, now that the front cooling exit is worked out
next to a bellhousing its the next best option to be provided, now that the front cooling exit is worked out
-
jeffball610
- Too Much Time on His Hands
- Posts: 619
- Joined: Wed Feb 22, 2006 5:29 am
- Location: Las Vegas, NV
SUCCESS! I finally got around to mating up the Toyota R154 and the Mitsubishi 4G63T in the car. It only took minor cutting of the transmission tunnel to clear the shifter. I can almost use the stock 510 transmission crossmember. I will definitely be able to use the stock holes to mount my own transmission crossmember to the car. This thing fits pretty well for being so large. My only concern will be the shifter location. I'll be sitting in the back seat and will need to really reach to shift this thing. A custom shifter should fix that. Hopefully it won't be too ugly.
So how high should my transmission output be? I haven't remounted the rear end (since I'm putting an R200) and don't know how high it needs to be. What driveshaft angle should I look for? I can't lower the engine much more without hitting the crossmember, so where it is is about where it will be. Here's a couple pictures of the fit.
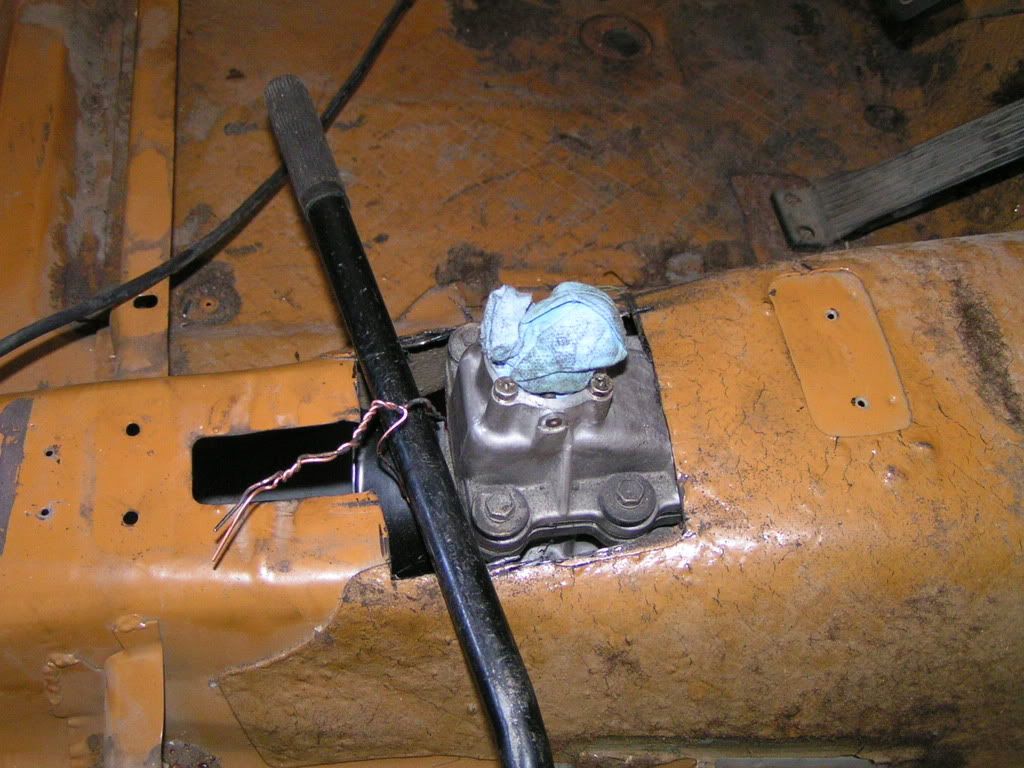
Trimmed to the end of the sound deadening to clear the shifter.
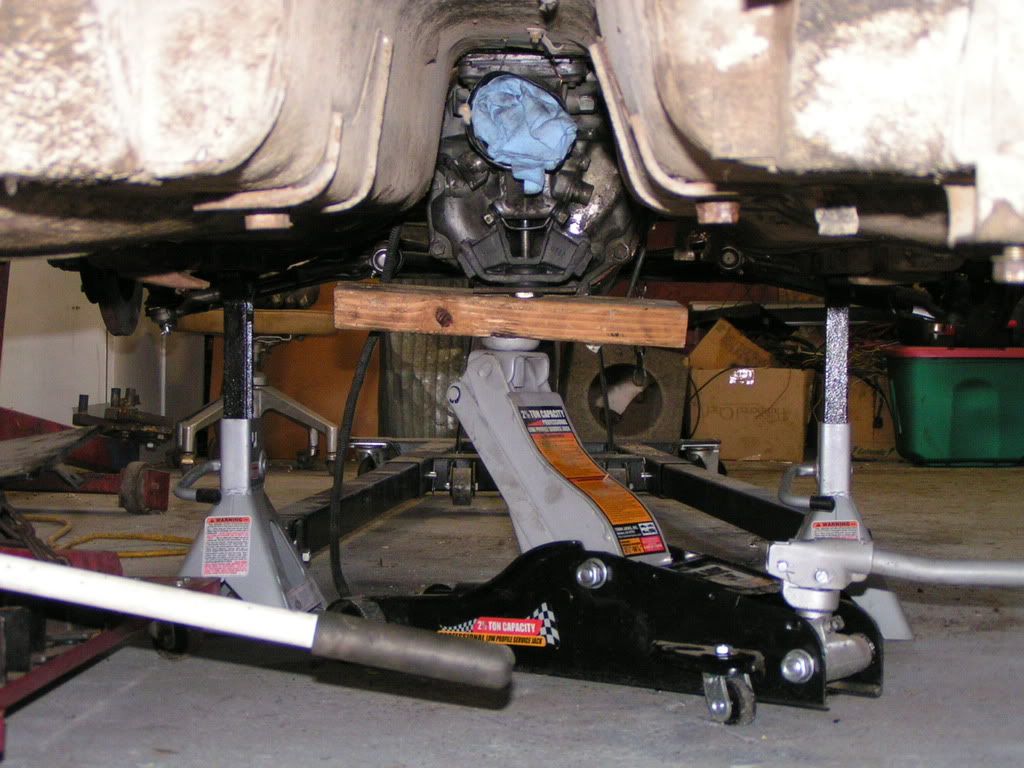
Didn't measure where the output is, but looks pretty close to where it should be.
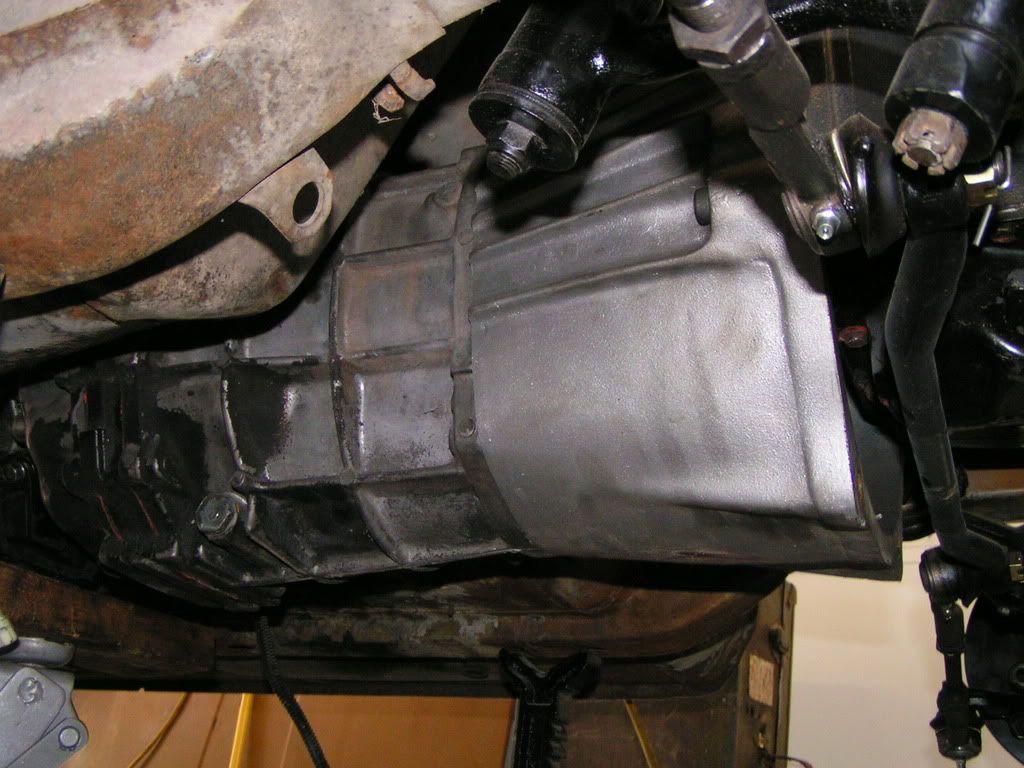
Clears the tunnel pretty good. I'll get some better pictures when I get a real trans mount done up.
Here's the clearance of the steering linkage. It does hit the bellhousing at full lock, but I don't think it will be an issue. If there is some issues with it, I'll do what the SR guys do and have it bent a little for clearance.
So how high should my transmission output be? I haven't remounted the rear end (since I'm putting an R200) and don't know how high it needs to be. What driveshaft angle should I look for? I can't lower the engine much more without hitting the crossmember, so where it is is about where it will be. Here's a couple pictures of the fit.
Trimmed to the end of the sound deadening to clear the shifter.
Didn't measure where the output is, but looks pretty close to where it should be.
Clears the tunnel pretty good. I'll get some better pictures when I get a real trans mount done up.
Here's the clearance of the steering linkage. It does hit the bellhousing at full lock, but I don't think it will be an issue. If there is some issues with it, I'll do what the SR guys do and have it bent a little for clearance.
-
Bill Hincher
- Donating Member
- Posts: 1625
- Joined: Thu Jun 22, 2006 8:57 pm
- Location: Toledo,Ohio
- Contact:
BEAUTIFUL! wow!
I would put my front yoke perfectly straight with the drive shaft ( elevation wise) and I would locate my rear pinion u-joint down at least 2 degrees. because the front u-joint only slips forward and backwards because of rear axle movement but the rear u-joint is going to try and move upward with rear spring wrap up so you need to start out at a slight downward angle to begin with
I would put my front yoke perfectly straight with the drive shaft ( elevation wise) and I would locate my rear pinion u-joint down at least 2 degrees. because the front u-joint only slips forward and backwards because of rear axle movement but the rear u-joint is going to try and move upward with rear spring wrap up so you need to start out at a slight downward angle to begin with
-
jeffball610
- Too Much Time on His Hands
- Posts: 619
- Joined: Wed Feb 22, 2006 5:29 am
- Location: Las Vegas, NV
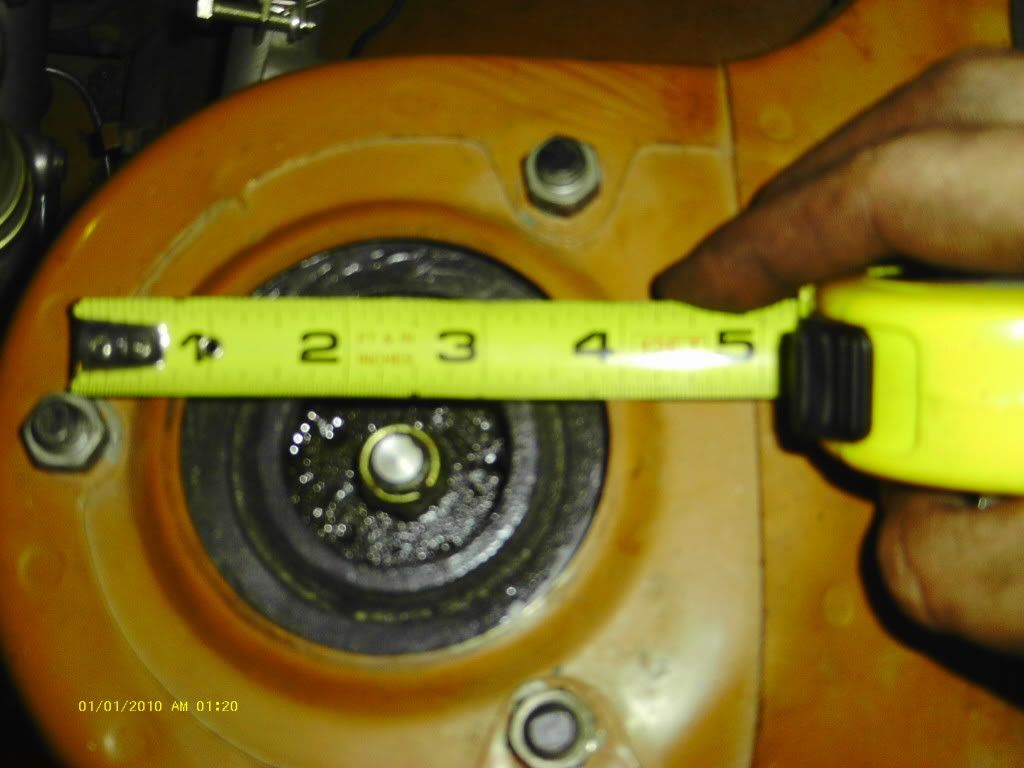
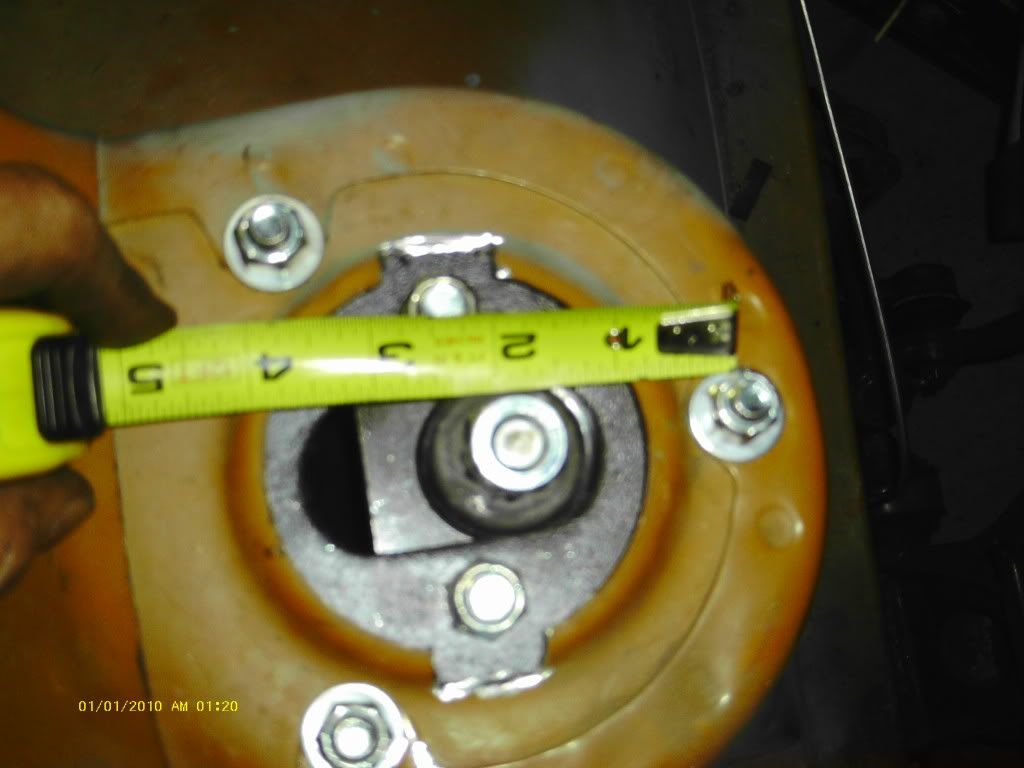
From the CAS to the end of the crank pulley is about 23". I'm not sure I'm going to run a front thermo housing yet. I'm thinking I can make due with the rear exit. I'll have to do some more mock up and measuring to see what I come up with.
And Bill, I don't have a live axle in the rear. The rear pumpkin is mounted to the rear subframe. If I remember right, it's kinda like the AWD DSMs in its setup. I'll take some pics to show you guys what I'm doing. Once I get this transmission mount and my modified rear subframe in, I'll take some measurements and see how close they are to the trans tunnel. I know I have room, but want to get the drive shaft tucked up nice and tight to the body.
On a fixed rear end like this, is 2 degrees still a good angle to shoot for? I know I need some angle to get those U-joints working properly. I'll see if I can measure some drive shafts at the junk yard and see what angles I come up with.
-
jeffball610
- Too Much Time on His Hands
- Posts: 619
- Joined: Wed Feb 22, 2006 5:29 am
- Location: Las Vegas, NV
75Colt he's likely running an R160 LSD. The rear pumpkins were made by Fuji Heavy Industries and happen to be in both Subarus and Datsun/Nissans. It's a direct fit into the 510 chassis. I've got an R200 for mock up and I'll get an R200 LSD unit when I find one. I'll need the LSD unit to fit the driveshaft as the bolt pattern on the input is different between the two. I also have to make a custom mustache bar (holds the pumpkin to the car) and make the stock Z31 (300ZX) CV shafts fit since the 510 rear is narrower than the Z31. I've got most of it figured out in theory. I just need to put it into practice.
Right now I'm just doing little things to the car before I move. I have the new intake manifold in place and I'm sorting out the wiring and placement of electrical parts. I've mounted the coil pack and coil transistor (or whatever) to the rear of the intake manifold. It conveniently has 10mm threaded holes to mount stuff to.
I'm also finishing up the transmission crossmember and the rear suspension work. I hope I get it all done in time. I'm on the road July 8th to move to Vegas. Then I'll have neither a place nor the cash to work on my car for a while.
-
jeffball610
- Too Much Time on His Hands
- Posts: 619
- Joined: Wed Feb 22, 2006 5:29 am
- Location: Las Vegas, NV
Hey you found my picture! Yeah that was the first day when I picked it up. It was a nice day until I got close to the guys shop. I also forgot my digital camera and stopped at a gas station to get a disposable camera. It wasn't an easy experience. But project cars never are. 
The car is actually a pretty nice shell. No major rust. Just the typical rear quarters and some in the front fenders. I also found a little under the sound deadening in the floor pan and a spot in the trunk. I consider myself lucky it has so little rust. It actually sat in that lot since the early 90s under all the elements.
Now I just need a job so i can get back to work on it.
Do it in a Datsun!
1972 Datsun 510
7-bolt 4G63T, EVO 9 pistons and rods, Garrett GT3076R, "flipped" stock intake, Toyota R154, Z31 R200 w/ CVs
1972 Datsun 510
7-bolt 4G63T, EVO 9 pistons and rods, Garrett GT3076R, "flipped" stock intake, Toyota R154, Z31 R200 w/ CVs
-
4G63/4Everything!
- Knowlege Seeker
- Posts: 10
- Joined: Mon Feb 05, 2007 7:59 pm
- Location: Ridgecrest, CA
-
jeffball610
- Too Much Time on His Hands
- Posts: 619
- Joined: Wed Feb 22, 2006 5:29 am
- Location: Las Vegas, NV
I wish I was close. However:
These showed up at my door the other day! I've been waiting to get these since before I even bought the car. These are TSW Kyalami 16x7. TSW stopped making them over 2 years ago and I've been looking for a set for a while. After a chance encounter on eBay, I landed these.
I've got the intercooler and radiator 90% mounted. I just need to drill some holes in the upper core support to attach the upper brackets to hold the radiator in. I'll take pics tomorrow.
Now that I have that done, I can route my headlight wires under the intercooler and mock up the intercooler pipes and coolant hoses. Can I mount the relays for the "upgraded" headlight wiring in the fuse panel? I have two spaces I can mount relays in my fuse panel and I know I want to add relays as suggested by Dime Quarterly. Is mounting the relays that far from the headlights counterproductive?
Like this:
http://www.the510realm.com/viewtopic.ph ... ht#p152559
Do it in a Datsun!
1972 Datsun 510
7-bolt 4G63T, EVO 9 pistons and rods, Garrett GT3076R, "flipped" stock intake, Toyota R154, Z31 R200 w/ CVs
1972 Datsun 510
7-bolt 4G63T, EVO 9 pistons and rods, Garrett GT3076R, "flipped" stock intake, Toyota R154, Z31 R200 w/ CVs
-
jeffball610
- Too Much Time on His Hands
- Posts: 619
- Joined: Wed Feb 22, 2006 5:29 am
- Location: Las Vegas, NV
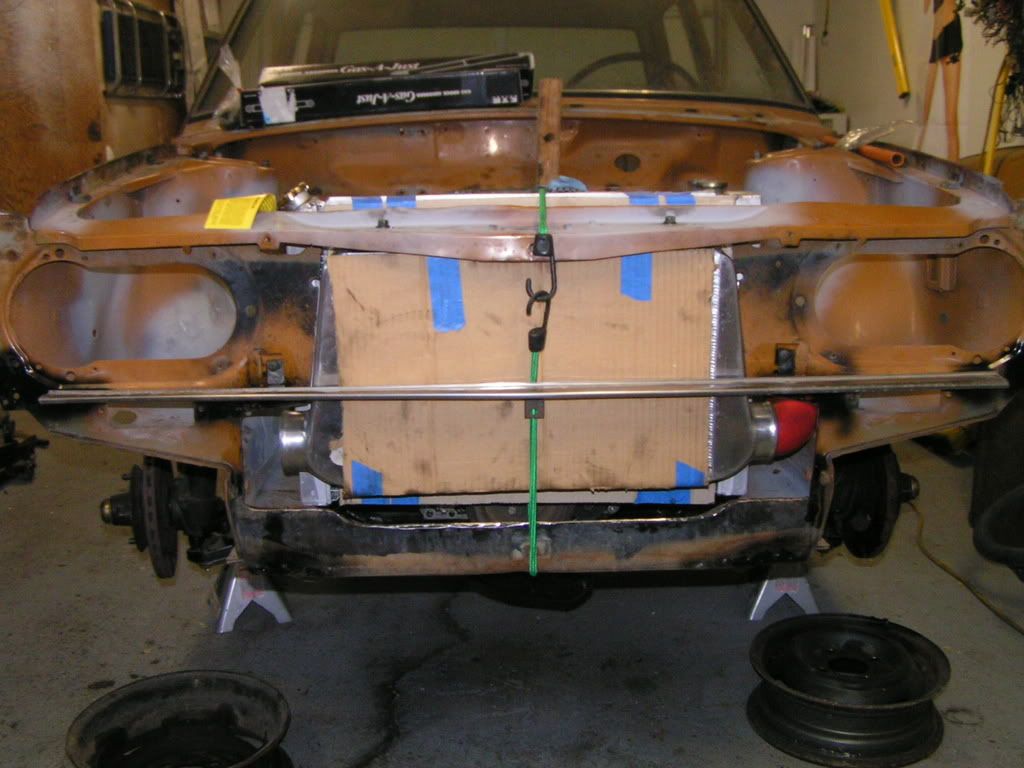
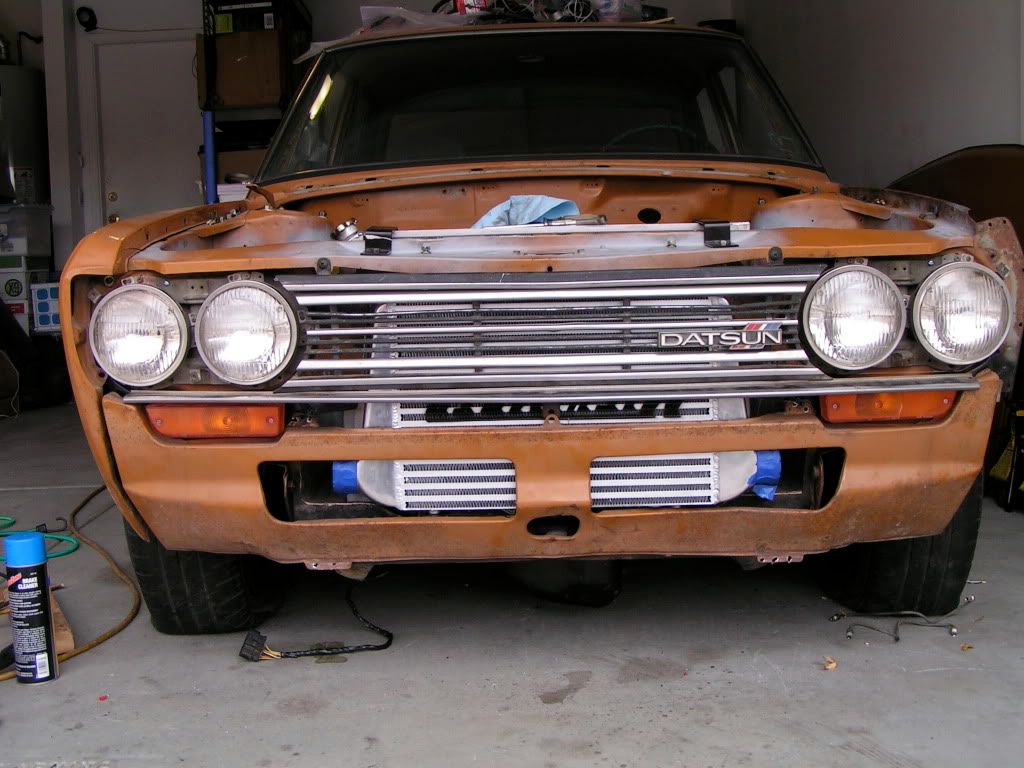
These are the pics I promised from my radiator and intercooler mount. As you can see, all I did is weld 2 nuts to the lower core support and mount the brackets to that. Trimming of the front of the car is limited to the area behind the grill. I may need to do some minor trimming to the backside of the lower valance, but it is so minor that even a trained eye probably won't notice. I have since painted the intercooler black. I'm not into showing off my intercooler for all to see, but left it this way for the pics so you could see it better.
Do it in a Datsun!
1972 Datsun 510
7-bolt 4G63T, EVO 9 pistons and rods, Garrett GT3076R, "flipped" stock intake, Toyota R154, Z31 R200 w/ CVs
1972 Datsun 510
7-bolt 4G63T, EVO 9 pistons and rods, Garrett GT3076R, "flipped" stock intake, Toyota R154, Z31 R200 w/ CVs
-
jeffball610
- Too Much Time on His Hands
- Posts: 619
- Joined: Wed Feb 22, 2006 5:29 am
- Location: Las Vegas, NV
I'm starting to run into issues. Small issues being that I need to figure out what to do with things like the clutch slave cylinder. Right where the hydro line goes int, it nearly touches my steering cross link.
I also feel that the oil pan sits way too low. It is close to the front crossmember, but plenty of room for vibration etc. Most of this can be solved by using custom mounts instead of the stock MM mounts. I think I will choose to raise the motor up so I won't have to modify the oil pan. I have plenty of room to move up. The only sheet metal I will need to cut is for the top of the transmission. Right where the R154 shifter is at, the transmission touches the tunnel. Other than that, I have plenty of room all around. This will also give me more room to run the exhaust under the driveshaft for ground clearance.
My biggest issue, however, is the motor itself. I bought this motor about 4 years ago for $150 from a trusted member in Colorado. He told me the motor was being scrapped due to a broken timing belt. The pistons didn't look bad, so I took it. This weekend I pulled the oil pan and front case to do a balance shaft eliminator and noticed some gray material on the pickup screen. There was some in the pan, but mostly just a little coolant that likely seeped in when pulling the head.
I was pulling off the balance shafts, and it looks like the bearing surface is F*CKED! I'll need to dig in a little more and see what's up, but I may need to scrap the motor if the bearings are bad, or if the crank looks like the balance shafts. I know I can find another motor, but why do things like this happen? Things were going so well.
I'll take some pics for everyone to enjoy.
Do it in a Datsun!
1972 Datsun 510
7-bolt 4G63T, EVO 9 pistons and rods, Garrett GT3076R, "flipped" stock intake, Toyota R154, Z31 R200 w/ CVs
1972 Datsun 510
7-bolt 4G63T, EVO 9 pistons and rods, Garrett GT3076R, "flipped" stock intake, Toyota R154, Z31 R200 w/ CVs
-
jeffball610
- Too Much Time on His Hands
- Posts: 619
- Joined: Wed Feb 22, 2006 5:29 am
- Location: Las Vegas, NV
I stripped the block last night to find out what the damage is. Here you go:
#2 Rod Bearing
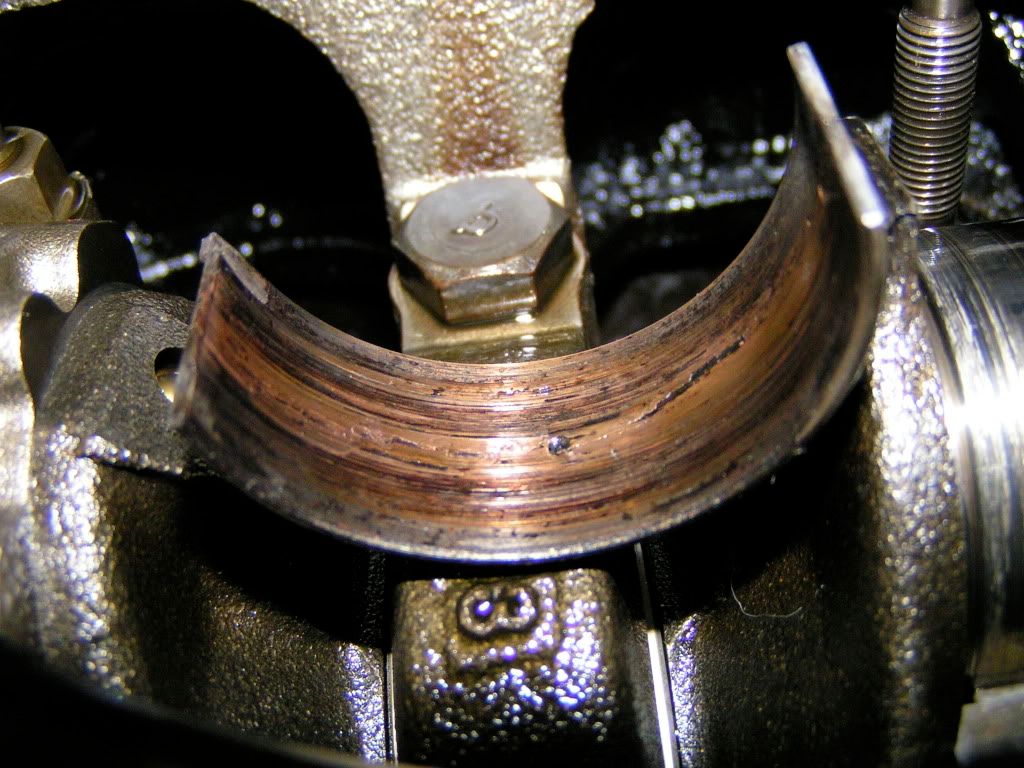
#2 Rod Bearing Cap
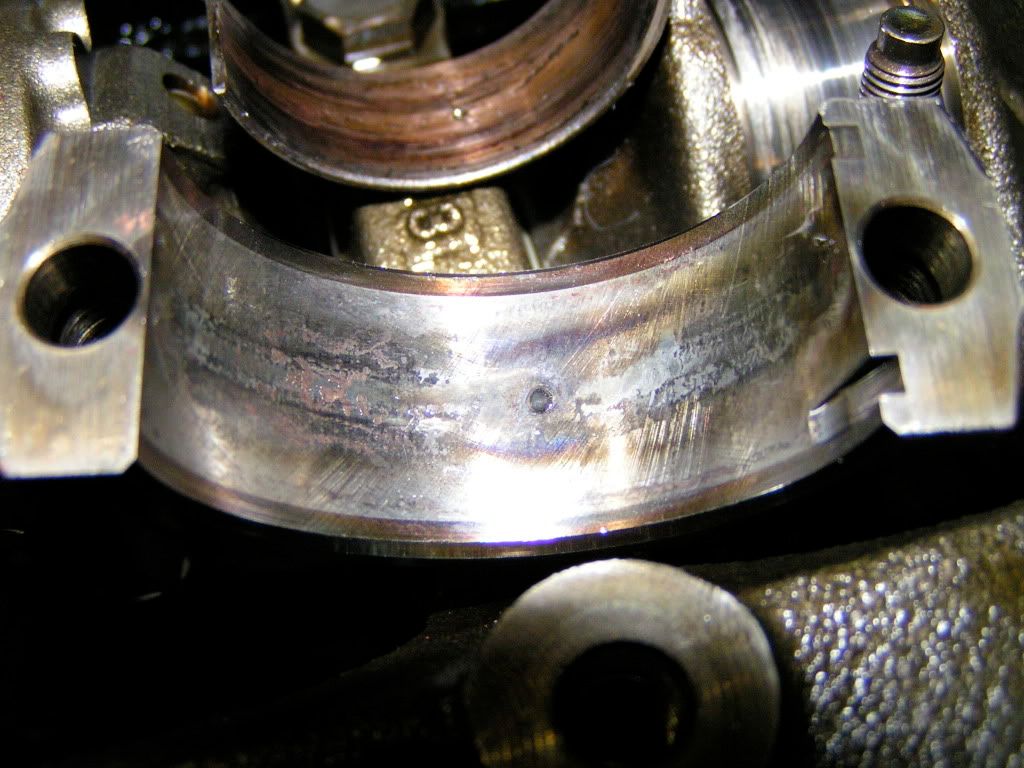
#2 Crank
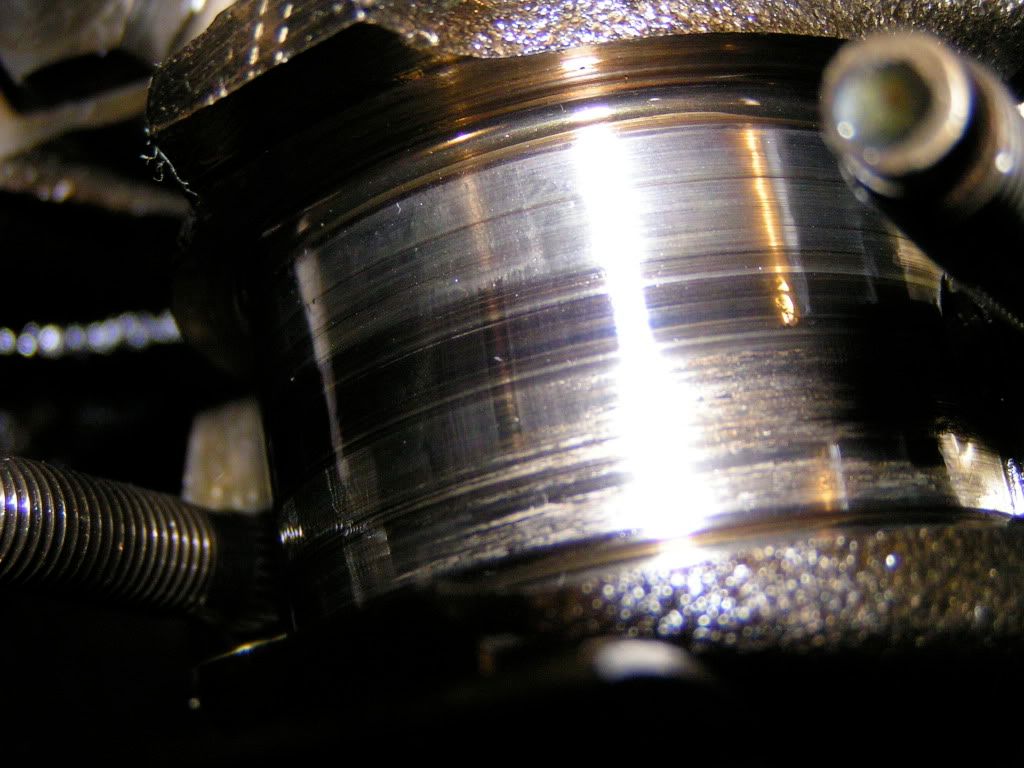
This one seemed the worst of all of them. I don't have enough experience to tell if the crank or rods are reusable. I'll get an opinion from Trevtec and see what he says. I will likely have to source another motor. Best case scenario is new bearings, rings and a cylinder hone. I doubt I'm that lucky.
More Pics here:
http://s165.photobucket.com/albums/u71/ ... G%20block/
#2 Rod Bearing
#2 Rod Bearing Cap
#2 Crank
This one seemed the worst of all of them. I don't have enough experience to tell if the crank or rods are reusable. I'll get an opinion from Trevtec and see what he says. I will likely have to source another motor. Best case scenario is new bearings, rings and a cylinder hone. I doubt I'm that lucky.
More Pics here:
http://s165.photobucket.com/albums/u71/ ... G%20block/
Do it in a Datsun!
1972 Datsun 510
7-bolt 4G63T, EVO 9 pistons and rods, Garrett GT3076R, "flipped" stock intake, Toyota R154, Z31 R200 w/ CVs
1972 Datsun 510
7-bolt 4G63T, EVO 9 pistons and rods, Garrett GT3076R, "flipped" stock intake, Toyota R154, Z31 R200 w/ CVs
-
Bill Hincher
- Donating Member
- Posts: 1625
- Joined: Thu Jun 22, 2006 8:57 pm
- Location: Toledo,Ohio
- Contact:
-
screemin eagle
- Too Much Time on His Hands
- Posts: 355
- Joined: Thu Feb 03, 2005 1:50 am
-
Bill Hincher
- Donating Member
- Posts: 1625
- Joined: Thu Jun 22, 2006 8:57 pm
- Location: Toledo,Ohio
- Contact:
-
77amc
- Too Much Time on His Hands
- Posts: 455
- Joined: Wed Jun 06, 2007 1:41 am
- Location: N-W Mississippi, Under Memphis
IF you're dead set on using that particular crank, you could have it ground and then Chrome plated to your spec.
I knew some guys out in Nashville that were doing that with some racecars and having good luck. They could get it to have a clearance of under a thou.
Otherwise At the local Advance auto parts, you could just order a 'crank kit' with bearings for under 180.00
E
I knew some guys out in Nashville that were doing that with some racecars and having good luck. They could get it to have a clearance of under a thou.
Otherwise At the local Advance auto parts, you could just order a 'crank kit' with bearings for under 180.00
E
Sorry to hear the bad luck on the engine.
If it helps, you can get a used crank out of another motor and run it as long as it is within spec. You can do that for rods also.
In fact, you might be surprised to hear that NT 4G63's use the same crank and rods (and block if you drill the oil squirters) as turbo, so if you have a "Pull-a-Part" or equivalent around, you can source a rotating assembly for under $100.
-
Bill Hincher
- Donating Member
- Posts: 1625
- Joined: Thu Jun 22, 2006 8:57 pm
- Location: Toledo,Ohio
- Contact:
-
Matt Arruda
- Addict
- Posts: 127
- Joined: Sun Dec 21, 2008 9:04 pm
- Location: Fall River Ma
- Contact:
Take Bill's word on this I learned the hard way lost 2 motors.Bill Hincher wrote:the trouble with a 'rebuilt' crankshaft is they dont get re hardened right, they are hung from hooks and run through an oven to heat them, and they warp.
They all come from 'topline' in Chicago
At the factory, they are rotated as they are heat treated and they dont warp
ALWAYS USE STD. OEM CRANKS
-
jeffball610
- Too Much Time on His Hands
- Posts: 619
- Joined: Wed Feb 22, 2006 5:29 am
- Location: Las Vegas, NV
It's coming back from the dead! I have all the materials for a rebuild with the exception of a crank. I still can't find a good used 7-bolt crank. The salvage yards are full of 1G 7-bolts when I don't need one, but now, they seem to be extinct. With any luck, by next weekend, I will have a rebuild motor.
I still have a ton of other things to do, but this will be a big step for me. Unfortunately, it's cutting into my $10k budget, but I think I've saved enough money in other areas that I can "splurge" for a rebuild. I'll take lots of pics and post my progress. Once I get it "running" I have a friend with a shop where I can get some other major things done like exhaust, intercooler pipes, driveshaft, brake/fuel lines etc.
See you soon. (hopefully)
Do it in a Datsun!
1972 Datsun 510
7-bolt 4G63T, EVO 9 pistons and rods, Garrett GT3076R, "flipped" stock intake, Toyota R154, Z31 R200 w/ CVs
1972 Datsun 510
7-bolt 4G63T, EVO 9 pistons and rods, Garrett GT3076R, "flipped" stock intake, Toyota R154, Z31 R200 w/ CVs
-
jeffball610
- Too Much Time on His Hands
- Posts: 619
- Joined: Wed Feb 22, 2006 5:29 am
- Location: Las Vegas, NV
I appreciate the offers, but with the price of buying one from you guys + shipping, it will cost way more than a used one from the yard. I can get them for $40 if I can find one. I'm not in a huge hurry, but I just want to get this part over with so I can move on.
Do it in a Datsun!
1972 Datsun 510
7-bolt 4G63T, EVO 9 pistons and rods, Garrett GT3076R, "flipped" stock intake, Toyota R154, Z31 R200 w/ CVs
1972 Datsun 510
7-bolt 4G63T, EVO 9 pistons and rods, Garrett GT3076R, "flipped" stock intake, Toyota R154, Z31 R200 w/ CVs
-
Bill Hincher
- Donating Member
- Posts: 1625
- Joined: Thu Jun 22, 2006 8:57 pm
- Location: Toledo,Ohio
- Contact:
-
jeffball610
- Too Much Time on His Hands
- Posts: 619
- Joined: Wed Feb 22, 2006 5:29 am
- Location: Las Vegas, NV
Decide? I thought you set these up to use the stock Mistu fork and Toyota throw out bearing. I hope that's what it's supposed to be, because that's what I have. I haven't opened up the flywheel to accept the transmission input shaft yet. I'll do that when the engine is built and have another look at what's there.
The only other issue I can see right now is the location for the fluid input line to the clutch slave cylinder. The stock port for the slave you gave me (Toyota truck?) is facing the motor and interferes with my steering link. I need to get one that points another way. I believe the Corolla unit faces side ways and should work, but I don't have one to test yet. That's coming up on the agenda as well.
There's about a billion other small issues like this that I need to figure out, but it's one step at a time.
Do it in a Datsun!
1972 Datsun 510
7-bolt 4G63T, EVO 9 pistons and rods, Garrett GT3076R, "flipped" stock intake, Toyota R154, Z31 R200 w/ CVs
1972 Datsun 510
7-bolt 4G63T, EVO 9 pistons and rods, Garrett GT3076R, "flipped" stock intake, Toyota R154, Z31 R200 w/ CVs
-
Bill Hincher
- Donating Member
- Posts: 1625
- Joined: Thu Jun 22, 2006 8:57 pm
- Location: Toledo,Ohio
- Contact:
-
jeffball610
- Too Much Time on His Hands
- Posts: 619
- Joined: Wed Feb 22, 2006 5:29 am
- Location: Las Vegas, NV
New parts! I finally got my clutch master cylinder that I think will work. Also got this in yesterday:
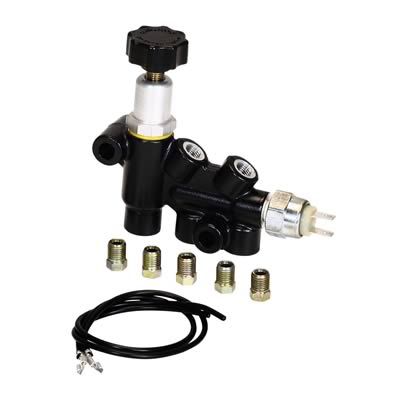
Now I can bend all of my brake lines. (or try to) It has a built in brake bias adjuster and takes my 280ZX dual out master cylinder and sends it out to 3 lines. 2 front and one rear. I just need to build a little bracket for this baby and then get to building the rest of the system. I've been putting off building the brake lines because I haven't found anything to separate the lines out from the master cylinder that I liked. So, hopefully this is the piece that gets the car building back on track.
Now I can bend all of my brake lines. (or try to) It has a built in brake bias adjuster and takes my 280ZX dual out master cylinder and sends it out to 3 lines. 2 front and one rear. I just need to build a little bracket for this baby and then get to building the rest of the system. I've been putting off building the brake lines because I haven't found anything to separate the lines out from the master cylinder that I liked. So, hopefully this is the piece that gets the car building back on track.
Do it in a Datsun!
1972 Datsun 510
7-bolt 4G63T, EVO 9 pistons and rods, Garrett GT3076R, "flipped" stock intake, Toyota R154, Z31 R200 w/ CVs
1972 Datsun 510
7-bolt 4G63T, EVO 9 pistons and rods, Garrett GT3076R, "flipped" stock intake, Toyota R154, Z31 R200 w/ CVs
-
jeffball610
- Too Much Time on His Hands
- Posts: 619
- Joined: Wed Feb 22, 2006 5:29 am
- Location: Las Vegas, NV
Finally got around to posting pics of my front brake lines. As soon as I finish some work on my Colt, I'll make room to get under the 510 and run the rear lines.
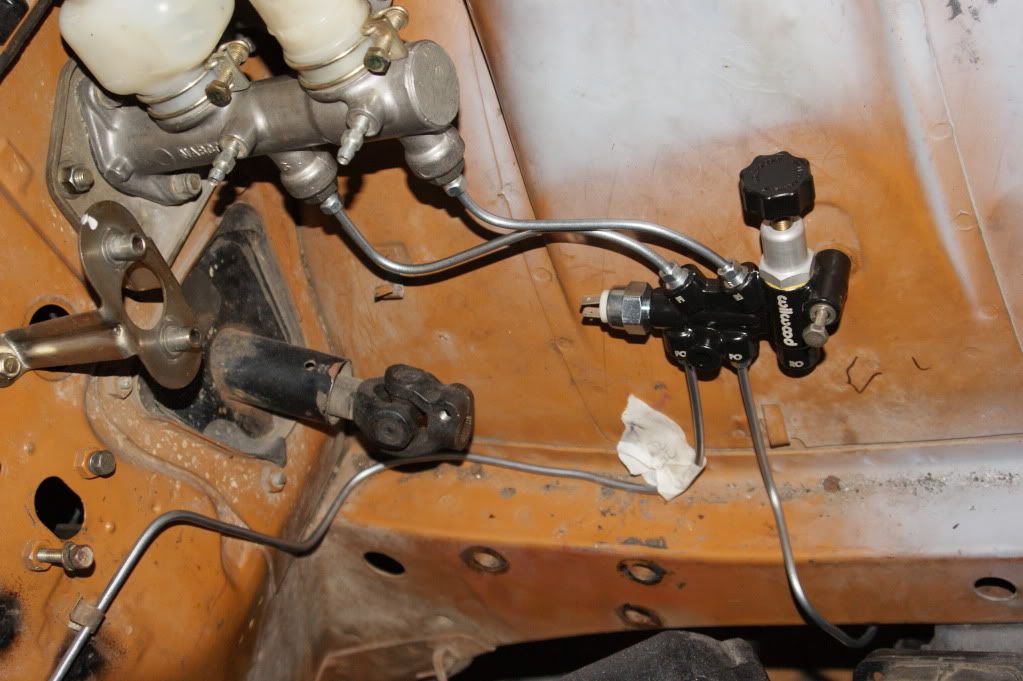
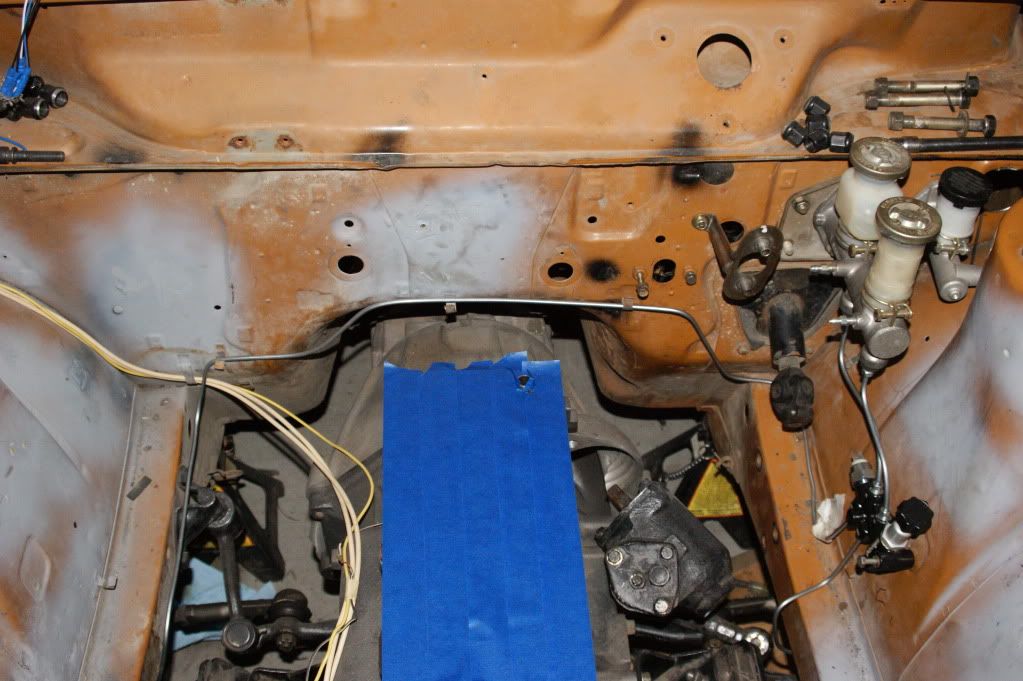
Not impressive, but not too bad for my first try. It needs some tweaking and I'm going to paint all the lines black for protection and to just not be silver.
I also figure out a solution (somewhat) to the clutch slave cylinder. A unit from an 86 Corolla GTS seems to work. There is tight clearance between it and the steering link, but it clears. I might grind the link a little. I will also need to adjust the steering stop on the driver's side. At full lock, the outer link hits the slave cylinder. I won't lose too much steering angle, but it will need to be resolved to avoid issues.
Do it in a Datsun!
1972 Datsun 510
7-bolt 4G63T, EVO 9 pistons and rods, Garrett GT3076R, "flipped" stock intake, Toyota R154, Z31 R200 w/ CVs
1972 Datsun 510
7-bolt 4G63T, EVO 9 pistons and rods, Garrett GT3076R, "flipped" stock intake, Toyota R154, Z31 R200 w/ CVs
-
jeffball610
- Too Much Time on His Hands
- Posts: 619
- Joined: Wed Feb 22, 2006 5:29 am
- Location: Las Vegas, NV
No pics or real updates, but wanted to let everyone know I'm into full gear now. I'm sitting down with a friend who owns a shop tomorrow to help plan out the last few stages.
I've also been hunting online for tires. Anyone have suggestions? I have 16x7 rims and was thinking maybe a 205/50/16. There's plenty of tires in that range for a decent price. I'm also staring to look at camber plates, but I'll need to price the machine work for custom bump steer spacers. I also have to factor in light machine work on a flywheel, head resurface, wheel spacers and a custom drive shaft. I'll try to map out an estimate of what else needs to be done to get it road worthy. It's a long way off, but with Spring Break in a week and some positive cash flow, I don't see a reason why I can't try to get it on the road by summer. It's been a long 5 years of just sitting, it's time to get it back on the road.
I've also been hunting online for tires. Anyone have suggestions? I have 16x7 rims and was thinking maybe a 205/50/16. There's plenty of tires in that range for a decent price. I'm also staring to look at camber plates, but I'll need to price the machine work for custom bump steer spacers. I also have to factor in light machine work on a flywheel, head resurface, wheel spacers and a custom drive shaft. I'll try to map out an estimate of what else needs to be done to get it road worthy. It's a long way off, but with Spring Break in a week and some positive cash flow, I don't see a reason why I can't try to get it on the road by summer. It's been a long 5 years of just sitting, it's time to get it back on the road.
Do it in a Datsun!
1972 Datsun 510
7-bolt 4G63T, EVO 9 pistons and rods, Garrett GT3076R, "flipped" stock intake, Toyota R154, Z31 R200 w/ CVs
1972 Datsun 510
7-bolt 4G63T, EVO 9 pistons and rods, Garrett GT3076R, "flipped" stock intake, Toyota R154, Z31 R200 w/ CVs
-
jeffball610
- Too Much Time on His Hands
- Posts: 619
- Joined: Wed Feb 22, 2006 5:29 am
- Location: Las Vegas, NV
The Hankooks look nice, but this will be a street car that only sees the track occasionally. I might stick with the General Exclaim UHPs that I have run for several years on my Colt. They're dirt cheap, offer good grip and excellent wear. At least in my case.
In the future, I would like to go with some track tires on track days. But this is well beyond where I am now.
In the future, I would like to go with some track tires on track days. But this is well beyond where I am now.
Do it in a Datsun!
1972 Datsun 510
7-bolt 4G63T, EVO 9 pistons and rods, Garrett GT3076R, "flipped" stock intake, Toyota R154, Z31 R200 w/ CVs
1972 Datsun 510
7-bolt 4G63T, EVO 9 pistons and rods, Garrett GT3076R, "flipped" stock intake, Toyota R154, Z31 R200 w/ CVs
-
jeffball610
- Too Much Time on His Hands
- Posts: 619
- Joined: Wed Feb 22, 2006 5:29 am
- Location: Las Vegas, NV
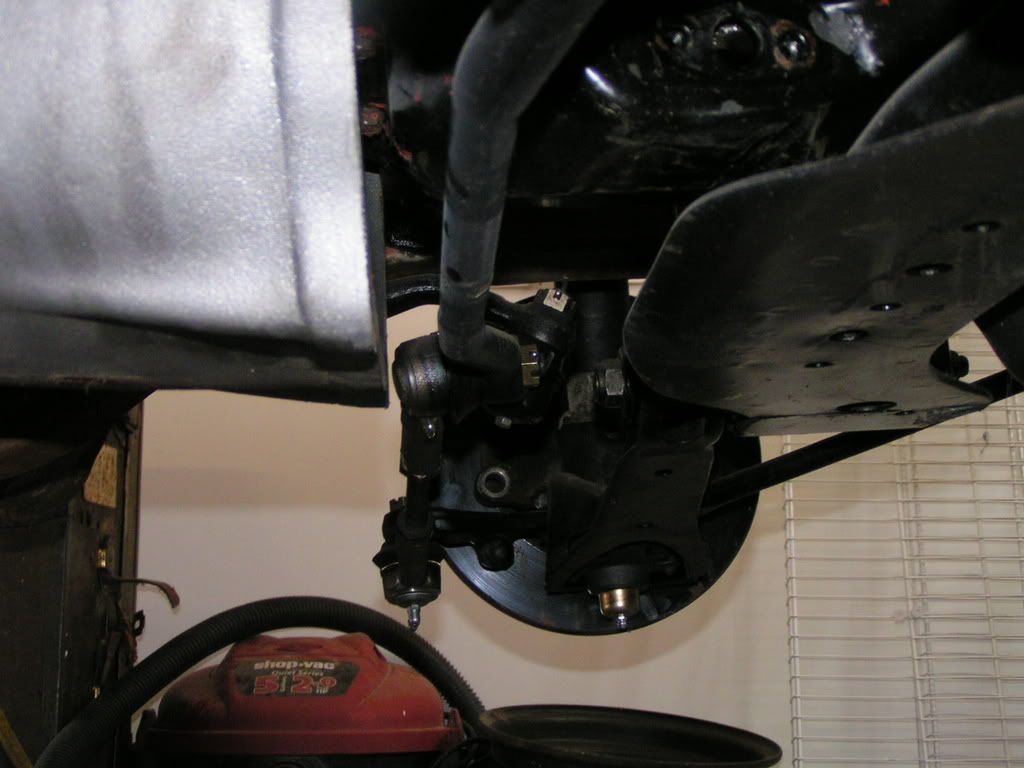
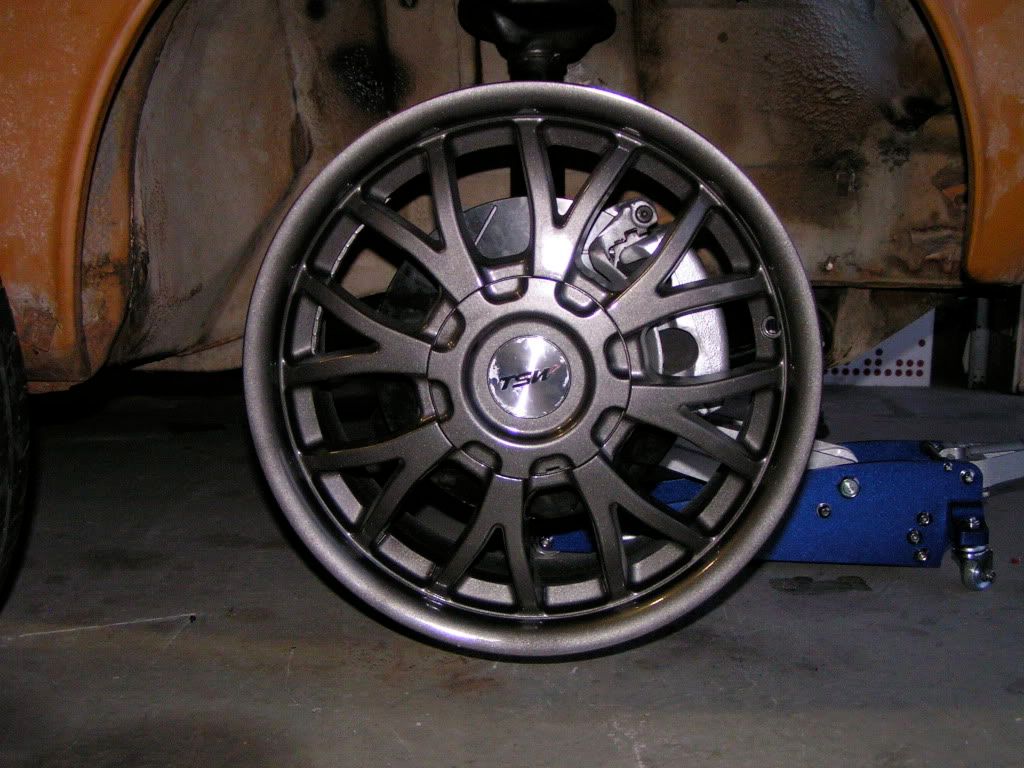
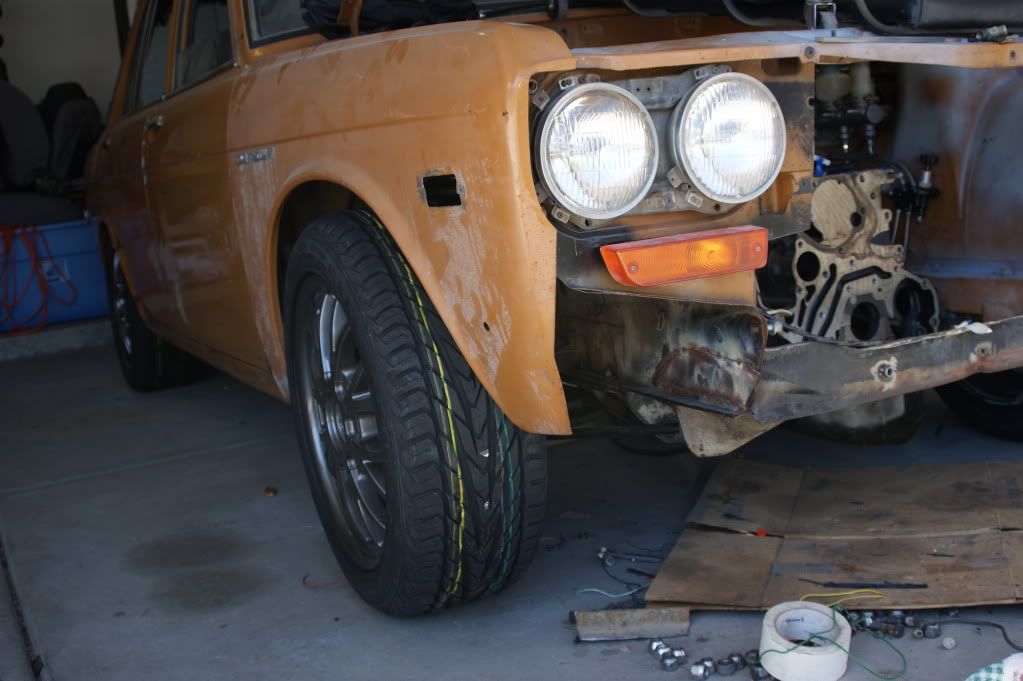
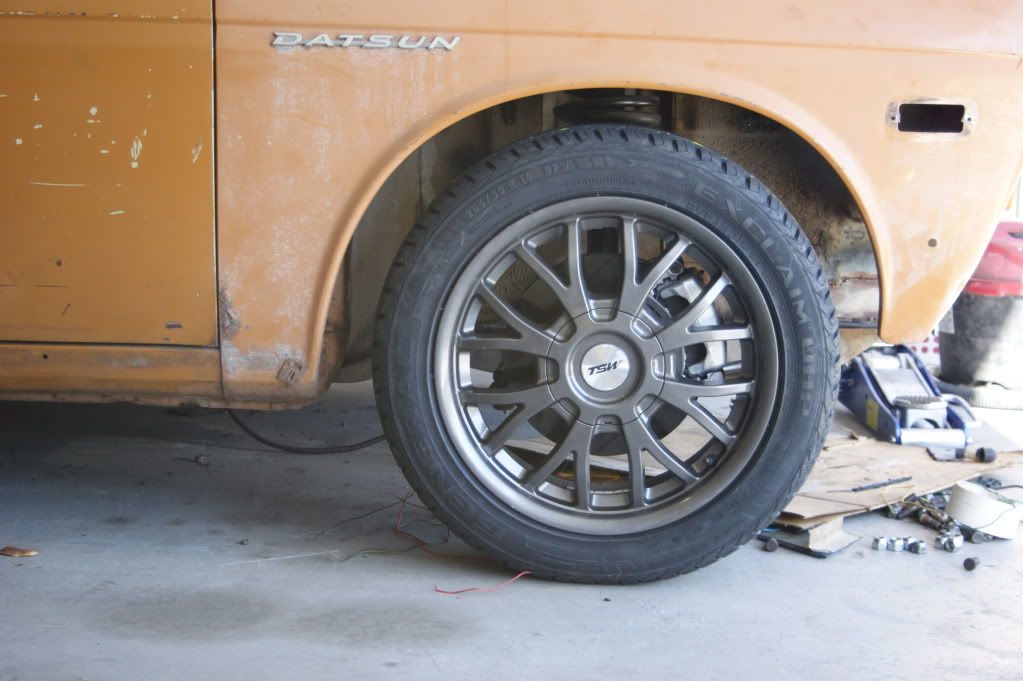
Things are starting to come together. I just got some more parts ordered including a crank, so now I can assemble the motor. But most importantly (for now) I got me some tires! Finally got to mount the TSW Kyalami wheels that I've been lusting over since before I even had this car. I found a set about 8 months ago and now I have tires. These are 16x7 +38 (I think) wheels with 205/50/16 tires. I also have 10mm spacers on all four corners right now. The rear spacers are actually behind the rotors to space the rotor out for the calipers. I think I need the proper turbo calipers on the rear. But as it is, I think there is going to be room for some 225 width tires in the future. I'll need to do some more work on the front before I can decide if there is room for more tire. Enough talk. Here's some pics:
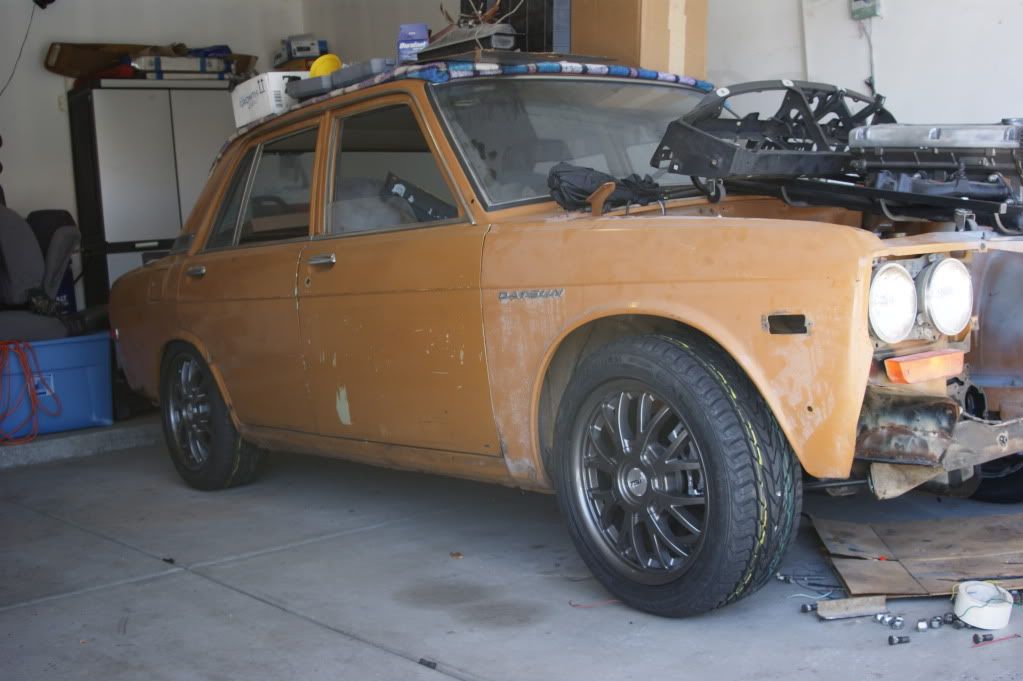
You can see the positive camber here from the S12 V6 struts.
Front is way too high, but I will wait until I get my camber plates to make adjustments to the spring perch. I have a set of springs from Specialty Engineering mounted on 510 perches to the stock location on the S12 V6 struts. They're just tack welded for now.
The rear looks much better.
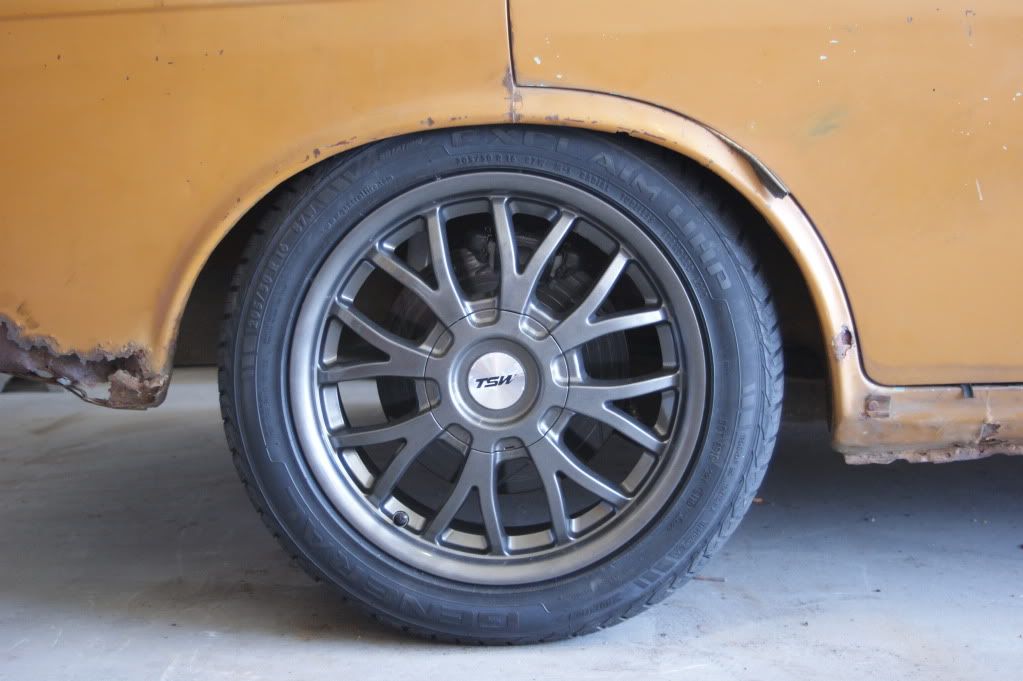
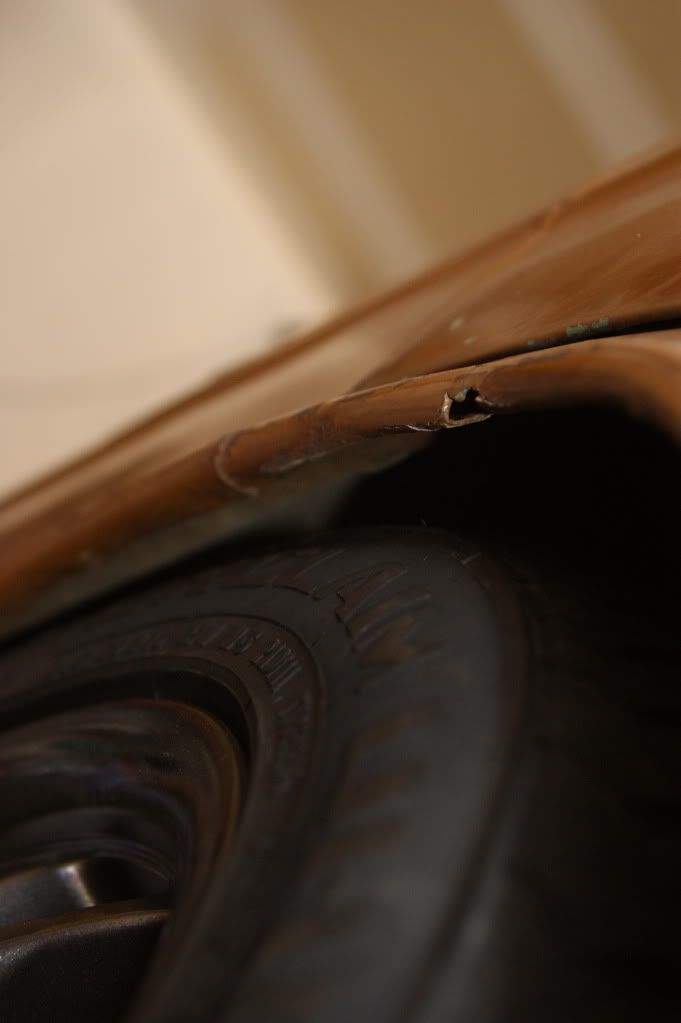
I cut just a little out of the lip and folded it in. I will make it look much neater when things get closer to the body work stage. And fix that spot full of bondo that cracked For now, they are clear of the tires.
You can see the positive camber here from the S12 V6 struts.
Front is way too high, but I will wait until I get my camber plates to make adjustments to the spring perch. I have a set of springs from Specialty Engineering mounted on 510 perches to the stock location on the S12 V6 struts. They're just tack welded for now.
The rear looks much better.
I cut just a little out of the lip and folded it in. I will make it look much neater when things get closer to the body work stage. And fix that spot full of bondo that cracked For now, they are clear of the tires.
Do it in a Datsun!
1972 Datsun 510
7-bolt 4G63T, EVO 9 pistons and rods, Garrett GT3076R, "flipped" stock intake, Toyota R154, Z31 R200 w/ CVs
1972 Datsun 510
7-bolt 4G63T, EVO 9 pistons and rods, Garrett GT3076R, "flipped" stock intake, Toyota R154, Z31 R200 w/ CVs
-
jeffball610
- Too Much Time on His Hands
- Posts: 619
- Joined: Wed Feb 22, 2006 5:29 am
- Location: Las Vegas, NV
Got quite a few updates.
First I installed the Top End Performance camber plates. Pretty simple device. I can only get it to move about a half inch in for negative camber from stock. I don't know if that will be enough with the positive camber the S12 struts provide. I think I can modify them to get another quarter to half inch more movement, but I will wait and see. I'll take some pics of the camber when I install the motor again so the weight will be about where it needs to be. For now, here you go.
Here's the kit laid out.
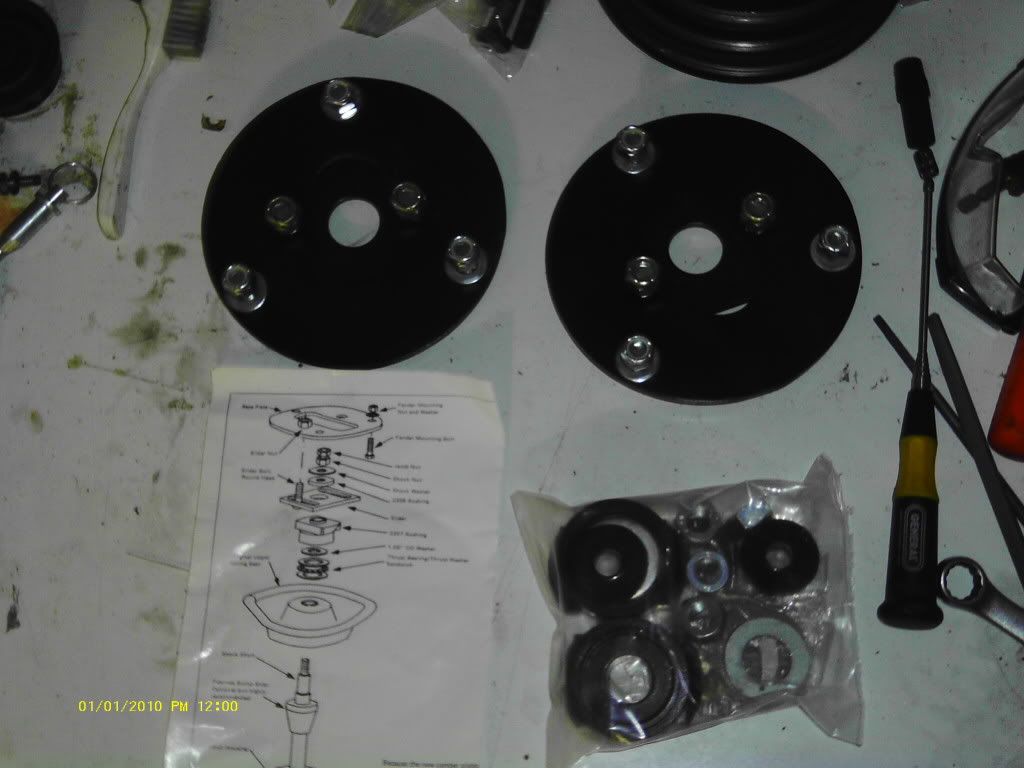
Stock strut top.
TEP strut top. I have already cut the strut tower a little more for getter clearance on the other side. I will take care of this side when I start to disassemble the car again.
And now the exciting stuff. (for me at least)
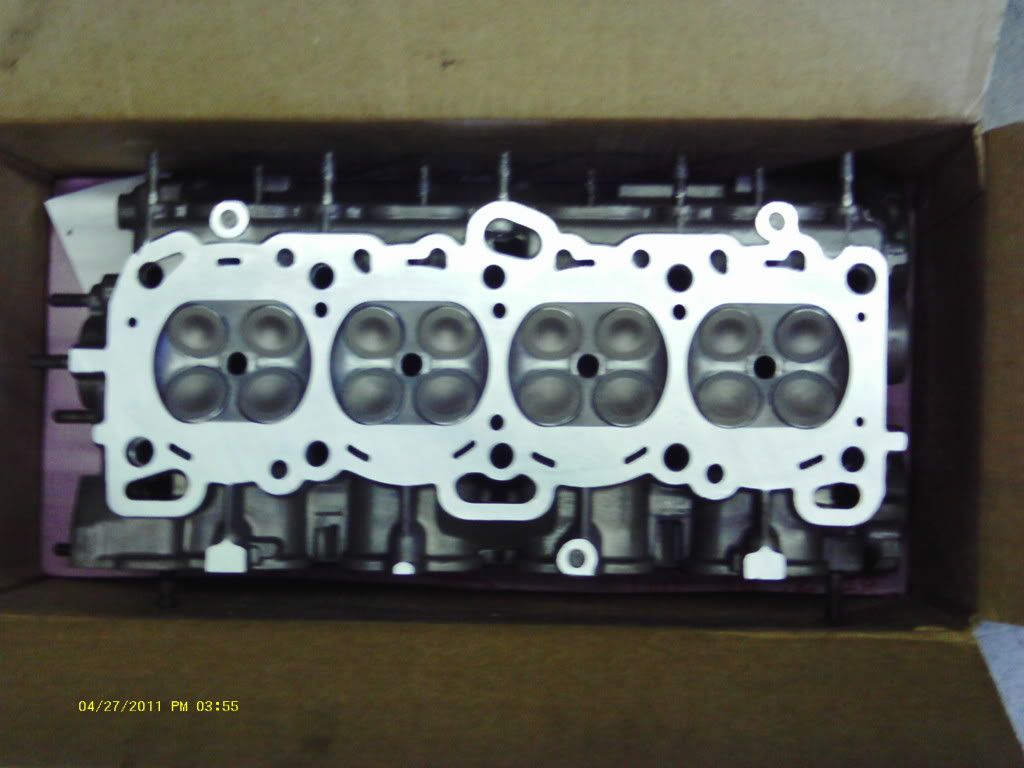
Freshly machined head.
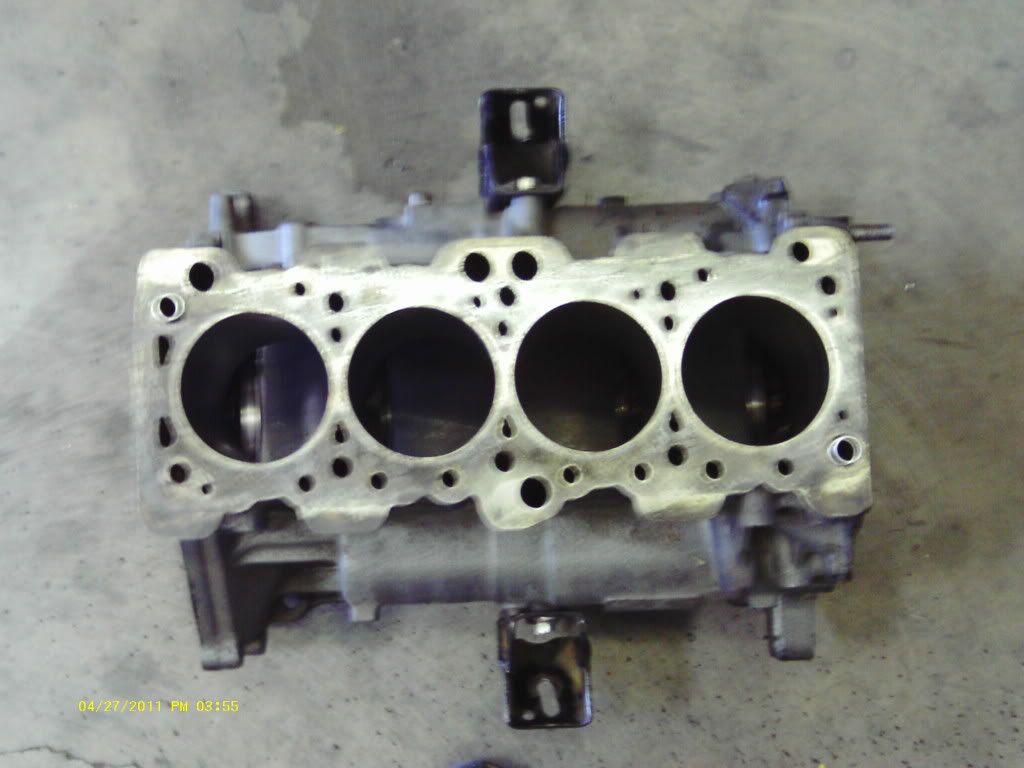
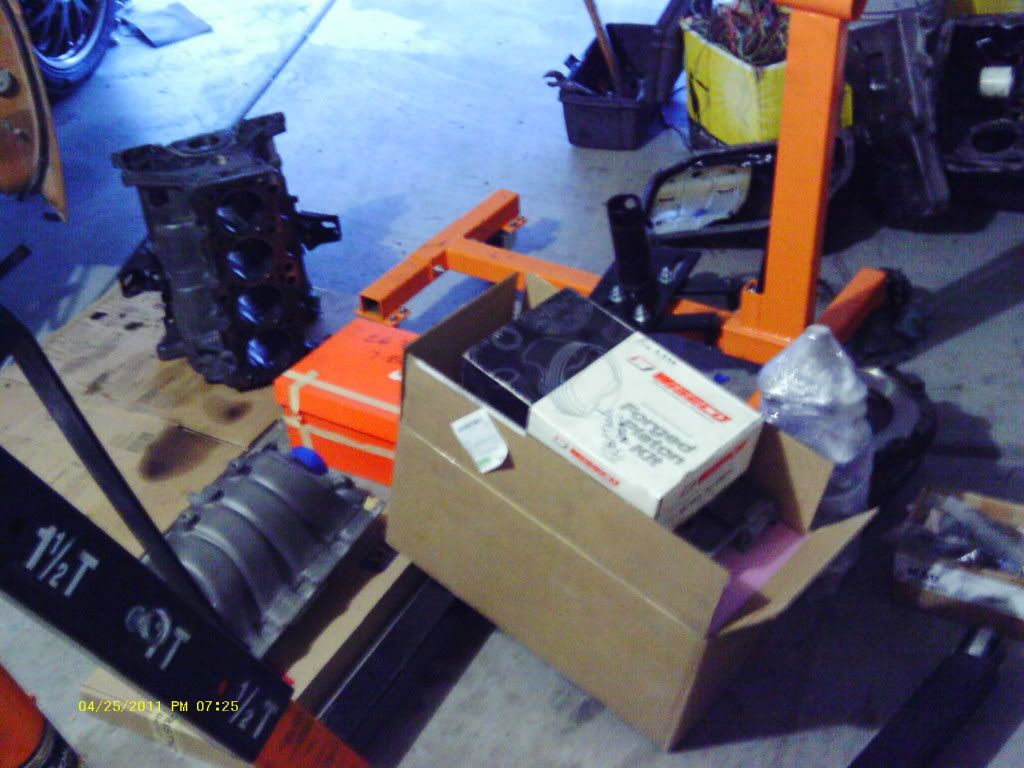
Dirty block ready for parts.
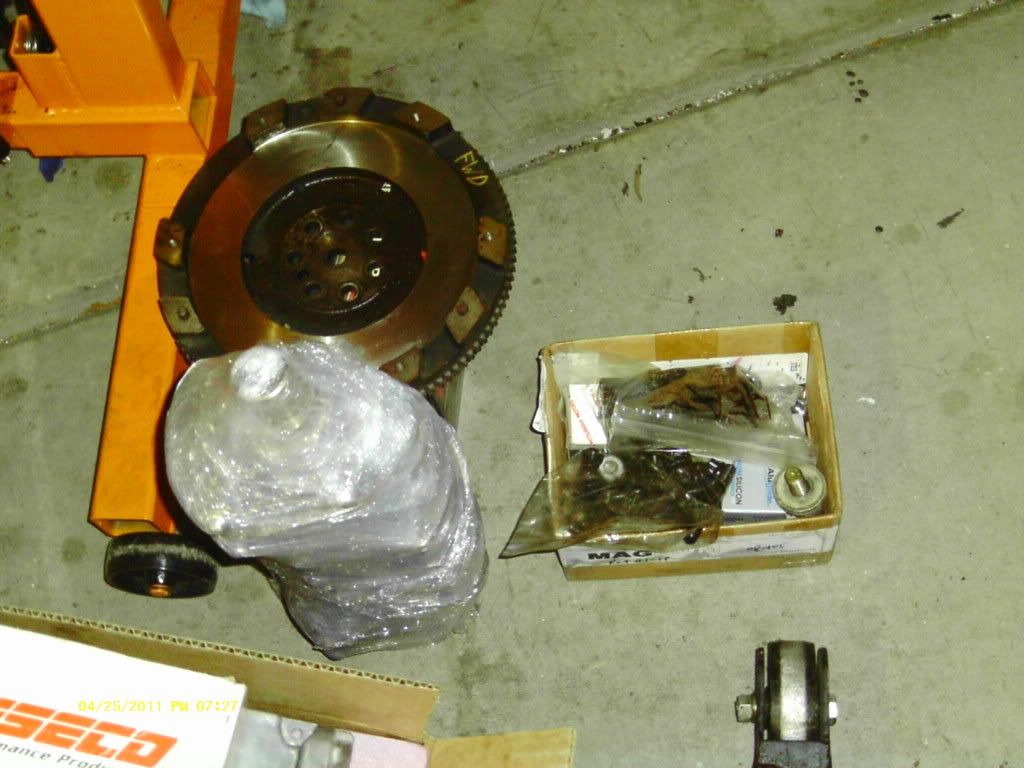
Parts to be assembled.
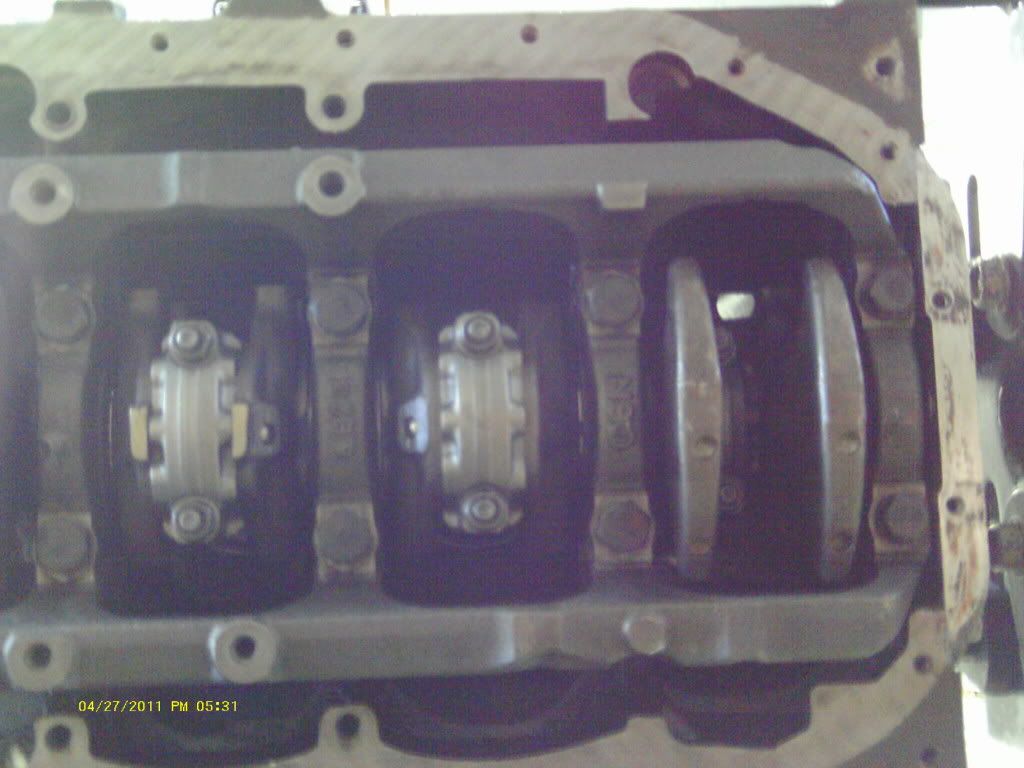
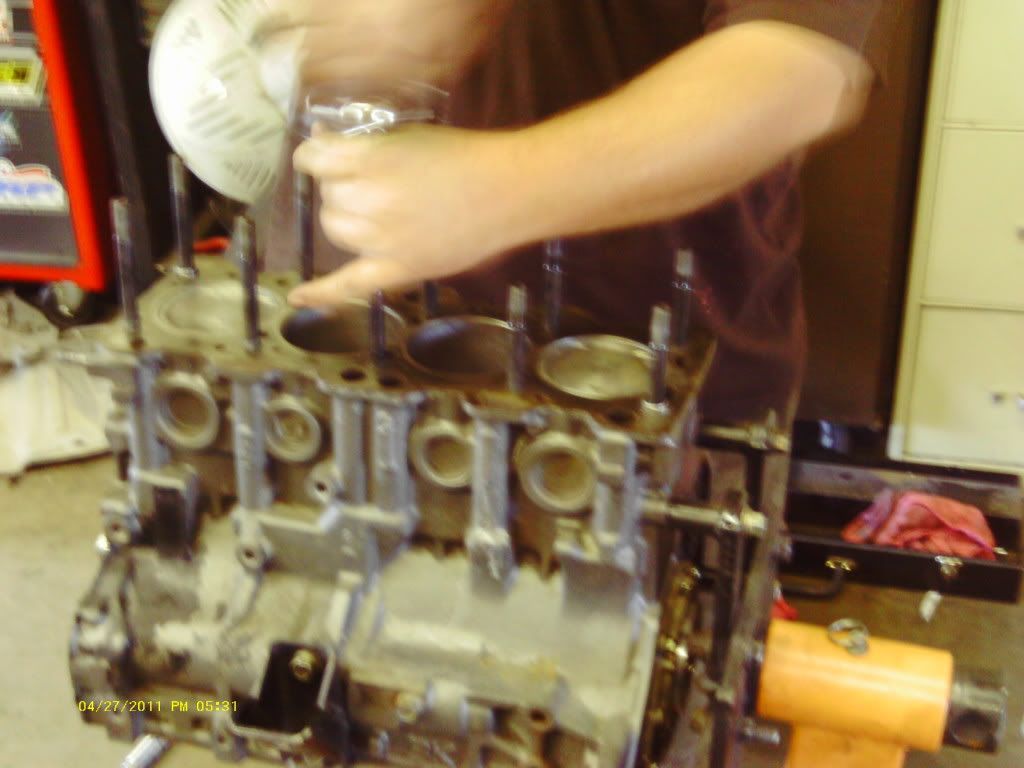
Assembled bottom end. I guess I didn't get a picture of the EVO 8 pistons from the top.
ARP head studs.
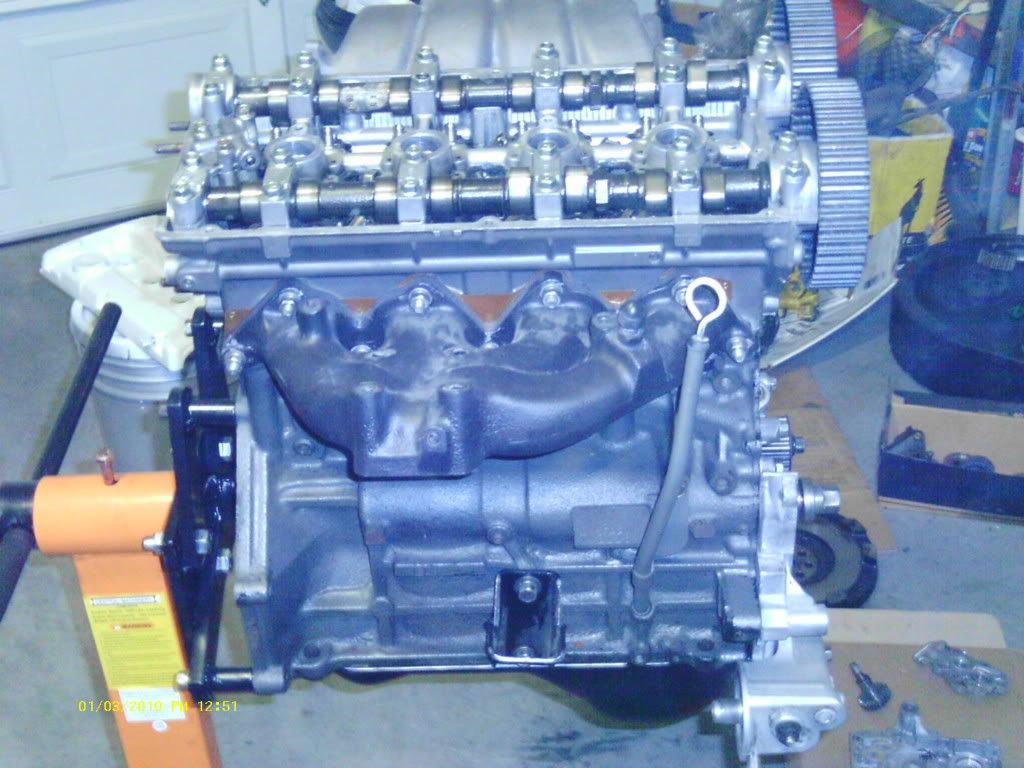
Engine assembled.
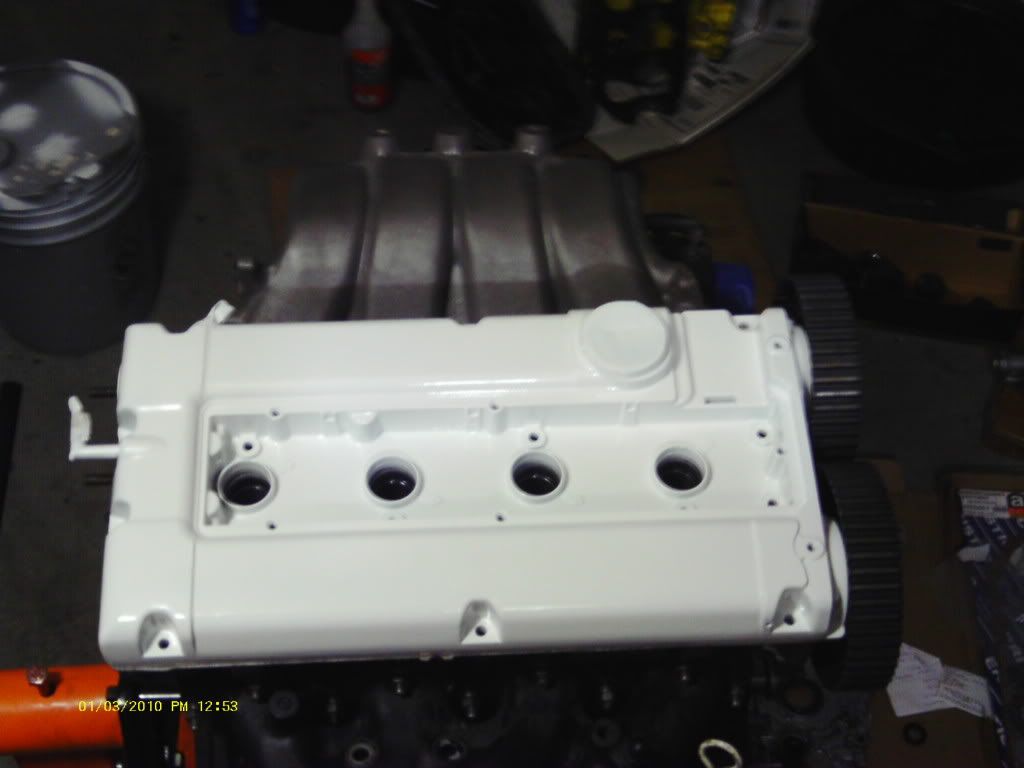
White valve cover. I will likely paint some type of design on here for fun.
That's if for now. I'm still sorting out the custom clutch assembly parts and finishing sealing up the motor with small stuff like valve cover and oil pan. Then it's back in the car to hopefully get it running. I still need to sort out some wiring for the initial startup, but the parts are all there.
PS my $37 10 megapixle camera sucks!
First I installed the Top End Performance camber plates. Pretty simple device. I can only get it to move about a half inch in for negative camber from stock. I don't know if that will be enough with the positive camber the S12 struts provide. I think I can modify them to get another quarter to half inch more movement, but I will wait and see. I'll take some pics of the camber when I install the motor again so the weight will be about where it needs to be. For now, here you go.
Here's the kit laid out.
Stock strut top.
TEP strut top. I have already cut the strut tower a little more for getter clearance on the other side. I will take care of this side when I start to disassemble the car again.
And now the exciting stuff. (for me at least)
Freshly machined head.
Dirty block ready for parts.
Parts to be assembled.
Assembled bottom end. I guess I didn't get a picture of the EVO 8 pistons from the top.
ARP head studs.
Engine assembled.
White valve cover. I will likely paint some type of design on here for fun.
That's if for now. I'm still sorting out the custom clutch assembly parts and finishing sealing up the motor with small stuff like valve cover and oil pan. Then it's back in the car to hopefully get it running. I still need to sort out some wiring for the initial startup, but the parts are all there.
PS my $37 10 megapixle camera sucks!
Do it in a Datsun!
1972 Datsun 510
7-bolt 4G63T, EVO 9 pistons and rods, Garrett GT3076R, "flipped" stock intake, Toyota R154, Z31 R200 w/ CVs
1972 Datsun 510
7-bolt 4G63T, EVO 9 pistons and rods, Garrett GT3076R, "flipped" stock intake, Toyota R154, Z31 R200 w/ CVs