I'm about to get my block back from my cousin to bolt my head to. I have some questions about water holes in the headgasket to reverse the flow as well as some info on water pipes to use.
Question. Is it really necessary to block off the 2 small front holes in the head if you've drilled the holes in the back of the head? If you don't there is another hole even bigger about an inch further along so I doubt blocking these off would restrict the flow very much around cylinder 1.
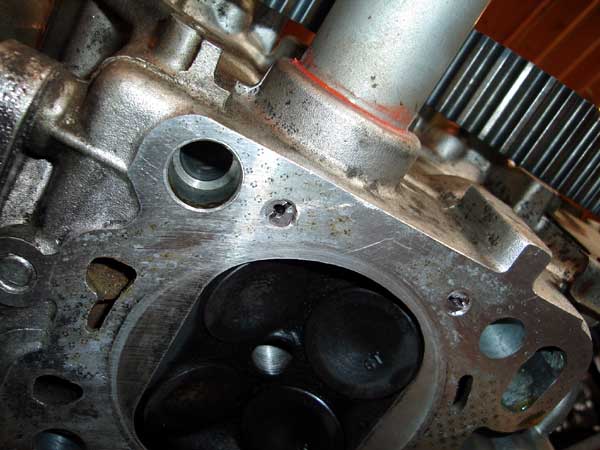
Info. The water pipe that you will likely eliminate under the exhaust manifold is 35mm O.D. The hole that you need to put it in in the front of the head is 35mm I.D. The pipe may be a little too loose to press fit, but they tend to vary a little and you can usually find a thicker part. If not you can just oval it a little bit with a hammer and it will hold pretty well and RTV can fill in the sliver of a gap. This thin walled steel tube will allow for lots of flow OUT of the head which I'm sure Bill will appreciate.
More Info. Its easy to punch holes in a MLS head gasket (if you know someone with a big punch machine). If anyone has any trouble I'd be happy to order the gasket for you, get it punched in the right spot and send it along to you. The key is to not touch the embossing in the spring steel. Other water holes in the head do not have embossing around them either, so these new holes are impossible to tell apart from the others..
Head Water Flow Tricks
Moderators: DJpowerHaus, mattmartindrift
-
DJpowerHaus
- Sir Post A Lot
- Posts: 1779
- Joined: Wed Apr 07, 2004 3:24 pm
- Location: Baltimore, MD
- Contact:
Head Water Flow Tricks

Getting the engine bolted in is about 10% of the way there.
The next 80% can go quickly with help and skill.
That last 10% takes about as long as the 90% that came before it.
Re: Head Water Flow Tricks
Once I get an affirmation that the head-flow-reversal works fine from more than one person (and works correctly, as if it were OEM) then I'd be willing to do it myself. I guess I"m hoping for a thread here all about it where even just one person says "yes it works great and here's how." Eric (BMW) seemed to have been doing it to his but his latest pictures show that he's still using the rear exit. Did he give up?
-
DJpowerHaus
- Sir Post A Lot
- Posts: 1779
- Joined: Wed Apr 07, 2004 3:24 pm
- Location: Baltimore, MD
- Contact:
How about Punisher from SQC: http://www.starquestclub.com/forums/vie ... light=4g63
or
http://www.jayracing.com/index.php?main ... ucts_id=31
Probably shouldn't have opened a new thread. This one covered most of it:
http://projectzerog.com/forum/viewtopic ... sc&start=0
or
http://www.jayracing.com/index.php?main ... ucts_id=31
Probably shouldn't have opened a new thread. This one covered most of it:
http://projectzerog.com/forum/viewtopic ... sc&start=0
Getting the engine bolted in is about 10% of the way there.
The next 80% can go quickly with help and skill.
That last 10% takes about as long as the 90% that came before it.
-
DJpowerHaus
- Sir Post A Lot
- Posts: 1779
- Joined: Wed Apr 07, 2004 3:24 pm
- Location: Baltimore, MD
- Contact:
I ended up cutting the tips off of some M8x1.25 bolts, notched them with a hack saw so I could install them with a screwdriver. Then I drilled through the center so air wouldn't get caught under neath it. Tapping the head was easier than I thought. I then red locktite'd the plug into the hole. I'll have pictures tomorrow.
Here is a Cometic head gasket with holes punched for flow to the back of the head.

Here is a Cometic head gasket with holes punched for flow to the back of the head.
Last edited by DJpowerHaus on Thu Jun 14, 2007 3:45 pm, edited 1 time in total.
Getting the engine bolted in is about 10% of the way there.
The next 80% can go quickly with help and skill.
That last 10% takes about as long as the 90% that came before it.
-
DJpowerHaus
- Sir Post A Lot
- Posts: 1779
- Joined: Wed Apr 07, 2004 3:24 pm
- Location: Baltimore, MD
- Contact:
Sure am.
Today I modified my water pump to clear the timing components. This was really easy because I had an old pump to practice with. I set the gate on the table saw and cut the pump. It turned out REALLY well. Should have pictures tomorrow.


I will be using the D50 dipstick tube (with a shortened DSM dipstick). I also and getting rid of my rubber turbo oil drain tube in favor of a metal one at least to the bottom to avoid the heat.

I may make my own alternator bracket. The curve of the DSM one looks like it might interfere with the water pipes from the D50 water pump. So far the hot side of of the engine is looking MUCH cleaner and accessible. Even had room to safety wire the alternator bolt.
Still not sure where I will be adding my water temperature sensors. Most likely in a section of pipe between the head and the alternator (I have no thermostat).
Today I modified my water pump to clear the timing components. This was really easy because I had an old pump to practice with. I set the gate on the table saw and cut the pump. It turned out REALLY well. Should have pictures tomorrow.
I will be using the D50 dipstick tube (with a shortened DSM dipstick). I also and getting rid of my rubber turbo oil drain tube in favor of a metal one at least to the bottom to avoid the heat.
I may make my own alternator bracket. The curve of the DSM one looks like it might interfere with the water pipes from the D50 water pump. So far the hot side of of the engine is looking MUCH cleaner and accessible. Even had room to safety wire the alternator bolt.
Still not sure where I will be adding my water temperature sensors. Most likely in a section of pipe between the head and the alternator (I have no thermostat).
Last edited by DJpowerHaus on Thu Jun 14, 2007 3:48 pm, edited 1 time in total.
Getting the engine bolted in is about 10% of the way there.
The next 80% can go quickly with help and skill.
That last 10% takes about as long as the 90% that came before it.
-
Bill Hincher
- Donating Member
- Posts: 1625
- Joined: Thu Jun 22, 2006 8:57 pm
- Location: Toledo,Ohio
- Contact:
-
DJpowerHaus
- Sir Post A Lot
- Posts: 1779
- Joined: Wed Apr 07, 2004 3:24 pm
- Location: Baltimore, MD
- Contact:
I didnt meantion it, but I recently got some shelving and bins for my bolts. It took 3 or 4 days to organize all of them, but it really pays off. Today I needed to find certain size and length bolts and I knew EXACTLY where to look. The next step is cleaning the rusty hardware up.
Bill, I'm not going to open it if its ticking.
Bill, I'm not going to open it if its ticking.
Getting the engine bolted in is about 10% of the way there.
The next 80% can go quickly with help and skill.
That last 10% takes about as long as the 90% that came before it.
-
Bill Hincher
- Donating Member
- Posts: 1625
- Joined: Thu Jun 22, 2006 8:57 pm
- Location: Toledo,Ohio
- Contact:
-
DJpowerHaus
- Sir Post A Lot
- Posts: 1779
- Joined: Wed Apr 07, 2004 3:24 pm
- Location: Baltimore, MD
- Contact:
-
DJpowerHaus
- Sir Post A Lot
- Posts: 1779
- Joined: Wed Apr 07, 2004 3:24 pm
- Location: Baltimore, MD
- Contact:
I got the package Bill. It'll be my summer reading after I finish my Spanish class. Its been really busy between my mom's birthday party, spanish and this car. Forgot to get pictures this weekend.
As of now the water hoses are nearing completion, but I may buy some hoses from the store since these ones are a little too short.
Even with the mods I'm finding that putting the CAS on with the engine in the car is impossible. I will need to either raise the transmission or drop the crossmember to get enough space to install the CAS. REAL pain in the ass.
I revised my upper radiator mount which is now much less likely to injure my radiator. Its SOLID now.
Oil filter housing is on as is the timing cover, pulleys and belts. I had to add a hole on the front of the timing cover for the water pipe and I got it dead on perfect. I also notched the side near the water pump to clear one of the bolts on the RWD water pump. I got lucky and it fits with almost no gaps. The timing cover is hurting on the number of bolts holding it on. I think its down to about 5 now all at the bottom. A top bolt on the intake side can be used luckily and the other holes are only 6mm off and in most cases a ziptie nut works.
Still need to run some fuel through the fuel rail and injectors to make sure that its still clean. Still need to extend wires for the water sensors and the oil pressure light switch. I installed a fuel pressure gauge off of my regulator, but after reading the instructions it says "Do not use on Flex Fuel vehicles" so I dont know. Probably will run it and just check the hose often for cracks or swelling.
Getting the engine bolted in is about 10% of the way there.
The next 80% can go quickly with help and skill.
That last 10% takes about as long as the 90% that came before it.
-
DJpowerHaus
- Sir Post A Lot
- Posts: 1779
- Joined: Wed Apr 07, 2004 3:24 pm
- Location: Baltimore, MD
- Contact:
-
Bill Hincher
- Donating Member
- Posts: 1625
- Joined: Thu Jun 22, 2006 8:57 pm
- Location: Toledo,Ohio
- Contact:
okay,okay,okay, I will help you both, Smog can do DJ's Spanish lessons, DJ can do Smog's kanji exercises, and I will do both of your gurlfriends!
SEEEEEEEEEEEEE! it all works out nicely! what are friends for?
I thought you had a second gen CAS all worked out on the oil pump drive in the front of the engine DJ ?
SEEEEEEEEEEEEE!
I thought you had a second gen CAS all worked out on the oil pump drive in the front of the engine DJ ?
-
DJpowerHaus
- Sir Post A Lot
- Posts: 1779
- Joined: Wed Apr 07, 2004 3:24 pm
- Location: Baltimore, MD
- Contact:
I was still investigating that stuff. Looks like it will be very difficult to pull off though as the 6 bolt and 7 bolt oil pump housings are way different.
Getting the engine bolted in is about 10% of the way there.
The next 80% can go quickly with help and skill.
That last 10% takes about as long as the 90% that came before it.
-
Bill Hincher
- Donating Member
- Posts: 1625
- Joined: Thu Jun 22, 2006 8:57 pm
- Location: Toledo,Ohio
- Contact:
I mounted the temp sensors into the block off plate at the back of the head where the orig water outlet/therm housing were. If you use an electric after market guage, the sensor is very small and the only stock sender I used was for the ECM. I also cut the firewall and made an access door for the CAS so that timing and changing the CAS were possible by removing a couple of wingnuts.
KILL
looking good
ive just ripped all my newly set camblet stuff off to do this water pump conversion as i wasnt aware it was even an option
what model pump are you using?
someone told me the starion pump flange sticks out 15mm further so a custom pulley is required
sounds like you are using one from a mightymax truck though?so no problems and it is the correct length for the pulley placement?
wouldnt know a part number for it would you?
dont want to buy one pump to find out another one was actually a better option
cheers
-
DJpowerHaus
- Sir Post A Lot
- Posts: 1779
- Joined: Wed Apr 07, 2004 3:24 pm
- Location: Baltimore, MD
- Contact:
I am using the D50 pickup truck water pump. I'd guess that this is the same part as the 2.0L Starion pump. The part number is: MD997615. It is NOT the correct length for pulley placement. You will need to smash down the offset of the pulley so that it matches the offset of the DSM pump. Its difficult to get perfect but you can get it close with a press and closer with a hammer.S0LJAH wrote:looking good
ive just ripped all my newly set camblet stuff off to do this water pump conversion as i wasnt aware it was even an option
what model pump are you using?
someone told me the starion pump flange sticks out 15mm further so a custom pulley is required
sounds like you are using one from a mightymax truck though?so no problems and it is the correct length for the pulley placement?
wouldnt know a part number for it would you?
dont want to buy one pump to find out another one was actually a better option
cheers
I FINALLY got my 2nd engine back in and everything hooked up. Today I primed the oil pump (much faster with grease in the pump!) I then started the engine, warmed it up, checked that timing was close, checked for leaks, and started my break in. Ran the engine around 3000rpm for 15 min, stopped to put some bolts in my valve cover because the 2 that were in it were not enough to seal the oil in. Started up again and ran it up around 3000 then I did some reving to get some vacuum to clear the metal from the rings. I was done in about 45 min. Temperatures never went above boiling, no weird air bubbles, and the system even seems to have bled itself pretty easily.
After I cooled it down and shut it off, I pulled the plugs and did a compression test. The results were strange: 136, 138, 156, 160. The 2 rear cylinders were higher. Starting to think that there is still water flow problems in the back and the pistons are warmer (and thus bigger) back there.
It will be pretty easy to run a hose from my blockoff plate to the water pump to get some more flow back there. Tomorrow I'll do a compression test when cold to see what that says. I have a feeling it'll be pretty even when cooled off.
I'll also be re torquing my head tomorrow. I'll also try to track down a laser thermometer which might tell me something as well.
EDIT. JUST remember that I didnt hold the throttle plate open while cranking. Not sure if this would make a difference or not.
Getting the engine bolted in is about 10% of the way there.
The next 80% can go quickly with help and skill.
That last 10% takes about as long as the 90% that came before it.
I find those compression readings strange, as well. I've never done a compression test on a fresh-ring motor, but in my experience with well-broken in motors (~150k miles) the difference between hot and cold numbers weren't as far off as yours.
If I'd gotten those numbers, I'd first think that there was something going on between cylinders 1 and 2 - obviously something along the lines of headgasket issues due to warped/cracked/scored head or block or simply a headgasket failure.
However, I suspect you're more knowledgable than I; also, your idea regarding warmer rear cylinders is absolutely plausible. it'd be sweet to be able to stick sensors inside the head and block in various areas. I was going to mentino that You MIGHT try getting one of those guns that can measure temperature from afar and point it at different parts along the block - I'd try along the intake side and see if there's any difference. That'd be a very easy way to check; that is, if you already have such a device handy. Apparently, you do.
Thanks for the detailed update.
By the way, I looked at Jay Racing's site again the other day and found they have some newer products for just what we're doing here (forward exiting coolant using the freeze plug by the cam sprockets). I intend to buy one of those at only $70/kit!
EDIT: after thinking for a minute, I'm a little more curious about the rate of expansion of the pistons versus the block. A question to add into this: would poor coolant flow cause the pistons to expand faster than the block (giving higher compression readings), cause the block to expand faster (not supported by your results), or cause them to expand equally as fast?
I'm a noob, but I was thinking that the oil squirters were keeping the pistons cool, though I know the coolant contributes greatly to it.
(All my jibber jabber can sadly [fortunately?] be shot down with a few words!)
-
DJpowerHaus
- Sir Post A Lot
- Posts: 1779
- Joined: Wed Apr 07, 2004 3:24 pm
- Location: Baltimore, MD
- Contact:
Looking at my records I should be seeing around 145-150 at the most. Perhaps those front 2 just haven't completely been broken in yet? Argg.. its tearing me apart trying to figure it out.
Getting the engine bolted in is about 10% of the way there.
The next 80% can go quickly with help and skill.
That last 10% takes about as long as the 90% that came before it.
-
Bill Hincher
- Donating Member
- Posts: 1625
- Joined: Thu Jun 22, 2006 8:57 pm
- Location: Toledo,Ohio
- Contact:
the closed throttle plate will definatly make a 20-30lbs difference in a compression test
The piston has to be able to draw air in order to compress it, bad cam lobes will give bad readings and misaligned gaskets. maybe you got some tight valves with all the machine work you have done
with no overheating and only a 45min break in run, you wouldnt have a bad headgasket
The piston has to be able to draw air in order to compress it, bad cam lobes will give bad readings and misaligned gaskets. maybe you got some tight valves with all the machine work you have done
with no overheating and only a 45min break in run, you wouldnt have a bad headgasket
Sounds stupid, but if your oil seal tube on that cylinder is leaking alot of oil on top of the plug you will get a higher reading in that hole. When you pull out the plug the oil from the tube will go into the hole and give you a higher reading than you should have. I know cause it does the same on my motor. That smashing the pulley bit worked eh? 
KILL
-
DJpowerHaus
- Sir Post A Lot
- Posts: 1779
- Joined: Wed Apr 07, 2004 3:24 pm
- Location: Baltimore, MD
- Contact:
Spark plugs were without oil when I pulled them so I doubt oil got into the rear cylinders.
I retested the compression today cold with the throttle open. I was within 1psi on all readings compared to yesterdays warm test with the throttle closed. Bill, I think the engine can still pull air from the other cylinders that don't have spark plugs in them. I really don't know what's going on with these compression numbers.
I retorqued the head today as planned. Other than changing the oil, I'm not sure what else to try. I might just switch to some better fuel and drive it up and down the driveway a few times and see if anything changes.
Later this week I will be installing 2 electric water temp senders. One in the back and one in the front with a switch to go back and forth between the 2. It'll let me monitor between the 2. For all I know the temps are the same front and back and the compression numbers are unrelated. Monitoring this should help to set up the cooling for everyone trying to do this front coolant exit.
Getting the engine bolted in is about 10% of the way there.
The next 80% can go quickly with help and skill.
That last 10% takes about as long as the 90% that came before it.
-
Bill Hincher
- Donating Member
- Posts: 1625
- Joined: Thu Jun 22, 2006 8:57 pm
- Location: Toledo,Ohio
- Contact:
no Mike, I meant the cylinder has to pull air in on the intake stroke before it can compress it, the volume of air that is inducted on the intake stroke contributes to the amount of compression made ( more air, higher compression) if there are any restrictions to air inlet on the intake stroke, less compression will result.DJpowerHaus wrote:
I retested the compression today cold with the throttle open. I was within 1psi on all readings compared to yesterdays warm test with the throttle closed. Bill, I think the engine can still pull air from the other cylinders that don't have spark plugs in them. I really don't know what's going on with these compression numbers.
.
The best test you can use to find compression trouble is a cylinder compression leakdown test, where you induct air into the cylinder with air pressure from your compressor and find where the pressure is leaking, wether it is leaking past the rings, or valves or gaskets
here are some atricles you might find helpful , I couldnt find any in Spanish though .............
http://www.geocities.com/dsmgrrrl/FAQs/leakdown.htm
http://www.xs11.com/tips/misc/misc3.shtml
as far as breaking in rings, you just use a soft iron ring ( never chrome) and the best finish you can hone in, the Japanese liners are not hardend very deep and after you bore a cylinder, you are in soft liner material, I do like to buy oversized rings and cut them to fit, using about .006 to .008 for end gap, depending on the bore size I am working on
-
Bill Hincher
- Donating Member
- Posts: 1625
- Joined: Thu Jun 22, 2006 8:57 pm
- Location: Toledo,Ohio
- Contact:
In a dusty environment such as gravel pits, sand or rock mines, or operating on a dirt or unpaved roads, chrome is the best choice. Because of the incoming air/fuel mixture probably will contain some sand/dirt In a dusty environment, Chrome's extreme density and hardness accelerates cylinder wear. Chrome has more resistance to scuffing and scoring than cast iron.
so if you use softer rings, they will form (deform)to the cylinder wall as the cylinder wall forms ( deforms) to the piston ring
in other words, no matter how hard you try, the cylinder bore will not be perfect, so you have to absorb some of its imperfections in the piston ring, chrome wont bend
so if you use softer rings, they will form (deform)to the cylinder wall as the cylinder wall forms ( deforms) to the piston ring
in other words, no matter how hard you try, the cylinder bore will not be perfect, so you have to absorb some of its imperfections in the piston ring, chrome wont bend
-
DJpowerHaus
- Sir Post A Lot
- Posts: 1779
- Joined: Wed Apr 07, 2004 3:24 pm
- Location: Baltimore, MD
- Contact:
I'll stick with the rings that came with the pistons that have been used by literally thousands of other people successfully. Haven't done a thing today. Got a cold.
Getting the engine bolted in is about 10% of the way there.
The next 80% can go quickly with help and skill.
That last 10% takes about as long as the 90% that came before it.
-
Bill Hincher
- Donating Member
- Posts: 1625
- Joined: Thu Jun 22, 2006 8:57 pm
- Location: Toledo,Ohio
- Contact:
ok so heres the d50 pump i got mate

the bits circled in red are the bits i am planning to trim off going by the looks of the one you posted
have you got an pics of the pulley you pressed?
was it just a case of getting a cylinder of metal the same size as the flange of the waterpump and pressing it to stretch the metal?
would a l200 or starion alternator bracket work?
-
DJpowerHaus
- Sir Post A Lot
- Posts: 1779
- Joined: Wed Apr 07, 2004 3:24 pm
- Location: Baltimore, MD
- Contact:
You don't really need to stretch the metal, just pop out the concavity that it has from the factory to be straight or a little convex. It will want to distort a little once you get it pressed most of the way out. The real trick is to keep the distortion even on all sides.
You could switch everything to Truck or 2.0L Starion V-belt pulleys if you'd like.
You could switch everything to Truck or 2.0L Starion V-belt pulleys if you'd like.
Getting the engine bolted in is about 10% of the way there.
The next 80% can go quickly with help and skill.
That last 10% takes about as long as the 90% that came before it.
-
Bill Hincher
- Donating Member
- Posts: 1625
- Joined: Thu Jun 22, 2006 8:57 pm
- Location: Toledo,Ohio
- Contact:
well, while we are on the concern of cooling.
if 36% of your engines horsepower goes out the tail pipe in exhaust and 36% of your engines horsepower is used to cool it and you only are using 36% of the horsepower to drive the rear wheels.
if your stock motor was 100 horsepower and you increased the horsepower by 50% what modifications are you going to make to increase the cooling of the engine by 36% of 50 horsepower?
I'm being a little lazy by not going back through the thread to see if this has been suggested before...
Why not put the block-off plate at the back of the head, then tap a 1/4"-1/2" 90° nipple into it to allow some flow out the back? It seems like this would be a decent fail-safe and likely equalize the temperatures across the head somewhat.
I don't pretend to know what size would be right, if any rear exit is used at all; but, unless someone has a good reason not to do this, I see myself putting a 3/8" or 1/2" fitting in the back which should protrude less than 1" (not as far out as the CAS).
-
DJpowerHaus
- Sir Post A Lot
- Posts: 1779
- Joined: Wed Apr 07, 2004 3:24 pm
- Location: Baltimore, MD
- Contact:
As soon as I can track down a D50 heater hose (the metal thing that runs under the exhaust manifold), I will run some water from the back of the head and see if it makes any difference. Even a small pipe should be plenty since one end is going to be right at the suction side of the water pump.
The ECU was recording the temps at the drift event yesterday (sensor is on the hose coming out of the front of the head). I had no bubbles or cooling problems. Logs show that the coolant was between 84C and 92C.
I'll be installing my VDO temp gauge soon and I'll put the sender in the back of the head in the blockoff plate. I have a 2nd sender coming that is on back order that I will put up front. Using an ON-OFF-ON switch I'll be able to go back and forth between the 2 senders.
Getting the engine bolted in is about 10% of the way there.
The next 80% can go quickly with help and skill.
That last 10% takes about as long as the 90% that came before it.
-
Bill Hincher
- Donating Member
- Posts: 1625
- Joined: Thu Jun 22, 2006 8:57 pm
- Location: Toledo,Ohio
- Contact:
This is how I mapped out the cooling system to use both ends of the cylinder head to vent out the cooling system, the reason I thought a rear exit would be good was because I didnt think the front exit alone was big enough to vent out the coolant by itself

the biggest reason I felt the remote thermostate was important was for thermoshock, thermostates are dynamic not static, you must design with constant temperature changes in mind, because the value of the cooling air temperatures constantly change

Thanks DJ
the biggest reason I felt the remote thermostate was important was for thermoshock, thermostates are dynamic not static, you must design with constant temperature changes in mind, because the value of the cooling air temperatures constantly change
Thanks DJ
just a quick note i thought id put up for others running the rwd water pump option, theres another way to do it other than custom pulley
i tried to pop my waterpupm pulley out bu wasnt able to get it square enough so it would run true
end up doing some measuring of both my original pulley and the rwd one and realised that if you put the mounting plate of the water pump in a press (or hydraulic puller of some sort) and pop it off then turn it round the other way and press it on again you are able to get so it mounts less than 1mm off the original mounting height of the 1g pump
then you just need to machine down the mounting plate centree so the pulley fits over it (only have to take about 1.5 mm off it and your all done and can use a factory puller
i got an engineer to do it all for bugger all money as i dont have the tools
I am a noob when it comes to this swap, even the 4G is new to me. But I have been reading through this forum quite a bit this past month. Now that I have that out of the way.
Were do you get the coolant for the turbo?
Maybe an adapter can me made to feed the turbo from the back of the block? This might be a good way to distribute some water out the back, with minimal added length. Actually a billet aluminum block off plate with a internal 90, could be made out of no more than .750" thick.
I am planning on using an electric water pump, and using the front of the head as the outlet from the motor. This thread has given me some great ideas/knowledge. I should be getting rest of my parts over the next month. At that time I can make some better judgements on these theories.
Brandon
-
Bill Hincher
- Donating Member
- Posts: 1625
- Joined: Thu Jun 22, 2006 8:57 pm
- Location: Toledo,Ohio
- Contact:
-
Bill Hincher
- Donating Member
- Posts: 1625
- Joined: Thu Jun 22, 2006 8:57 pm
- Location: Toledo,Ohio
- Contact:
whenever I am making a decsision about engine performance I ask my self, if it wasnt important why would Mistubishi spend the extra $10.00 per car to put it there?
$ 10.00 bucks per unit @ 10,000 units????????? hmmmmmmmmmm?
You bet water cooling the turbo is important . You want to enjoy your ride, not be frustrated by it. build it like an endurance engine and you will get more enjoyment out of it
$ 10.00 bucks per unit @ 10,000 units????????? hmmmmmmmmmm?
You bet water cooling the turbo is important . You want to enjoy your ride, not be frustrated by it. build it like an endurance engine and you will get more enjoyment out of it
Sure, they know what they're doing and I've always been a strong advocate of water cooling turbochargers that were designed as such; but there are turbocharger designers/manufacturers that know what they're doing, as well, when they design turbochargers without water jackets. There are a jazillion turbo diesel big rigs running 10's of thousands of miles (hundreds?) on air-cooled turbochargers.75COLT wrote:thanks Bill. I was just thinking out loud I guess. Mits knows what they are doing.
So, while I think it's a bad idea to only air cool a turbocharger which has a water jacket, there are plenty of people (several friends of mine) doing just that and doing quite well; in fact, one of my friends' 240Z is using a stock, original from 1982, water-jacketed Garret T3 from a 280ZX Turbo with no water lines to it and he's been pushing it pretty hard for quite awhile with no problems because he maintains it with a turbo timer. To my knowledge, the primary (if not only) reason for water cooling was to protect the bearings from oil coking up due to rapidly decreasing temperatures when the owner shut the engine down after having just been in boost and the turbo is glowing. Allowing the temperatures after a hard run to cool more slowly by running the engine for a bit at idle or under very little load nearly eliminates this issue (think turbo timers). There are a lot of people who buy turbo timers because they have a turbo vehicle because that's what Greddy, HKS, etc, want you to think you must do.
I would (and do) go with a water-cooled turbocharger on a car I intend to just drive and not have to pay much attention to (wait to cool off or run a turbo timer); but on my fast car, which I also want simple looking and easy to work on, I'd prefer to have an air/oil-cooled turbo.
I'd also like to have an electric oil-pump to keep oil circulating a for a minute after turning off the engine and to prime the engine for a couple seconds each time before I start it up. But I'll probably never do that. It would save gas over a turbo timer, but would be more complicated than I'd like and possibly messy.
I didn't mean to change the subject of this thread to turbos. 
Since we are talking about cooling them. Are not most ball bearing turbos cooled with water and oil, were journal bearing turbos are just oil cooled. I know with Garret's line of turbos, it's that way. If the turbo as a R at the end of its part # then it is a water cooled ball bearing turbo. I have never thought of air cooling a turbo, but I guess it does to a point.
As for turbo timers, I personally don't see the need for them. As long as you take it easy the last bit of your drive. The moving air that passes through your engine bay, radiator, oil cooler is much more efficient than letting your car sit an idle in one spot. I have watched my oil temps rise while letting the car run for a bit while parked, after a easy cool down of less than a mile drive.
-
Bill Hincher
- Donating Member
- Posts: 1625
- Joined: Thu Jun 22, 2006 8:57 pm
- Location: Toledo,Ohio
- Contact:
the very best way to make sure a turbo cools is with a Oil Accumulator, you set it up so it collects oil during engine operation and when you shut the key off it bleeds oil into the turbo bearing inlet .
the problem is , you have a turbo spinning at 15000 RPMs and you shut off the engine, well, the turbo hasn't slowed down yet, and there is no oil pressure coming from the engine ,so the bearing goes dry while the turbo is hot and spinning.
If you have a Oil Accumulator in the system, it can feed oil to the bearings for a couple minutes after shut down
the opposite is also true of any hot rod, you should have one ignition switch and one starter switch, you should always prime the engine with oil using the starter switch before you start the engine
Good thoughts, Bill. Two comments:Bill Hincher wrote:the very best way to make sure a turbo cools is with a Oil Accumulator, you set it up so it collects oil during engine operation and when you shut the key off it bleeds oil into the turbo bearing inlet .
the problem is , you have a turbo spinning at 15000 RPMs and you shut off the engine, well, the turbo hasn't slowed down yet, and there is no oil pressure coming from the engine ,so the bearing goes dry while the turbo is hot and spinning.
If you have a Oil Accumulator in the system, it can feed oil to the bearings for a couple minutes after shut down
the opposite is also true of any hot rod, you should have one ignition switch and one starter switch, you should always prime the engine with oil using the starter switch before you start the engine
1.)The turbochargers I've seen at idle would barely spin (if at all) at idle; perhaps because they were old and worn. It may also be because of the A/R and size of the turbo.
2.)How would an oil accumulator best be set up the way you described? My first thought was inline with the high-pressure block-to-turbo oil supply line but it seems like the oil pressure to the turbo would not be high enough. Do you have pictures of such a setup?
EDIT: After considering comment 2 for a few minutes and looking at a couple accumulator designs, I realized there are a couple different ways to do this. It seems that the optimal setup would be to run two accumulators: one for pre-ignition lubrication of engine (and maybe turbo) and one for post-shutdown for proper cooling of the turbocharger bearings. I could make up some ideas about running T-fittings and some type of check-valves, but I just assume hear from the guy(s) that have done it.
Now I'm gonna feel like I MUST have this