While I wait for my 4G64 to return from the shop, I am going to be doing this. Not a 4G63 or 4, but a 4G32.
http://torontohyundaiclub.forumup.com/v ... iclub#1759
If you guys have any ideas/thoughts, let me know. This would be my first SC install, ever.
1987 Hyundai Pony M90 build
Moderators: DJpowerHaus, mattmartindrift
-
citrus3000psi
- Addict
- Posts: 71
- Joined: Tue Dec 09, 2008 1:51 pm
- Location: Indianapolis, Indiana
- Contact:
This as all the info you need.Jed118 wrote:Does anyone know how to calculate the amount of boost based on the pulley diameters?
http://www.planetsoarer.com/boost/boost.htm
98 Acura Integra Type R #139
92 Mitsu Eclipse GS Turbo (in pieces)
88 Dodge Ram 50 (almost running)
92 Mitsu Eclipse GS Turbo (in pieces)
88 Dodge Ram 50 (almost running)
Excellent. I actually found that site 5 days ago, but thanks are still in order
I have done some initial calculations: to get 5.6 PSI I need a ratio of 0.75:1 (on a 1600 cc motor)
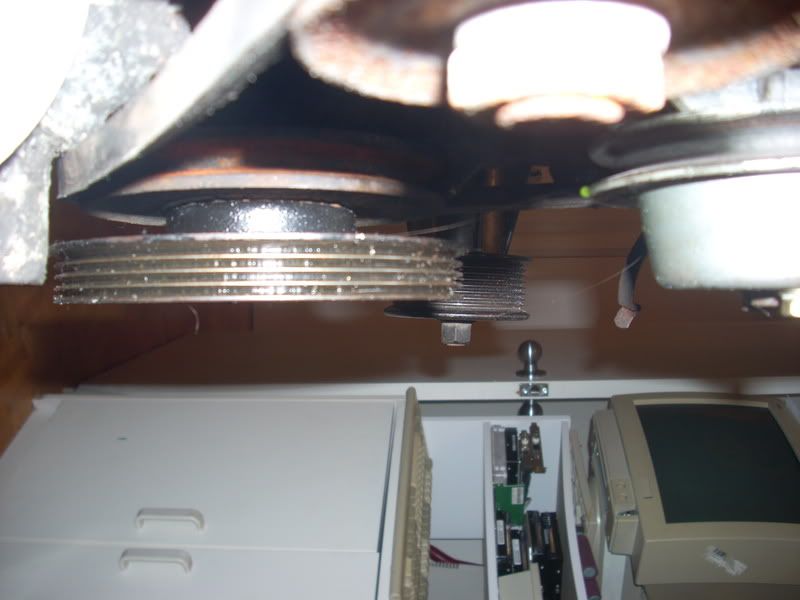
I will double check this. I have the 3.5 inch wheel on the M90, so im gonna go out and find at least a 5 rib pulley to weld to the crank (Which is V-type) of the appropriate size (junkyard run perhaps?)
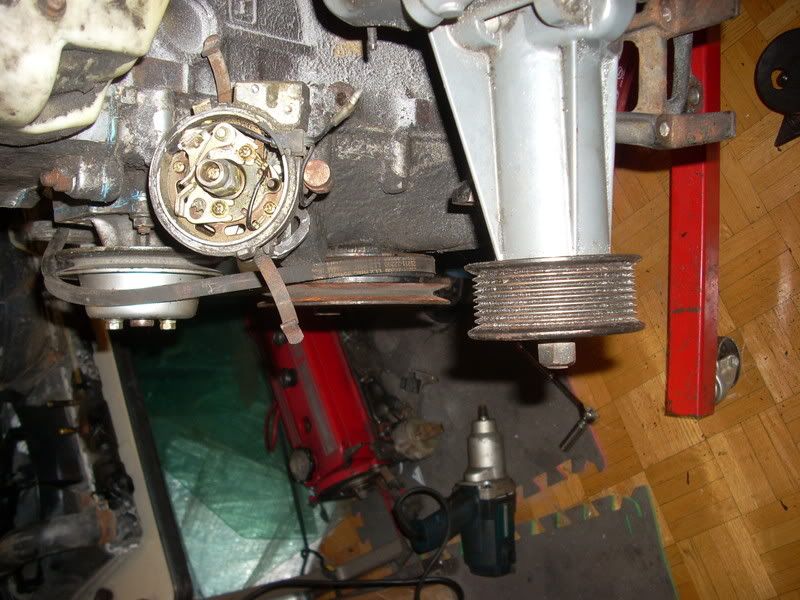
Here's a couple update pics:
Touching the old Pony starter:
not good. As I was searching through the old 4G64's SOHC parts (pulleys mainly, just to get an idea, and also the tensionner), I found the Sonata starter which is smaller. Behold:
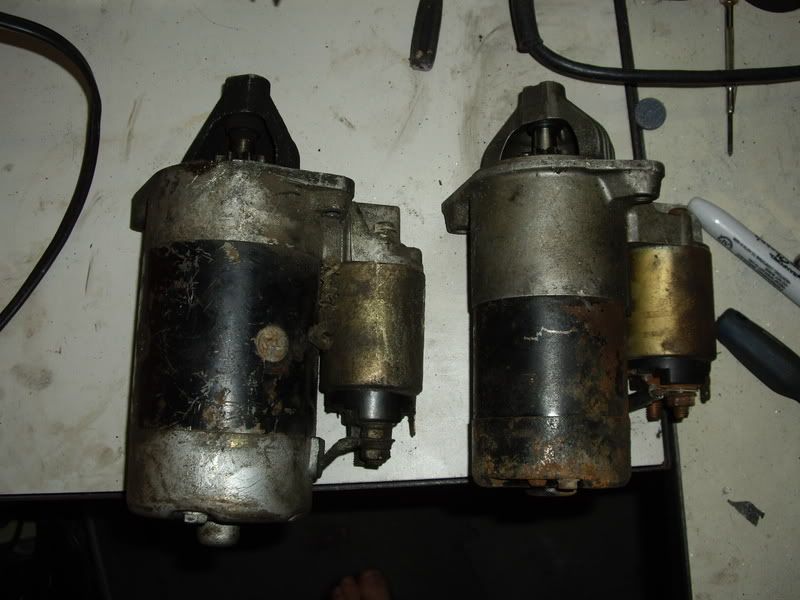
The Pony starter is a BEAST of a unit. It weighs at least 40% more, if not more.
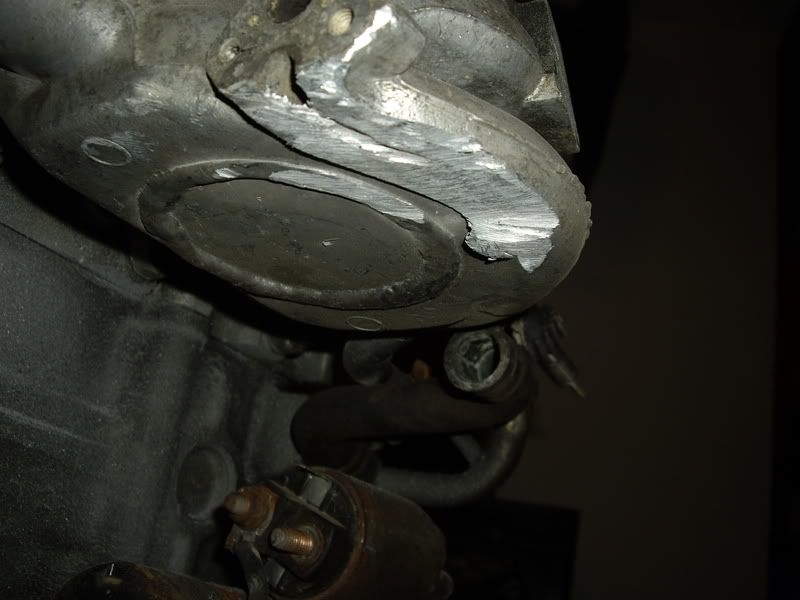
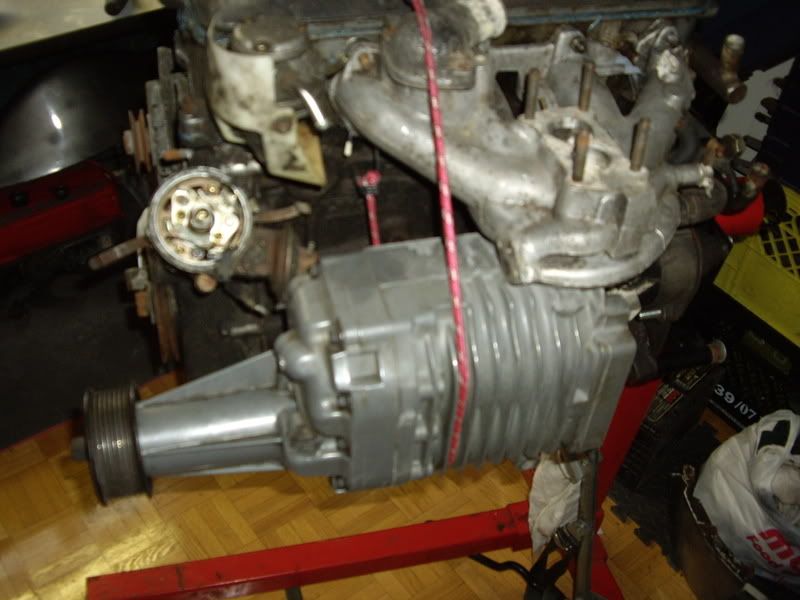
Thanks to it's installation, and a little bit of manifold cutting
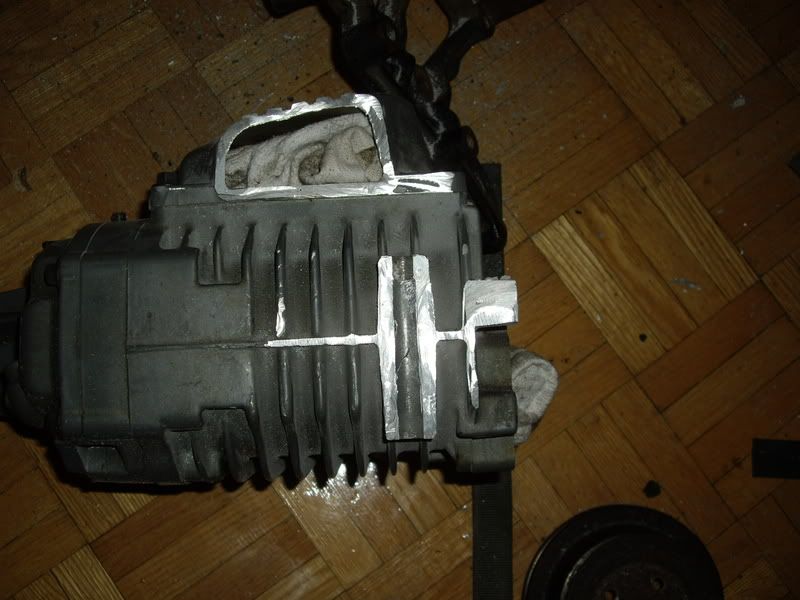
And a little bit of supercharger cutting
Now it's closer to the back, and inline with the main crank pulley (Im going to weld and balance a 5 or 6 rib pulley to it, so just imagine it's there)
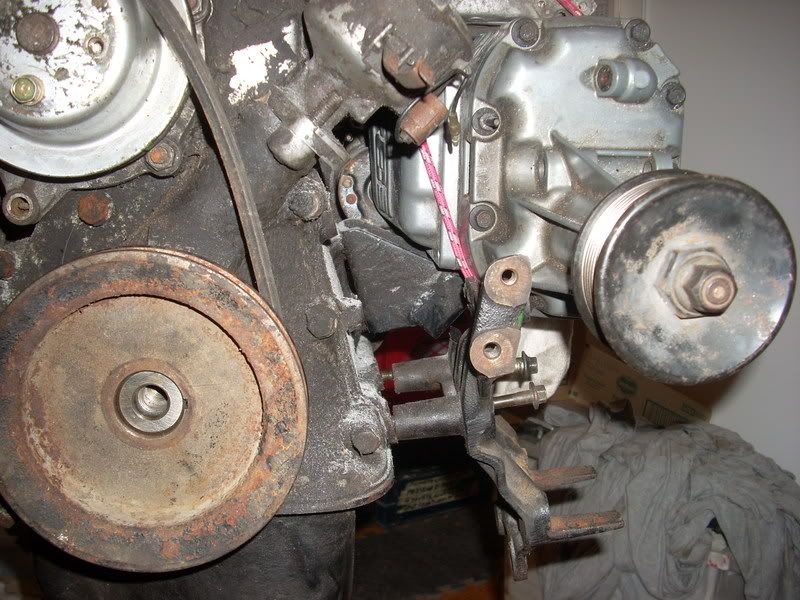
TO hold it in place, I'm going to make something out of the brackets I took off the 4G64 that I don't need (front mount that portrudes from the timing case) and some Stellar power steering/alternator brackets, as well as some self made L brackets that I will get reinforced. To hold the tensionner in place, whatever bracket was holding the A/C on the 4G64 *almost* fits onto the 4G32 (slight drilling/cutting will take place)
The air inlet "cap" will have to be closed up and a new opening will have to be made to face the front of the engine... this I will address AFTER I bolt the M90 into place and create a tensioner system. The inlet will just bend down 90' behind it's current location (clearing the steering box) and simply obtain air from the back of the engine compartment.
Next week im going to fashion the brackets and the pulley/tensionner.
Where do I get veriable length ribbed belts from?
I have done some initial calculations: to get 5.6 PSI I need a ratio of 0.75:1 (on a 1600 cc motor)
I will double check this. I have the 3.5 inch wheel on the M90, so im gonna go out and find at least a 5 rib pulley to weld to the crank (Which is V-type) of the appropriate size (junkyard run perhaps?)
Here's a couple update pics:
Touching the old Pony starter:
not good. As I was searching through the old 4G64's SOHC parts (pulleys mainly, just to get an idea, and also the tensionner), I found the Sonata starter which is smaller. Behold:
The Pony starter is a BEAST of a unit. It weighs at least 40% more, if not more.
Thanks to it's installation, and a little bit of manifold cutting
And a little bit of supercharger cutting
Now it's closer to the back, and inline with the main crank pulley (Im going to weld and balance a 5 or 6 rib pulley to it, so just imagine it's there)
TO hold it in place, I'm going to make something out of the brackets I took off the 4G64 that I don't need (front mount that portrudes from the timing case) and some Stellar power steering/alternator brackets, as well as some self made L brackets that I will get reinforced. To hold the tensionner in place, whatever bracket was holding the A/C on the 4G64 *almost* fits onto the 4G32 (slight drilling/cutting will take place)
The air inlet "cap" will have to be closed up and a new opening will have to be made to face the front of the engine... this I will address AFTER I bolt the M90 into place and create a tensioner system. The inlet will just bend down 90' behind it's current location (clearing the steering box) and simply obtain air from the back of the engine compartment.
Next week im going to fashion the brackets and the pulley/tensionner.
Where do I get veriable length ribbed belts from?
There are a number of possibilities to drive the SC, but first
Using the formula
Boost (psi) = (PR x 14.7 x V / C/2 ) - 14.7 - I
and plugging in the values (in inches)
5.356 (crank) and 3.146 (M90) is roughly 1.7
PR = 1.7
V = The M90 is 90 cubic inches or 1475 cc
C = 1,597 (/2 is ~798) It's probably minutely less because head is shaved 0.030 in
so then, PSI = (1.7 x 14.7 x 1475) = 36860 / 798 = 46.1 PSI - 14.7 = 31.5 PSI!!
That's way too much...
let's assume 3.8 inch pulley (largest available) on M90
5.356 / 3.8 = 1.4
so then, PSI = (1.4 x 14.7 x 1475) = 36860 / 798 = 38.0 PSI - 14.7 = 23.2 PSI!!
Damn, I need like... 6-7 PSI
I wonder if I swap the crank pulley (detachable) to the SC and bring the SC pulley to the crank... that would yeild: 1.2 PSI. Yay!
To get 7 PSI I need 0.8:1 (Crank 20% smaller dia then SC)
I will have to scour the junkyards for a crank pulley that is SMALLER than the SC pulley... perhaps, another SC pulley? It seems that this roots will be severely under-utilized...
In any case, mounting options follow:
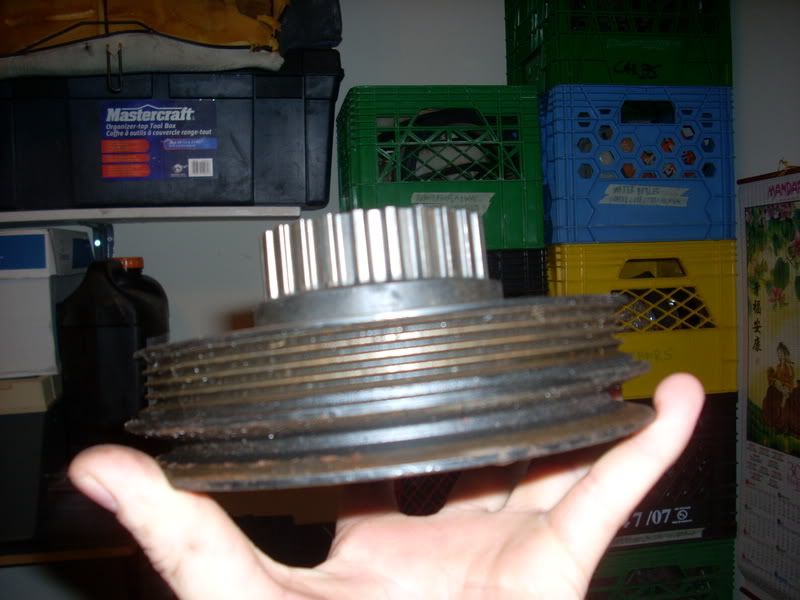
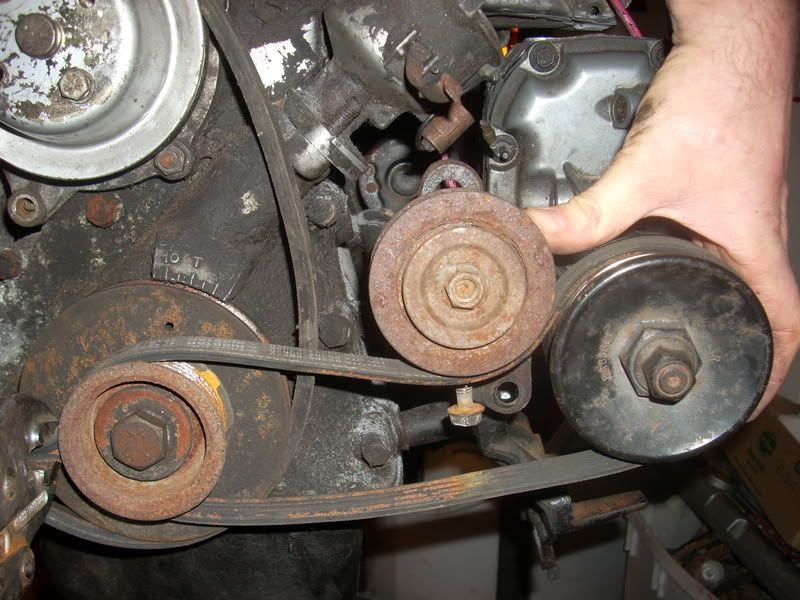
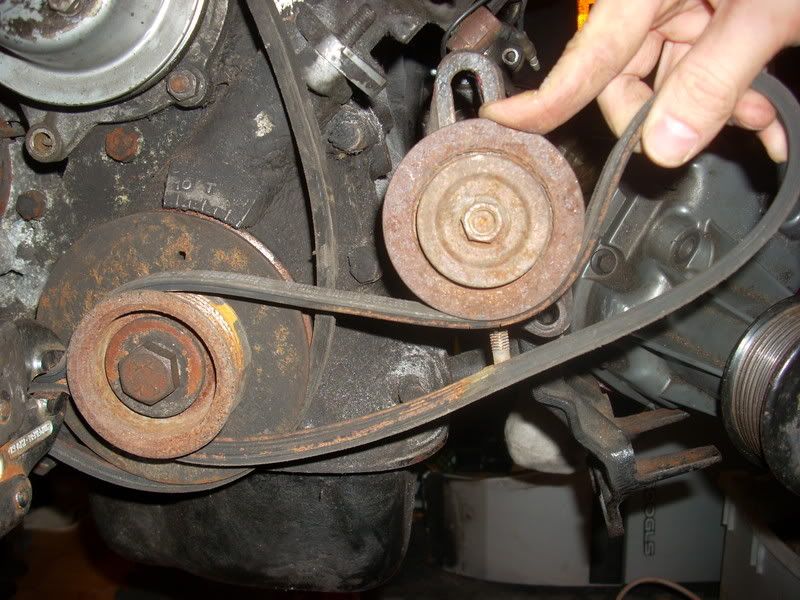
 for 4 rib setup (it's a pulley from P/S I think, 1989 Sonata, just pressed up against the VBelt system with the crank bolt)
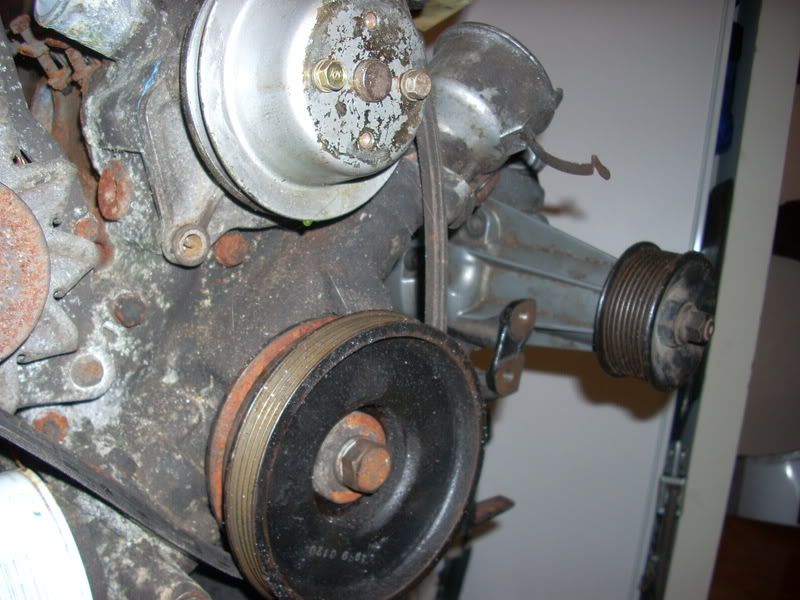
Here was my Vbelt idea (stock 1986 Hyundai Stellar AC pulley)
This would necessitate removing the pulley off the supercharger, and placing a larger, generic one. I somehow have reservations about placing a roughly 6 inch V pulley at the end of that SC and building a tensionner, only to watch the pulley slip + fail at idle.
Another idea was this: the 4G64's SOHC crank. I'd have to machine out the geared part and get it to fit in the block. And then i'd be faced again with the problem of finding a HUGE wheel to put on the M90.
I think the best would be to achieve the 0.8:1 ratio by way of finding a small poly pulley and welding it to the end of the stock crank pulley and having it balanced.
Now, one other question: Which of the two methods should I employ for the tensionning of the belt?
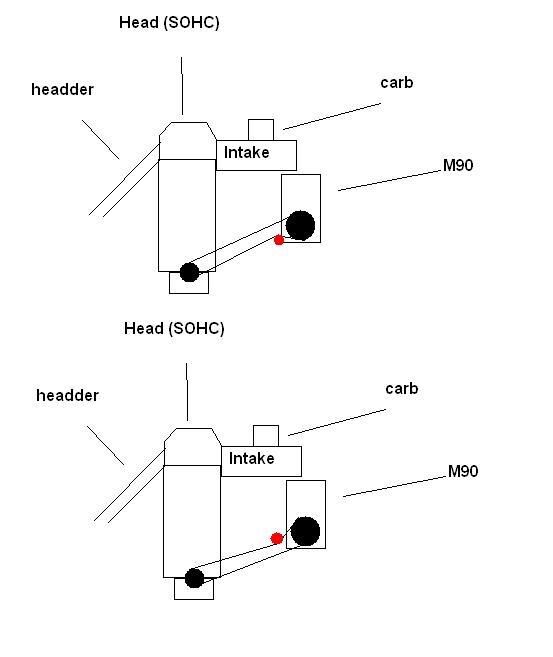
The belt is going clockwise from the crank bearing.
(Also the approximate ratios are shown here)
Using the formula
Boost (psi) = (PR x 14.7 x V / C/2 ) - 14.7 - I
and plugging in the values (in inches)
5.356 (crank) and 3.146 (M90) is roughly 1.7
PR = 1.7
V = The M90 is 90 cubic inches or 1475 cc
C = 1,597 (/2 is ~798) It's probably minutely less because head is shaved 0.030 in
so then, PSI = (1.7 x 14.7 x 1475) = 36860 / 798 = 46.1 PSI - 14.7 = 31.5 PSI!!
That's way too much...
let's assume 3.8 inch pulley (largest available) on M90
5.356 / 3.8 = 1.4
so then, PSI = (1.4 x 14.7 x 1475) = 36860 / 798 = 38.0 PSI - 14.7 = 23.2 PSI!!
Damn, I need like... 6-7 PSI
I wonder if I swap the crank pulley (detachable) to the SC and bring the SC pulley to the crank... that would yeild: 1.2 PSI. Yay!
To get 7 PSI I need 0.8:1 (Crank 20% smaller dia then SC)
I will have to scour the junkyards for a crank pulley that is SMALLER than the SC pulley... perhaps, another SC pulley? It seems that this roots will be severely under-utilized...
In any case, mounting options follow:
for 4 rib setup (it's a pulley from P/S I think, 1989 Sonata, just pressed up against the VBelt system with the crank bolt)Here was my Vbelt idea (stock 1986 Hyundai Stellar AC pulley)
This would necessitate removing the pulley off the supercharger, and placing a larger, generic one. I somehow have reservations about placing a roughly 6 inch V pulley at the end of that SC and building a tensionner, only to watch the pulley slip + fail at idle.
Another idea was this: the 4G64's SOHC crank. I'd have to machine out the geared part and get it to fit in the block. And then i'd be faced again with the problem of finding a HUGE wheel to put on the M90.
I think the best would be to achieve the 0.8:1 ratio by way of finding a small poly pulley and welding it to the end of the stock crank pulley and having it balanced.
Now, one other question: Which of the two methods should I employ for the tensionning of the belt?
The belt is going clockwise from the crank bearing.
(Also the approximate ratios are shown here)
More updates:
I've been busy with school assignments, but two separate trips yielded the following components:
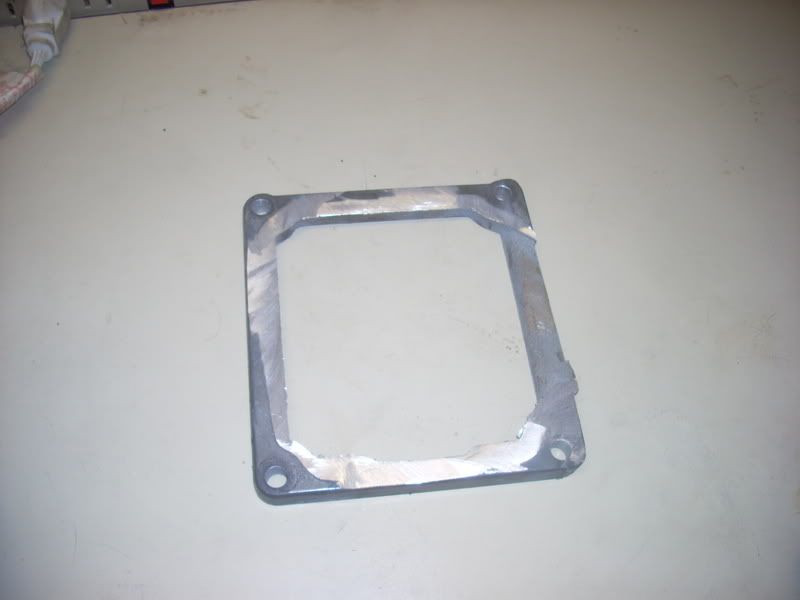
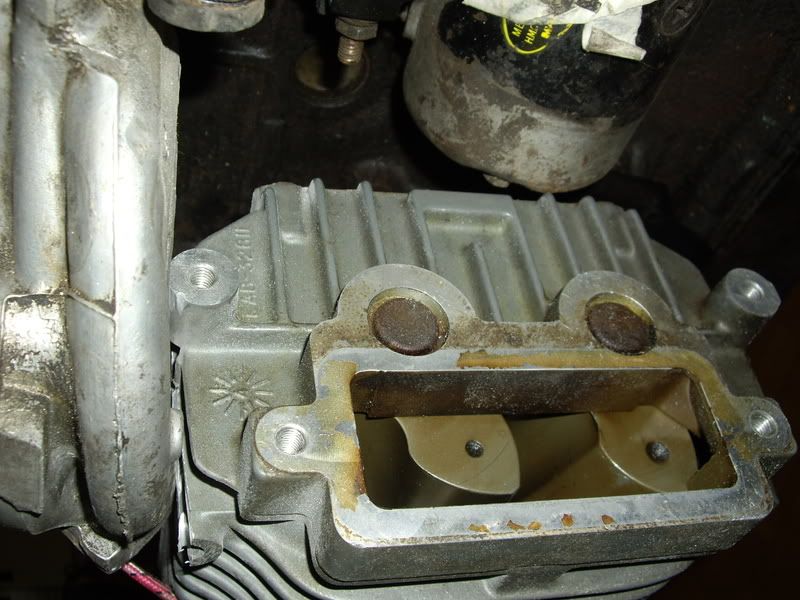
This is the exhaust plate on the supercharger. I had to cut it at the flange and I'm going to have it welded thusly:
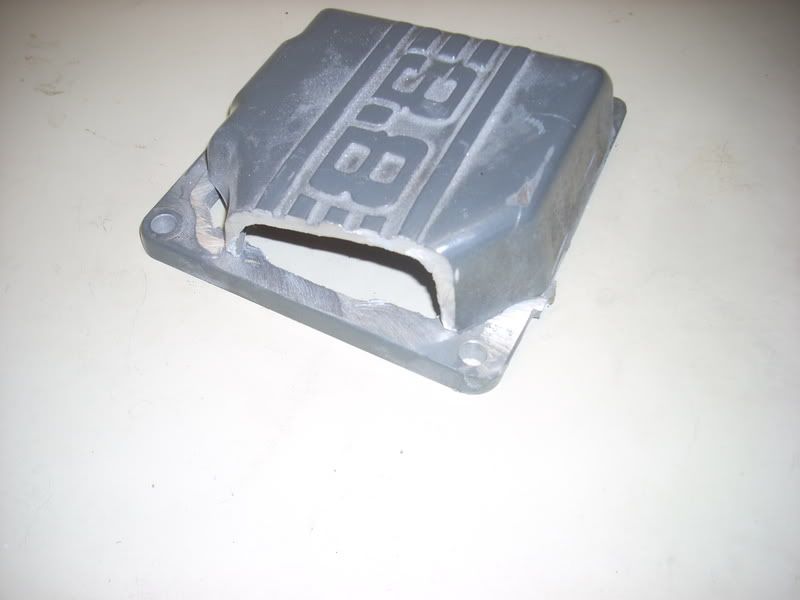
The same will be fashioned with the intake flange - basically im going to attach a circular attachment that will permit me to do this:
It's going to make filter replacements pretty hard, but this is the LAST piece to get fabbed.
My last trip to the wreckers yielded the exact diameter pulley I needed from a Lincoln V8 alternator, as well as its tensionner. The tensionner was too big and could not be installed, however I will see if I can use its pulley on what I found today:
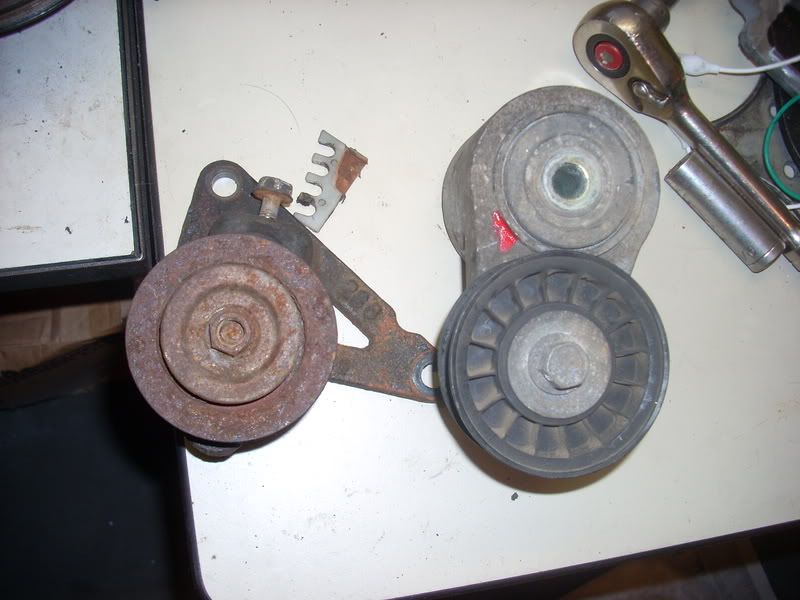
out of a 7GZE (I think) 1980's Supra 24 valve: The air conditioner tensionner to the left, and the Lincoln one to the right. I cut the far support arm off with a grinder and the following ensued:
It bolted into the Sonata AC compressor housing! It lines up PERFECTLY! The only mod I'd have to make is to drill a hole inline with the other treaded opening on the AC bracket (drilling into the Toyota tensionner)
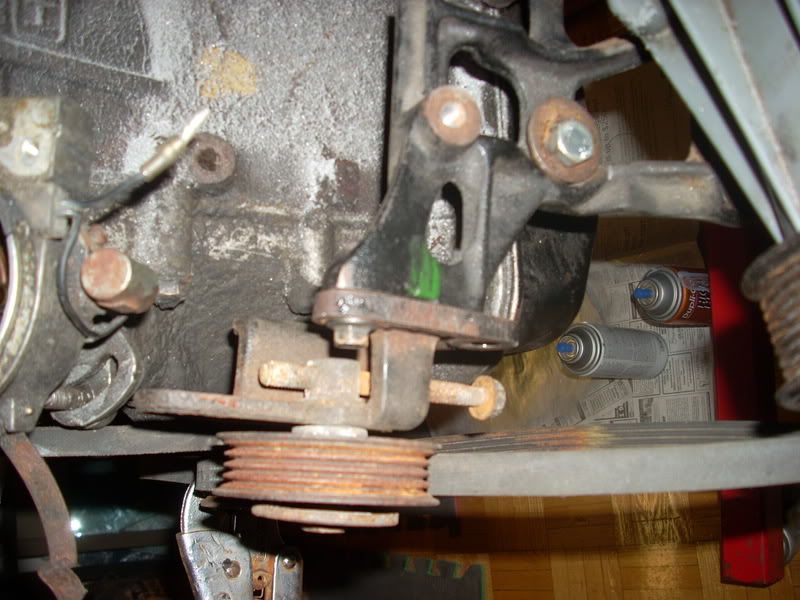
This is what it will approximately look like:
With SC removed:
Now, I grabbed a bunch of random brackets and beams from cars, and I will attempt to make them suitable to actually hold the SC to the car. I have one solid idea for the bottom mounting, one decent idea for a top mounting, and I'm gonna have to get creative for the lower mid mount towards the back. I have no idea about that yet, but I'm sure something will come to me when the need arises.
I just can't believe how perfectly that toyota AC tensionner fit!
I've been busy with school assignments, but two separate trips yielded the following components:
This is the exhaust plate on the supercharger. I had to cut it at the flange and I'm going to have it welded thusly:
The same will be fashioned with the intake flange - basically im going to attach a circular attachment that will permit me to do this:
It's going to make filter replacements pretty hard, but this is the LAST piece to get fabbed.
My last trip to the wreckers yielded the exact diameter pulley I needed from a Lincoln V8 alternator, as well as its tensionner. The tensionner was too big and could not be installed, however I will see if I can use its pulley on what I found today:
out of a 7GZE (I think) 1980's Supra 24 valve: The air conditioner tensionner to the left, and the Lincoln one to the right. I cut the far support arm off with a grinder and the following ensued:
It bolted into the Sonata AC compressor housing! It lines up PERFECTLY! The only mod I'd have to make is to drill a hole inline with the other treaded opening on the AC bracket (drilling into the Toyota tensionner)
This is what it will approximately look like:
With SC removed:
Now, I grabbed a bunch of random brackets and beams from cars, and I will attempt to make them suitable to actually hold the SC to the car. I have one solid idea for the bottom mounting, one decent idea for a top mounting, and I'm gonna have to get creative for the lower mid mount towards the back. I have no idea about that yet, but I'm sure something will come to me when the need arises.
I just can't believe how perfectly that toyota AC tensionner fit!
another trip to the wreckers yielded a BETTER tensionner pulley (5 rib) which I shall be machining down for smoothness. It's from a 1995 Lexus SC (forget what one) and it fits the supra bolt.
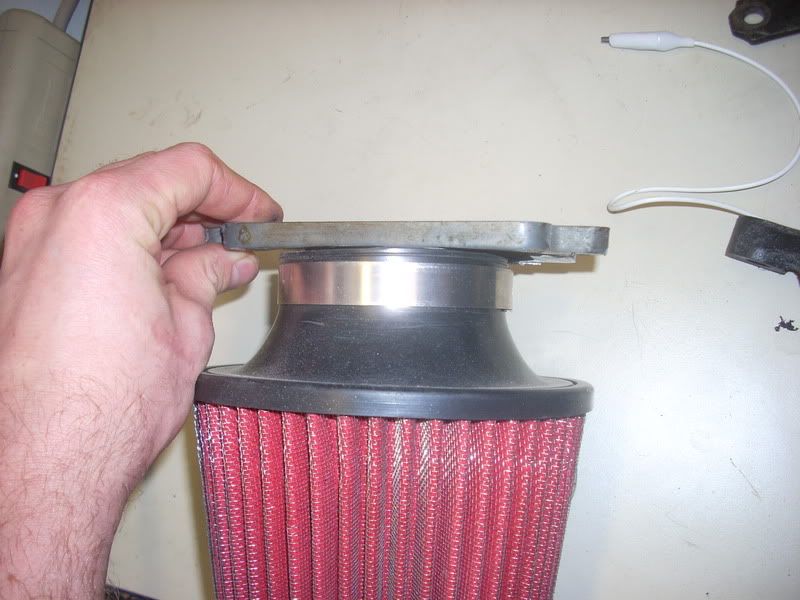
I went to Brafasco today and got parts to settle the lower mount, I'm going to weld them on Friday, as well as the intake hat. Tomorrow morning im going to the metal supermarket to obtain the parts I will need (pipes mainly) to build the carb hat, intake hat, and filter pipe. All made out of aluminum so I can polish them later! I've also got a 3 ft peice of 2 inch PVC pipe to clear the tight spot between the supercharger and the block out front, and a couple of elbows to bring the charged air to the intercooler. Routing is last on my list, as the SC has to first be installed in the car.
Some parts I still need to get are the BOV and couplers. I plan on reusing the nice "SUPERCHARGED" Ford piping up to the carb hat i'm making, but I have to check clearances first. Here is a rough (very rough) plan of what I need to build:
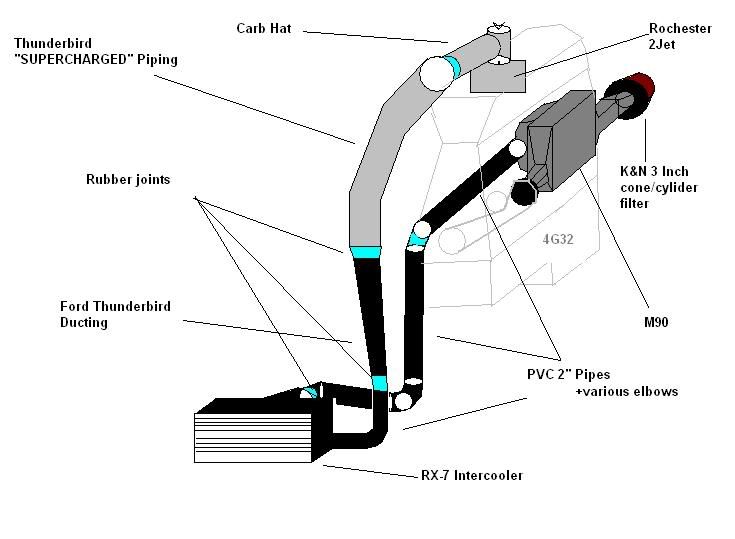 The BOV will be either on the "SUPERCHARGED" pipe or the carb hat, I have to see the materials first
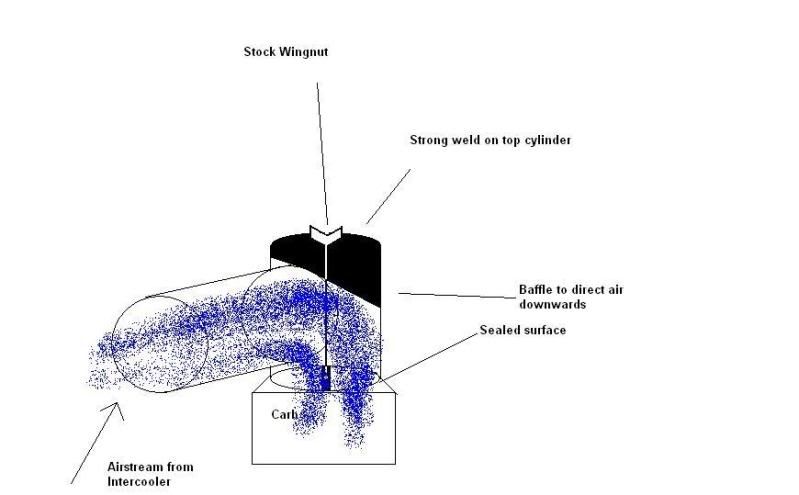
And this is a close up of the carb hat I plan to make, simply out of two tubes of aluminum (I need the flat top surface to clamp down on the carb)
I hope to have some of this at least cut by sunday night, and the supercharger mostly mounted to the block (3 of 4 mount points, hopefully)
I went to Brafasco today and got parts to settle the lower mount, I'm going to weld them on Friday, as well as the intake hat. Tomorrow morning im going to the metal supermarket to obtain the parts I will need (pipes mainly) to build the carb hat, intake hat, and filter pipe. All made out of aluminum so I can polish them later! I've also got a 3 ft peice of 2 inch PVC pipe to clear the tight spot between the supercharger and the block out front, and a couple of elbows to bring the charged air to the intercooler. Routing is last on my list, as the SC has to first be installed in the car.
Some parts I still need to get are the BOV and couplers. I plan on reusing the nice "SUPERCHARGED" Ford piping up to the carb hat i'm making, but I have to check clearances first. Here is a rough (very rough) plan of what I need to build:
The BOV will be either on the "SUPERCHARGED" pipe or the carb hat, I have to see the materials firstAnd this is a close up of the carb hat I plan to make, simply out of two tubes of aluminum (I need the flat top surface to clamp down on the carb)
I hope to have some of this at least cut by sunday night, and the supercharger mostly mounted to the block (3 of 4 mount points, hopefully)