Page 2 of 3
Posted: Mon Nov 09, 2009 2:37 pm
by Bill Hincher
we ought to build a good water/heat exchanger for the intercooler system, that would clean up the instalation and get the size of the intercooler smaller
Posted: Tue Nov 10, 2009 2:15 pm
by boise-nic
^Too big???

I've actually been doing some research on air to liquid intercoolers and weighing the pros / cons of the setup. I REALLY like how citrus300psi's truck is setup. The routing is nice and I'm sure the radiator likes the more direct air path. The ability to remotely locate the heat exchangers is nice too.
I do like seeing a big shiny intercooler behind the grill though. If I get serious with the drag setup, I might just go to air-liquid setup so I can chill it down to below ambient.
Posted: Tue Nov 10, 2009 4:10 pm
by Bill Hincher
yea, too big
there is a great deal of extra horsepower in a large intercooler but large capacity intercoolers take too long for the turbo to fill and they cause turbo lag, so if you can restrict the intercooler size but increase the cooling capacity, its win/win
you can get more effeicant cooling from a water heat exchanger with less size plus better packaging
Posted: Mon Dec 07, 2009 8:21 pm
by boise-nic
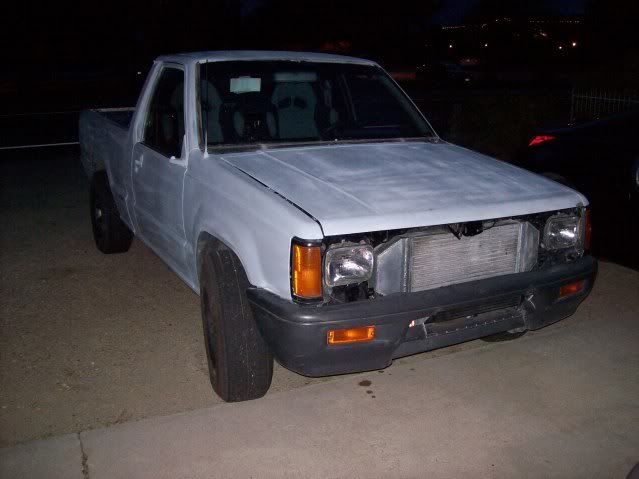
Well I got all the electrical done I think...it sparks and the fuel system is pressurized. Just need exhaust done so I can run it for a while and not to crazy loud...Next week it gets towed to the shop to get a 3" mandrel, catless exhaust put on. Probably going to go with a mangaflow muffler unless someone wants to tell me otherwise. so far, this is my entire exhaust system
Went and effectively doubled my traction...
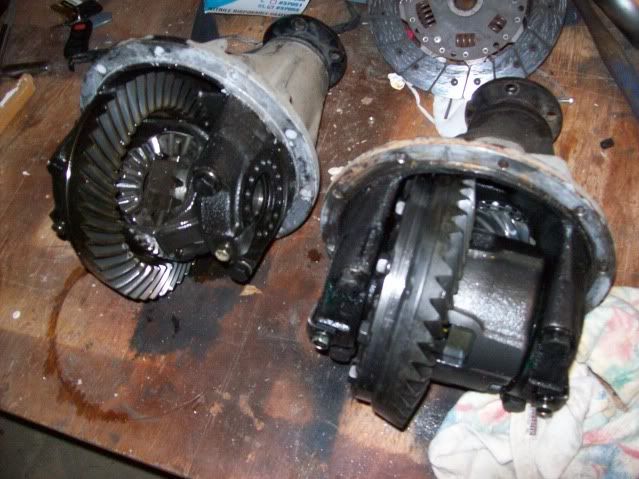
This pic is the stock diff. I don't think the fluid had ever been changed. It smelled so bad...I thought the magnetic drain plug was worth showing off. yeah, they do work!
Now some questions...
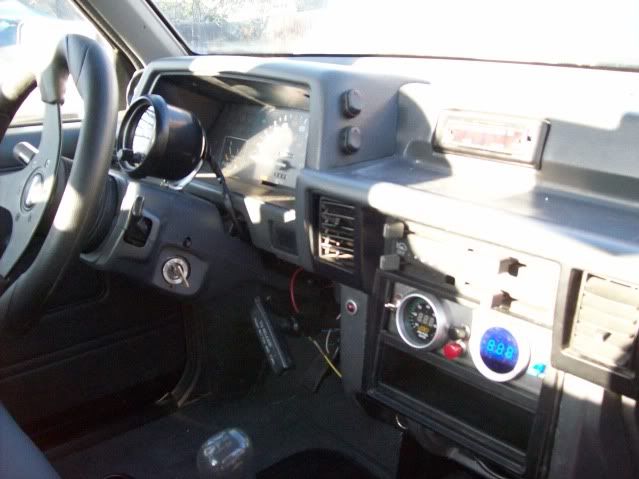
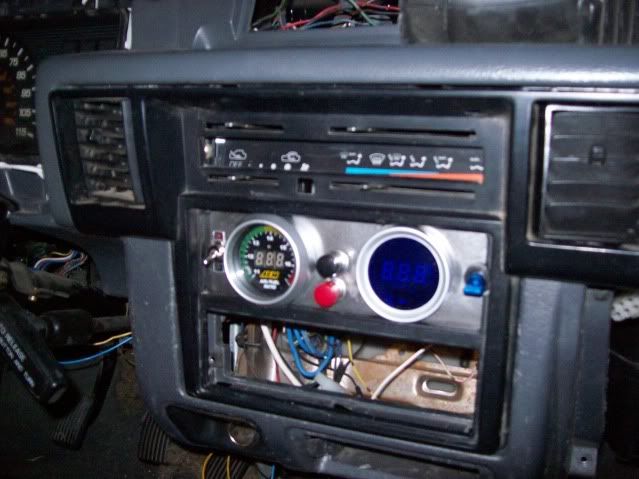
I'm hooking up the oil pressure sensor for the dash and notice that the stock max's oil sensor plug is different that the 4g's plug. I wish I didn't throw away the old engine so soon because I'm hoping they are similar. Here's the difference. DSM (left), mighty max (right)

See how the max's is a plugin style and the dsm's is a slip over type. I just cut and soldered the dsm's end onto the wire. hopefully it will work. I believe its just for the idiot light on the max's gauge cluster since it doesn't have a real oil pressure gauge.
I wanted more accurate oil pressure readings so I went with a real oil pressure gauge. Sits next to the wideband. People think its a wierd location but I refuse to mount pillar gauge pods on the truck for all to see. Looses the sleeper / stealth value.
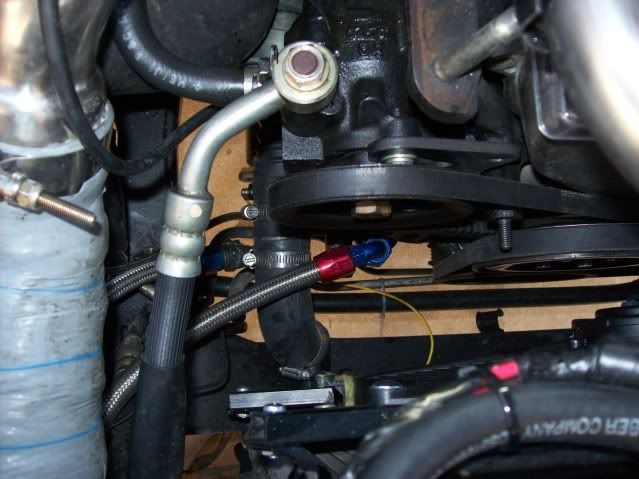
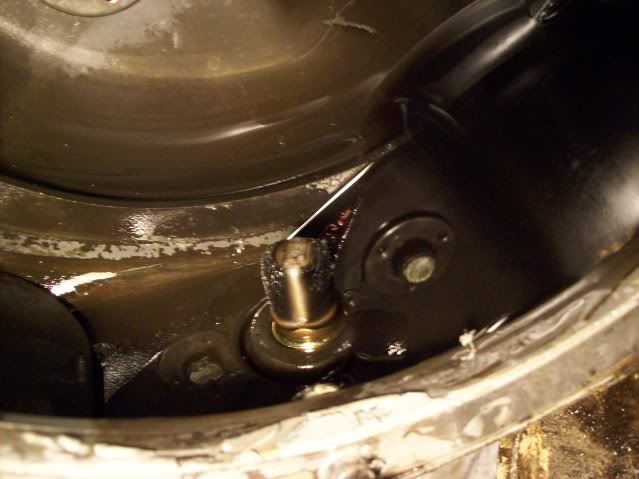
My main problem is mounting the sender unit for the oil pressure. I wanted to use the hole in the head that normally was the oil supply line for the turbo (turbo gets it from the oil pump assembly now). But, my 1.8l upper water neck is in the way. May have to fab up some banjo bolt / threaded thingy that might clear.
blow off valve
Posted: Sun Dec 13, 2009 5:26 am
by evoman
good work except for one thing the blow off valve is ment to be as close
to the throttle valve body as you can get it
Re: blow off valve
Posted: Wed Dec 16, 2009 1:47 am
by boise-nic
evoman wrote:good work except for one thing the blow off valve is ment to be as close
to the throttle valve body as you can get it
Good catch. Hmm, that might not be an easy fix. Part of me wants to take the easy way out and braze my old bov near the throttle and call it good. It would work but would be a bandaid on a bad design. But having two bov's would sounds interesting. Maybe I could hide it?
Posted: Wed Dec 16, 2009 1:50 am
by boise-nic
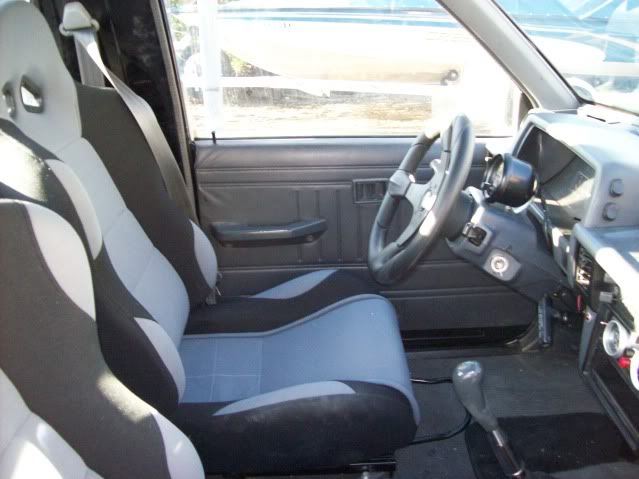
Got my seats in. I really like them. Very comfortable. They sit perfect. They recline but do so by a rotating knob like VW's do. That's the only part I don't like. A lever is so much easier.

Posted: Fri Dec 18, 2009 6:04 pm
by Mad Menace
(Colorful Language!) Those are nice!!! what/where did you get those?
Posted: Fri Dec 18, 2009 10:48 pm
by boise-nic
Mad Menace wrote:(Colorful Language!) Those are nice!!! what/where did you get those?
Opps sorry for my colorful language
I got the seats from JC whitney. Here is the link...
http://www.jcwhitney.com/BUY_2_AND_SAVE ... 007299;0;0
I had my doubts because of the price but these seats are REALLY nice with good reivews too. I don't need some fancy carbon fiber reinformced seat for a truck...its not some exotic. I figured these would work great. Best part is I googled a coupon search for JC whitney and got $60 off the price! Can't go wrong.
Posted: Sat Dec 19, 2009 12:37 am
by Mad Menace
Nicely done! and also now on my google shopping list, but thats for AFTER the engine.
I as well dislike the tilt by knob thing, but hey the OE bench seat that I've been wearing my butt groove into for 10 years has no tilt option besides leaning forward... lol, but personally I find it quite comfortable compared to other vehicles I've owned and driven.
Do you think you would be able to catch a nap in one of them seats? I often enough catch naps in my truck, if they aren't comfortable enough for that I guess it would give me a good reason to add some sort of a seat to the rear end thats nice and soft, since I have the rear window of my truck knocked out like a blow thru for the 7200 watt's worth of stereo equipment I lug around...lol
Posted: Sun Dec 20, 2009 11:08 pm
by boise-nic
This was pretty cool. Took out the factory clock and installed a scanmaster. I can turn it on or off if I'm not wanting to look at it...
btw, this was the little gaget that my post under the electrical section was concerning. The box has a plug that 'normally' plugs into the diagnostic port. Since my engine/ecu harness isn't hooked up in any way to the diagnostic plug, I need to know which wires from the diagnostic port hookup to which wires of the ECU. Anyways...it will be cool once its hooked up and working!

Posted: Sun Jan 24, 2010 12:43 am
by boise-nic
Finished my wire tuck. I am so sick of soldering wires. But all the wires run behind the wirewall now so I feel pretty good about it. Here she is everything working and running (says the scanmaster) with no CEL's. Still need upper radiator hose and fan so it doesn't run for more than a couple seconds right now...

Got about half way though my exhaust...

Posted: Sun Jan 24, 2010 4:42 pm
by Mad Menace
Looking good man, I cant wait 1 week to do mine.
Can I suggest Votion Speed.com for a good and fair priced electric cooling fan... they also have all the silicone hose you may want too
Posted: Tue Jan 26, 2010 11:30 pm
by boise-nic
^Yeah I'll check them out. I'm guessing you can't go too big on the fan CFM. Thinking about getting a 16" fan, 2500 cfm, 12.5 amps. Should cool well enough.
Posted: Mon Feb 15, 2010 9:42 pm
by boise-nic
I relocated my battery and finished my exhaust. I was able to reuse the stock hangers and rubber mounts with some tunbuckles to dial it in exactly how I want. I'm almost running out of things to do! Its a nice feeling. I decided I should start it so I primed the oil, primed the fuel, and crossed my fingers...guess what?...it runs. Fired up right away and purrs beautifully.
Not even timed yet.
Man its a good feeling to know everything works ok so far.
Here's an awful phone video of it so far...
http://www.youtube.com/watch?v=z0wlU3_TCRM
One thing I noticed is I have only one drip...and that drip is a big one. It's not from the engine but from the output shaft of the transmission. I'm guessing the output of the tranny seals against the drive shaft? No worries, I'm getting a new seal anyways since it's all torn apart. Should get the driveshaft back from the shop soon. They questioned the strength of the supra yoke...said it would be the weak link in the system and they will search around for something more substantial...whatever that means. They had said it would be fine for street but if I were to run slicks and be aggressive with my launching, he wasn't sure it would hold up. I'll post pics later.
Posted: Thu Feb 18, 2010 7:39 pm
by Mad Menace
That's awesome... We definitely need more videos on these.
I gotta tune mine up real good and fix my 1 fuel leak that's been plaguing me and I am ready to roll, but I cant do any of that without the exhaust and muffler first (to get the nasty neighbors and Police off my a#$) but I got all that stuff now and this weekend it is my Ultimate goal to be driving it to work Monday morning... Crossing My Fingers.
Posted: Fri Feb 19, 2010 8:45 pm
by boise-nic
Mad Menace wrote:That's awesome... We definitely need more videos on these.
I gotta tune mine up real good and fix my 1 fuel leak that's been plaguing me and I am ready to roll, but I cant do any of that without the exhaust and muffler first (to get the nasty neighbors and Police off my a#$) but I got all that stuff now and this weekend it is my Ultimate goal to be driving it to work Monday morning... Crossing My Fingers.
Good luck with Monday! Yeah fuel leaks can go bad fast. Can't wait to see some video up!
Posted: Sat Feb 20, 2010 5:11 pm
by Mad Menace
kinda hard to tune when its 30 degrees outside and wont start, kick over or anything
Posted: Sun Feb 21, 2010 1:03 pm
by Gentleman Rogue
it hasnt been 30 degrees here in Iowa for a few months it seems. sucks working in the garage with that, but the kerosene heater helps.
Posted: Tue Mar 02, 2010 1:45 am
by boise-nic
Well, I got my new driveshaft from the shop. I've done all I can with the truck in the garage so I decided to take it across the street to the parking lot and just idle it around. Works good except I haven't hooked up the brake booster. I didn't dare give it any gas yet, just wanted to see if steering and clutch works and everything works as expected. One other thing I found out is mangaflow mufflers (non chambered straight thru) are really quiet. Even not running a cat, they are super quiet which is exactly what I'd hope they would be.
Before I put the bed back on, I thought I'd do a fuel pump re-wire sense my battery is like 3' away. I have thought about what I am going to use for a relay when it occured to me that the defroster relay would be perfect. IF you've never looked closely at one, the main wires are really thick gauge. Makes sense since it basically a controlled short. I went ahead and installed it. Forgot how loud walbros can get. Anyways, here's the final product before the bed goes on...

Posted: Thu Mar 04, 2010 8:49 pm
by DropEverything
Looks like you're almost ready to roll. Hell, even if it never ran, it'd still be nice just to look at that engine. You've got some pretty slick pieces on this thing. What did that transmission come from? How would you have gone about using the stock trans? I'd like to use all Mitsu parts if possible.
Posted: Fri Mar 05, 2010 1:41 am
by boise-nic
DropEverything wrote:Looks like you're almost ready to roll. Hell, even if it never ran, it'd still be nice just to look at that engine. You've got some pretty slick pieces on this thing. What did that transmission come from? How would you have gone about using the stock trans? I'd like to use all Mitsu parts if possible.
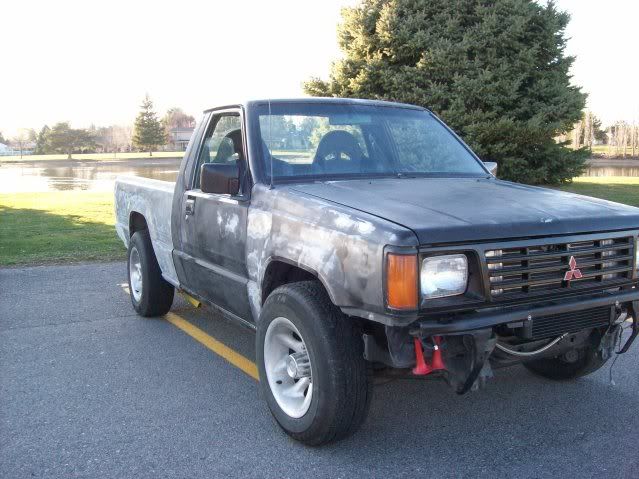
There is a parking lot of a golf course right across the street from where I'm building it. Its perfect for running around in and just doing some test n' tuning. Haven't really opened it up, just checking to see if everything is working. Well ok I did find the lsd diff works great. Since there's no bed on the thing, its probably the worlds easiest drift machine. I get some strange looks when the golfers see just a cab with a FMIC and nothing else drivign around. lol.
The transmission is a toyota w58 with one of bills adapters for the narrow block 4g. If you want to use the stock tranny, you'll need to source a narrow one from the junkyard. Most mightymax's trannys were the wide block design. But it shouldn't be too hard. I found a narrow one on craigslist before I decided to go with the toyota tranny. I reused the stock mighty max's engine mounts and just welded a spacer piece to move it up.
My one piece of advice is move the motor forward 3". Life is so much easier. I couldn't imagine living with the motor pushed up against the firewall.
Posted: Fri Mar 05, 2010 7:20 pm
by DropEverything
Yeah, I'll bet you do get some odd looks at a golf course of all places.
I meant, what kind of Toyota... Tacoma, Supra...? Either way, I think I still want to use a Mitsubishi unit. I'm going to try to hit the junkyard this weekend to see what I can find. As far as moving the engine forward goes, I think I'm just going to relocate the neck to the front.
Posted: Fri Mar 05, 2010 7:21 pm
by DropEverything
*edit* Deleted double post...
Posted: Sun Mar 07, 2010 3:41 am
by shroder15
Just looking back through your pictures, do you have pictures of how you mounted your seats?
Posted: Sun Mar 07, 2010 7:26 pm
by boise-nic
shroder15 wrote:Just looking back through your pictures, do you have pictures of how you mounted your seats?
I don't have any pics of it but I could take a few tonight. Mine originally had a bench seat. I just used 1x1 tube steel and some big bolts.
Posted: Mon Mar 08, 2010 1:04 am
by shroder15
Man that would be great. I've also had the original bench seat and am swapping over. I've got some 1x1 tube steel laying around and am just looking for advice...THanks!
Posted: Mon Mar 08, 2010 5:54 am
by Gentleman Rogue
here's a pic step by step i did on putting DSM buckets into my D50. i probably did a little more work than i had to, but i love how the seats sit level and not bolt in pretty much like stock....
http://www.iowaautoforums.com/viewtopic ... at#p123747
Posted: Mon Mar 08, 2010 6:19 am
by shroder15
Yea, I actually saw your write up, but am getting different ideas from as many people as I can. Mainly because I have 1x1 box steel, and have so much invested into getting the truck running that I'm just tired of making trips and want to see if what I have can work...if not, oh well...but might as well not let materials go to waste right?!
Thanks again for the link tho!
Posted: Tue Mar 09, 2010 12:00 am
by boise-nic
Looks like I did something similar...
The mount on the front section of the seat doesn't sit level with the back. There is a hump that runs across. Gentleman Rouge's link shows it better. Anyways, this bump is just about an inch or so high. To get it to sit level, I just used 2 1x1 spacers in the back and 1 1x1 piece on the front.

Back section...

This pic shows it better...

One thing I noticed is that the dimensions for the cross supports (^in and out of the above picuture) need to be really close. If they are not exactly paralell the seat won't slide back and forth (or at least not easily).
I may go back and weld it all together. Haven't decided yet.
Hope this helps.
Posted: Wed Mar 10, 2010 9:51 pm
by shroder15
Thanks for the pics! For the bottom, under the spacers, are those the rails from the eclipse or the truck? thanks again!
Posted: Thu Mar 11, 2010 7:58 pm
by boise-nic
shroder15 wrote:Thanks for the pics! For the bottom, under the spacers, are those the rails from the eclipse or the truck? thanks again!
No problem, glad I can help. There aren't any rails other than the one that came with the seat. It's all 1x1 tube steel.
Posted: Sun Mar 14, 2010 11:59 pm
by boise-nic
With most of the mechanical stuff done, I decided to spend the weekend and finish off the body work...mostly wetsanding the body and getting it ready for paint. It was almost the perfect weather for it. I think I even got some sun, haven't been able to say that in a while. I didn't get a chance to go the gym but it still feels like something sure kicked my arse. Sanding is a LOT of work.
Hopefully next week you will see it painted PPG hot rod black. It's a satin blakc finish that looks bad A.
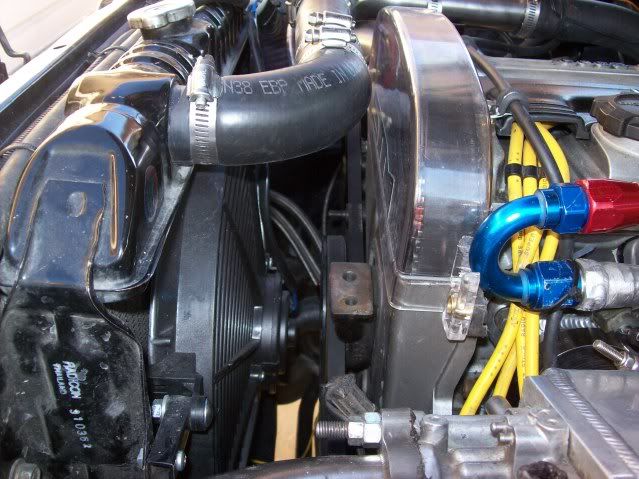
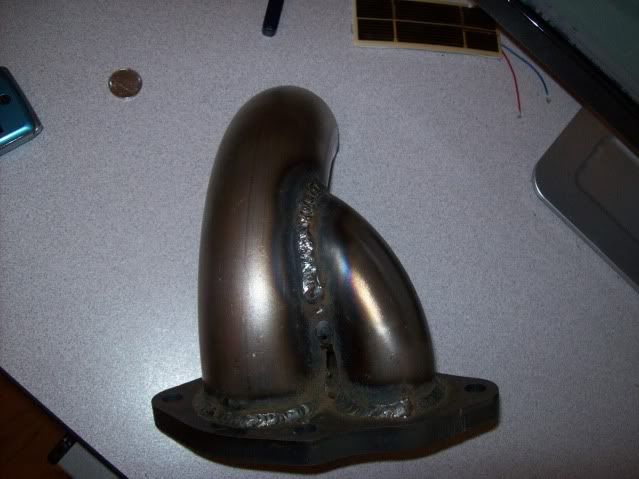
I'm running very light boost (waste gate spring @ 9 psi.) I've noticed that it takes forever to build. I'm sure that when I rotated the compressor housing, the wastegate bracket isn't closing all the way. I need to shim the support so that it closes.
Also, my HKS SSQV isn't sealing at the flange base. That may add to my spool troubles. Went down to the hardware store and just got a rubber o-ring. Should fix it.
Here are some before paint pictures....
Posted: Mon Mar 15, 2010 11:35 pm
by shroder15
well...just so you know you wont be the only one on the site with a satin black D50. I'm running ALK 200 black. Not the best stuff, but sure looks good now that its done. I gotta start updating my thread. Its now satin black, I have a pic of the motor out of the car, I stillhave to bed liner the bed, cab, and engine bay and move my motor forward an inch (thanks to my driveshaft being an inch off...ugh...dont ever have someone measure for you and trust them)
Posted: Mon Mar 15, 2010 11:55 pm
by boise-nic
shroder15 wrote:well...just so you know you wont be the only one on the site with a satin black D50. I'm running ALK 200 black. Not the best stuff, but sure looks good now that its done. I gotta start updating my thread. Its now satin black, I have a pic of the motor out of the car, I stillhave to bed liner the bed, cab, and engine bay and move my motor forward an inch (thanks to my driveshaft being an inch off...ugh...dont ever have someone measure for you and trust them)
Nice! Yes update your thread...I'd love to see pics. I stole the idea for the satin paint from a GMC syclone that I saw painted. I figured the mighty max is just a truck, a flashy and expensive paint job doesn't really fit well for me but I wanted it to still stand out.
Yeah man I know what you mean about the driveshaft. I measured it but still wasn't entirely sure in my ability until I got it back and it fit to my surprise. Only bad thing about the paint is it will be hotter than **** in the summer.
Posted: Tue Mar 16, 2010 12:48 am
by shroder15
Oh yea...def. But thank god my daily has AC and cruize...this is just for the track and show...but still driven everywhere...but the shootout. I'll be trailered there
Posted: Wed Mar 17, 2010 1:42 am
by boise-nic
shroder15 wrote:Oh yea...def. But thank god my daily has AC and cruize...this is just for the track and show...but still driven everywhere...but the shootout. I'll be trailered there
I took a look at your truck. That beast looks like it could be very very fast.
Yes thank god for daily drivers indeed! I couldn't get the damn wire controls for the hot/cold and recirc/fresh hooked back up. I must have spent a good 2 hours on it. It was the single most frustrating thing on my whole truck. I was almost tempted to take it all out.
In other news, decided to see how a good 1st gear WOT feels. THe boost (all 9 psi LOL) popped off my coupler at the maf connection. That is going to be a problem. I can't stand hoseclamps poping off and leaking. A fix is soon to come.
Posted: Wed Mar 17, 2010 1:48 am
by shroder15
Wow...I'm glad I dont have to deal with that, but I am clueless with wiring, so this is gonna be a challenge anyways. But I figure if I can knock everything else out, I should be able to figure that out too. As far as the coupler goes, try the ol hairspray trick. I've always found it to work...
Posted: Mon Mar 22, 2010 1:10 am
by boise-nic
Put the bumper back on and made a sheet metal air duct for the radiator. It actually looks pretty good. Hopefully the next pics I'll post are of it being painted.

Posted: Sun Apr 11, 2010 9:22 pm
by boise-nic
Did some low boost pulls. So far everything is wokring great. Fuel trims are happy and the wideband is too. Nothing to keep me from turning up the boost except getting some more miles on it and re-tightening the headbolts. With no more mechanical to work on, I turned my attention to paint. Did the primer today. Found a few small dings I missed. Now I just need a nice warm day to spray the paint. I'm going with PPG hot rod black with a 20% satin sheen. Should looks bad A.

Posted: Mon Apr 12, 2010 1:29 pm
by DropEverything
It's good to see some progress. I was starting to wonder what was going on with this thing. Can't wait to see it painted.
Posted: Tue Apr 13, 2010 1:16 am
by boise-nic
DropEverything wrote:It's good to see some progress. I was starting to wonder what was going on with this thing. Can't wait to see it painted.
Yeah man its nice to begin to run out of things to do! Should be ready just in time for the nice weather. I'm waiting on mother nature to give me a nice 70 degree day so I can paint the thing. I may order a set of caltracs for the rear. Thats about it. Can't wait to make it my daily driver. On low boost it feel quicker than my 350z. Can't wait to run throgh the gears on high boost.
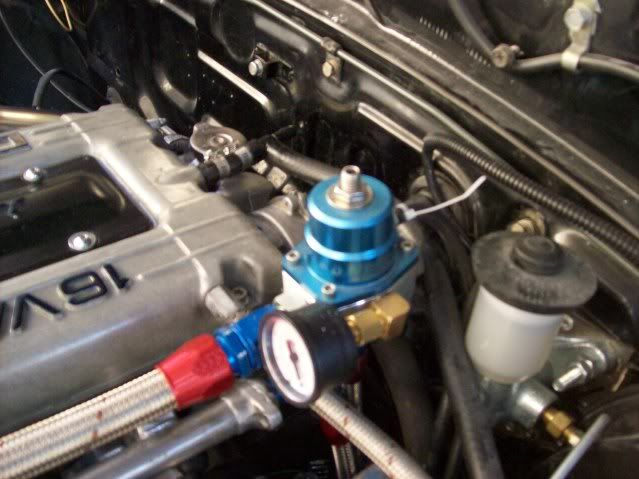
I decided to pop the 450cc injectors back in for now because my 750cc are too big for just a MAF-T to correct for. It puts the timing way too aggresive especially for having 2g pistons. No big deal, dsmlink is comming soon.
Posted: Tue Apr 13, 2010 9:03 am
by DropEverything
Where did you get that O2 housing? Did you just buy a flange and make the pipes? If so, where did you get the flange?
Posted: Wed Apr 14, 2010 12:14 am
by boise-nic
DropEverything wrote:Where did you get that O2 housing? Did you just buy a flange and make the pipes? If so, where did you get the flange?
Road race engineering sells the flange. Its a nice piece...1/2" thick and they sell them in mild steel and stainless. I got just the plain mild steel. The pipe is just made from some mandrel bends. I didn't trust my welding skills on this piece so I had someone local do it.
Posted: Thu Apr 22, 2010 1:54 am
by boise-nic
Just an update:
The original plan to paint the truck this comming weekend has been delayed. The guy I spoke with at the paint shop informed me that satin black paint jobs can be a nightmare to maintain. He was saying they are similar to a stainless steel appliance...you see every smudge mark, greese stain, and inperfection. I just wasn't up for risking it. I still can't decide on a conventional paint color. Anyone want to through out some ideas? I don't care for anything bright, no yellows or reds. I think the bodywork is good enough that I wouldn't be afraid to spray a dark color. I'm thinking a dark gray metalic would look good.
In the meantime, I've been enjoying driving the truck and tuning. Mostly I've been fixing boost leaks. I think I've pinned down most of them. I can pressurize everything from the turbo to the head and it very slowly leaks down from 15 to 0 in about a minute. So I still have one or two but notthing that will make much of a difference (i hope). That slow of leak might even be the valves and piston rings so maybe I don't have any boost leaks...hmmm.
One of the biggest PITAs that I've experienced is setting the ignition timing. I've done it a lot before on a normal DSM but this truck is a little different beast. For one, the relocated alternator's belt makes it difficult to line up the timing marks. It block the view of the hash marks on the timing cover. Ok, no bother. I just took some whiteout and dripped a line across the entire pulley. So now I need to ground the igntion wire that keep the ECU from adjusting the timing so I can adjust it manually. I grounded it out and the rpms dropped a little but the timing would still jump around enough that I couldn't get a good measure. Oh well, I can get a 'rough' tune by just doing it on the fly. Start almost all retarded and start to advance until I hear knock and it starts to feel about right. Probably not the best method but at only 9 psi (breaking in the engine) I won't be hurting anything. The problem is that no matter what I do, the scanmaster says I can getting 40+ counts of knock anytime I push the gas a little. I can feel the timing getting pulled. Adjusting the CAS proved futile. It would knock just about everywhere I adjusted it. What the heck was going on?
Then I remembered...In addition to grounding out the wire, you need to disconnect anything you have plugged into the diagnostic port like the scanmaster! I only came to this revelation after I was pissed off and driving back home, away from my truck. Can't wait to try to time it for real tomorrow. God I hope that what the problem was.
Posted: Thu Apr 22, 2010 2:13 am
by boise-nic
Ha, I just read up what I actually did...
If the Datalogger is installed and you try to adjust engine timing by grounding the connector in the engine bay, you will actually be putting the ECU into basic idle speed mode instead. So just remember to remove the Datalogger before you try to set the timing.
Ya learn something everyday!
Anyways the inital driving impressions:
The brakes suck! I might still have a bubble in the line somewhere.
The W58 has a pretty tall 1st gear. 2nd gear is about right and 3rd dropps off a lot. I was hoping 2-3 would be a little closer but no worry. With a 16g it shouldn't drop off the boost too much.
Also, the shifter is S-W-E-E-T! This is the transmission that the 4G deserves! It slots into 1st gear from a roll even when cold.
Clutch take up and pedal effort are just about right, maybe even a little light. If I start slipping and need to throw in my heavy pressure plate, I think I'll have plenty of room.
I have the 190 degree thermostat. I might get a 180 degree thermostat later. Right now though, it cools pretty quick. I have an indicator light so I can see when my fan is on (just something I like to know). Right now it comes on when I'm in traffic or cruising slow. I've never had it come on and stay on when I'm above 30 mph. I guess my ducting works.
In short, I'm pretty stoked. The hardest part of the whole project (and I'm not joking) was the vent control cables. They absolute are a giant PITA to get hooked up when the dash is on.
Posted: Thu Apr 22, 2010 7:29 am
by 4g63mightymax
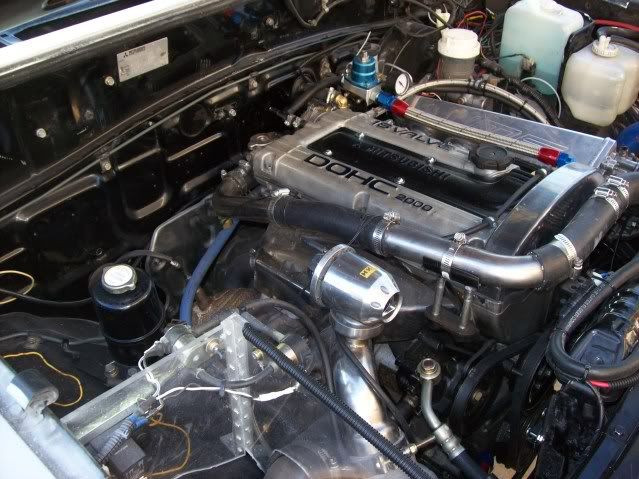
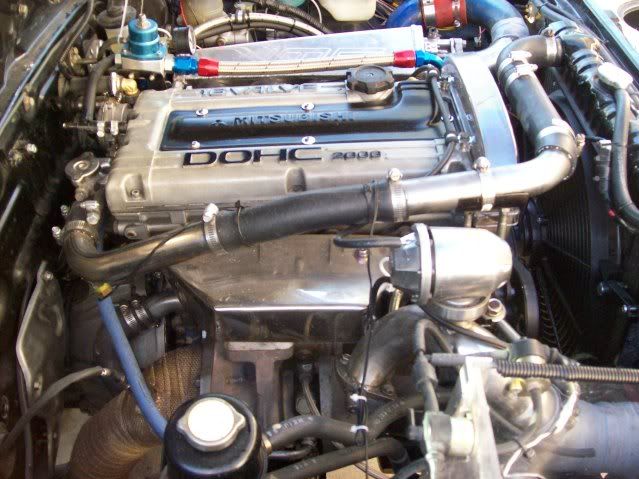
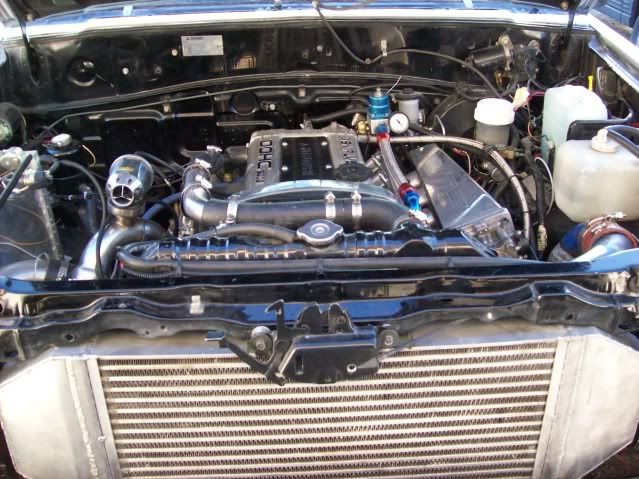
How about some new under hood pics?
-Jeremy
Posted: Tue Apr 27, 2010 2:27 am
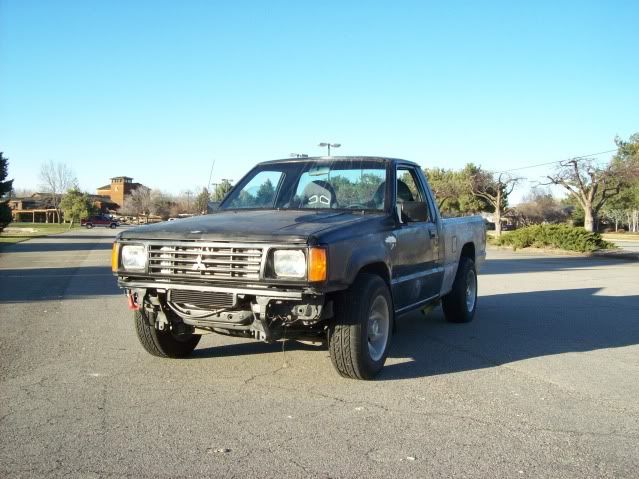
by boise-nic
Posted: Tue Apr 27, 2010 2:35 am
by boise-nic
There's always stuff to clean up but I'm driving it. Drove it to work and got some strange faces. Put about 100 miles on it. The only complaint is the maft is doing some strange things. I can't seem to get my idle and low fuel trim dialed in. Also, I am having a problem with throttle tip in...it runs around 14.5-15 af when cruising and if you blip the gas, it goes super lean for a fraction of a second which sets off the knock sensor and pulls timing. However, if I roll into it or downshift and go WOT then all is well and there is zero knock. It kills drivability because of the pulled timing. Pretty sure that its a maf-t problem. It's almost like there is a lag time and it doens't respond right away to changes in air flow. I'm researching the dsmlink v3 lite. I would like to go speed density. I could at least get rid of the damn gm maf.
Posted: Tue Apr 27, 2010 4:59 pm
by DropEverything
Good job getting it rolling. Looks like all that's left is little details. Thanks for the heads-up on the RRE flanges. I'd been to their site a few times and hadn't noticed those pieces, but I'm definitely going to have to order one, probably this week. I know now is a bad time to ask, but do you have any better pics of your alternator mounts?